Archive

How to configure Static IP address in Ubuntu 20.04

Typically, in most network configurations, IP addresses are dynamically assigned by a DHCP server. Static IP address setting may be required in various situations such as port forwarding configuration or media server implementation. Join us in this tutorial to introduce you to how to configure Static IP address in Ubuntu 20.04.

Static IP address configuration using DHCP:

The easiest and most recommended way to assign a static IP address to a device on your LAN is to configure static DHCP on your router. Static DHCP or DHCP reservation is a feature found on most routers that causes the DHCP server to automatically assign an IP address to a dedicated network device each time the device requests an address from the DHCP server. It works by assigning a static IP to a device’s unique MAC address. DHCP reservation configuration steps vary from router to router.

Netplan:

Ubuntu 17.10 and later versions use Netplan as the default network management tool. Previous versions of Ubuntu used ifconfig and its configuration file /etc/network/interfaces for network configuration. Netplan configuration files are written with YAML command with .yaml file extension. To configure a network card with Netplan, you need to create a YAML description for the network card, and Netplan will create the required configuration files for the selected provider tool. Netplan supports two providers, NetworkManager and Systemd-networkd. NetworkManager is mostly used on desktop machines, while Systemd-networkd is used on non-GUI servers.

Static IP address configuration on Ubuntu server:

In Ubuntu 20.04, the system identifies NICs using “predictable NIC names”. The first step to setting up a static IP address is to identify the name of the Ethernet card you want to configure. To do this, use the ip link command:

ip link

The command displays a list of all available network cards. In this example, the user card name is ens3:

۱: lo: <LOOPBACK,UP,LOWER_UP> mtu 65536 qdisc noqueue state UNKNOWN mode DEFAULT group default qlen 1000      link/loopback 00:00:00:00:00:00 brd 00:00:00:00:00:00  ۲: ens3: <BROADCAST,MULTICAST,UP,LOWER_UP> mtu 1500 qdisc fq_codel state UP mode DEFAULT group default qlen 1000      link/ether 08:00:27:6c:13:63 brd ff:ff:ff:ff:ff:ff

Netplan configuration files are stored in /etc/netplan directory. You will probably find one or more YAML files in this directory. The file name may be different in different systems. Usually the file name is 01-netcfg.yaml, 50-cloud-init.yaml or NN_interfaceName.yaml, but it may be different on your system. If your Ubuntu cloud instance has cloud-init, you need to disable it. To do this, create the following file:

sudo nano /etc/cloud/cloud.cfg.d/99-disable-network-config.cfg
network: {config: disabled}

To assign a static IP address on the network card, open the YAML configuration file with your text editor:

sudo nano /etc/netplan/01-netcfg.yaml
network:    version: 2    renderer: networkd    ethernets:      ens3:        dhcp4: yes

Before changing the config, let’s briefly explain the code.

Each Netplan Yaml file starts with a network key that contains at least two required elements. The first required element is the version of the network config template and the second is the device type. The device type can be ethernets, bonds, bridges, or vlans. Under Device type (ethernets), you can specify one or more network interfaces. In this example, we have only one ens3 interface configured to obtain an IP address from a DHCP4 server: dhcp4:yes.

To assign a static IP address to the ens3 interface, edit the file as follows:

  • Set DHCP to dhcp4:no.
  • Specify a static IP address. Under Addresses: you can add one or more IPv4 or IPv6 IP addresses that will be assigned to the network interface.
  • Specify the gateway.
  • Under nameservers, set the nameservers IP addresses.
network:  version: 2  renderer: networkd  ethernets:  ens3:  dhcp4: no  addresses:  - ۱۹۲٫۱۶۸٫۱۲۱٫۲۲۱/۲۴  gateway4: 192.168.121.1  nameservers:  addresses: [8.8.8.8, 1.1.1.1]

When editing Yaml files, make sure you follow YAML code indentation standards. If it is not true, the changes will not be applied. After finishing the work, save the file and apply the changes by running the following command:

sudo netplan apply
Confirm the changes by typing the following commands:
ip addr show dev ens3
۲: ens3: <BROADCAST,MULTICAST,UP,LOWER_UP> mtu 1500 qdisc mq state UP group default qlen 1000      link/ether 08:00:27:6c:13:63 brd ff:ff:ff:ff:ff:ff      inet 192.168.121.221/24 brd 192.168.121.255 scope global dynamic ens3         valid_lft 3575sec preferred_lft 3575sec      inet6 fe80::5054:ff:feb0:f500/64 scope link          valid_lft forever preferred_lft forever

You have assigned a static IP to your Ubuntu server.

Fixed IP address configuration in Ubuntu desktop:

Setting up a static IP address on Ubuntu desktops requires no technical knowledge.

On the Activities page, search for “settings” and click on the icon. This will open the GNOME Settings window. Click on Network or Wi-Fi depending on the interface you want to change. Click the cog icon next to the interface name to open interface settings. In the “IPV4” tab, select the “Manual” method and enter your static IP address, Netmask and Gateway. When you are done, click the “Apply” button.

ip addr

The output shows the IP address of the network card:

...  ۲: wlp1s0: <BROADCAST,MULTICAST,UP,LOWER_UP> mtu 1500 qdisc noqueue state UP group default qlen 1000      link/ether 50:5b:c2:d8:59:7d brd ff:ff:ff:ff:ff:ff      inet 192.168.121.221/24 brd 192.168.31.255 scope global dynamic noprefixroute wlp1s0         valid_lft 38963sec preferred_lft 38963sec      inet6 fe80::45e3:7bc:a029:664/64 scope link noprefixroute 

Conclusion :

We have shown you how to configure a static IP address in Ubuntu 20.04.

Setting up a permanent DNS address server on Ubuntu and Debian Linux

In this tutorial, we will look at how to install and use the resolvconf program to set a permanent DNS address server in the /etc/resolv.conf file on Debian and Ubuntu Linux distributions. Stay with us.

/etc/resolv.conf is the main configuration file for the DNS name resolver library. A resolver is actually a set of functions in the C library that provides access to the Internet’s Domain Naming System , or DNS. These functions are set to check the entries in the /etc/hosts file or some DNS name servers or to use the network information database service or NIC.

On modern Linux-based systems that use the system management tool and systemd service, DNS or name resolution services are provided to help local applications using the systemd-resolved service. By default, this service has four different modes to manage domain name analysis. Also, by default, the systemd DNS stub file at /run/systemd/resolve/stub-resolv.conf is used.

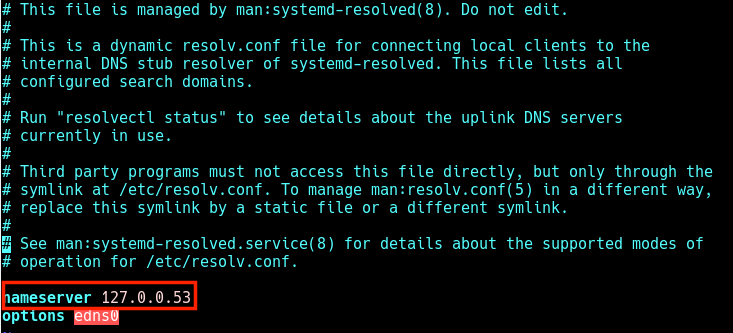
The file contains the local address 127.0.0.53 as the only DNS server. This address refers to the /etc/resolv.conf file, which is used by the system to add server titles.

If you run the following ls command for /etc/resolv.conf, you will see that this file is a symlink to the /run/systemd/resolve/stub-resolv.conf file.

1
$ ls -l /etc/resolv.conf
1
lrwxrwxrwx 1 root root 39 Feb 15  2019 /etc/resolv.conf -> ../run/systemd/resolve/stub-resolv.conf

Of course, considering that /etc/resolv.conf is indirectly managed by the systemd-resolved service and in some cases is under the control of the network service (by initscripts or NetworkManager), any manual changes by the user cannot be permanent. or stored for a certain period of time.

Why should we edit the /etc/resolv.conf file?

The main reason for this is that the system’s DNS settings are usually not set correctly. You may also prefer to use your own server titles. The following cat command will show the default server address in the /etc/resolv.conf file on the sample Ubuntu system.

1
$ cat /etc/resolv.conf

Check DNS name servers

Here, when local applications such as the APT package management tool try to access FQDNs on the local network, the result will contain the error message “Temporary failure in name resolution” as shown in the image below.

Temporary problem in DNS server title parsing

The same thing happens when using the ping command.

1
$ ping google.com

Temporary problem in name parsing

Therefore, when a user tries to manually configure DNS address servers, these changes will not be permanent. In fact, these settings will be lost after a single system restart. To overcome this problem, you can install the reolvconf tool so that you can apply the changes permanently.

In order to install the resolvconf package, you must first manually configure all DNS address servers in the /etc/resolv.conf file. This way you can access FQDMs of Ubuntu source servers on the Internet.

1
2
3
nameserver 8.8.4.4
nameserver 8.8.8.8

Installing resolvconf on Ubuntu and Debian

First, we update the system software packages. Then we will install resolvconf from official sources using the following commands.

1
2
3
$ sudo apt update
$ sudo apt install resolvconf

When the resolvconf tool installation is finished, systemd will automatically run and enable resolvconf.service. You can use the following command to check the status of this service.

1
$ sudo systemctl status resolvconf.service

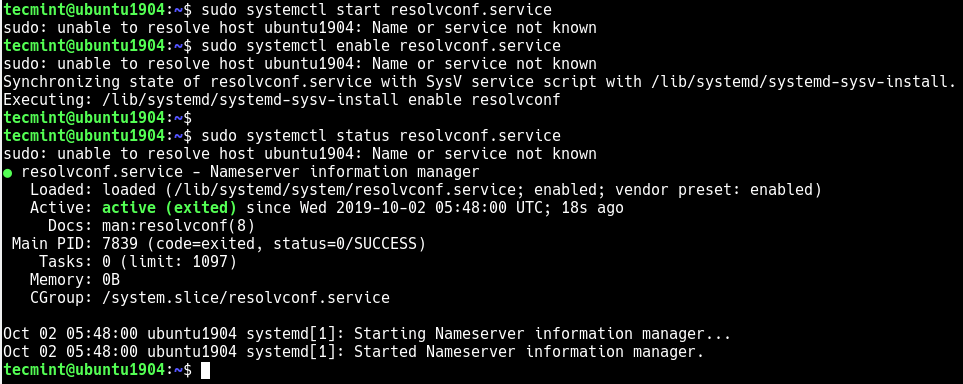
If this service does not start and is not activated automatically for any reason, you can run and activate it using the following commands.

1
2
3
4
5
$ sudo systemctl start resolvconf.service
$ sudo systemctl enable resolvconf.service
$ sudo systemctl status resolvconf.service

Checking the service status of the resolvconf tool

Setting permanent DNS server address in Ubuntu and Debian

Then it’s time to set the configuration file /etc/resolvconf/resolv.conf.d/head.

1
$ sudo nano /etc/resolvconf/resolv.conf.d/head

Add the following in it.

1
2
3
nameserver 8.8.8.8
nameserver 8.8.4.4

Setting permanent DNS address server in Resolvconf

Now save the changes and restart the resolvconf.service. You can also reboot the system.

1
$ sudo systemctl start resolvconf.service

Now by checking the /etc/resolv.conf file you will notice that the imported title servers are permanently stored in it. From now on, there will be no problem in resolving the DNS server name in your system.

Permanent DNS address servers

We hope that this article about setting up a permanent DNS address server in Ubuntu and Debian has been of interest to you. Be sure to follow the future contents of hosting100’s blog in this field

How to install VirtualBox on CentOS 8

VirtualBox  is an open source virtualization platform. It supports a number of guest operating systems, including Linux and Windows, and allows you to run multiple virtual machines at the same time. Join us in this tutorial to introduce you to how to install VirtualBox on CentOS 8.

Installing VirtualBox on CentOS 8:

1. Update your system:

It’s recommended to keep your system up-to-date before installing new software. Use the following command:

sudo dnf update

2. Add the repository URL:

Create a new file named virtualbox.repo using your preferred text editor (e.g., nano) and add the following lines:

[VirtualBox]
name = Oracle VirtualBox Repository
baseurl = https://download.virtualbox.org/virtualbox/rpm/el/8
enabled = 1
gpgkey = https://www.virtualbox.org/download/pubkey/0E6C-43CF-874D-BF85-1ED6-06BD-6C46D277DFBA.asc

Save and close the file.

3. Install VirtualBox:

sudo dnf config-manager --add-repo=https://download.virtualbox.org/virtualbox/rpm/el/virtualbox.repo

Step 2: At the time of writing this article, the latest stable version of VirtualBox is version 6.0.x. To install the VirtualBox-6.0 package, run the following command:

sudo yum install VirtualBox-6.0

During installation, you will be prompted to import the GPG repository. Type y and press Enter. At this point, 

4. Start and enable VirtualBox service:

While VirtualBox doesn’t require a service to run manually, it’s helpful to set it to start automatically at boot:

sudo systemctl start virtualbox
sudo systemctl enable virtualbox

5. Verify the installation:

You can verify the installation by running:

vboxmanage -v

This should display the installed VirtualBox version.

Installing the VirtualBox add-on package:

The VirtualBox add-on package provides several useful features for guest devices such as virtual USB 2.0 and 3.0 devices, RDP support, image encryption, and more. Use wget to download the add-on package from the VirtualBox download page:

wget https://download.virtualbox.org/virtualbox/6.0.14/Oracle_VM_VirtualBox_Extension_Pack-6.0.14.vbox-extpack

After downloading the file, import it using the following command:

sudo VBoxManage extpack install Oracle_VM_VirtualBox_Extension_Pack-6.0.14.vbox-extpack

You will be presented with an Oracle license and asked to accept the terms and conditions.

Do you agree to these license terms and conditions (y/n)?

Type y and press Enter. Once the installation is complete, you will see the following output:

۰%...۱۰%...۲۰%...۳۰%...۴۰%...۵۰%...۶۰%...۷۰%...۸۰%...۹۰%...۱۰۰%  Successfully installed "Oracle VM Virtu

Replace <username> with your actual username.

Start VirtualBox:

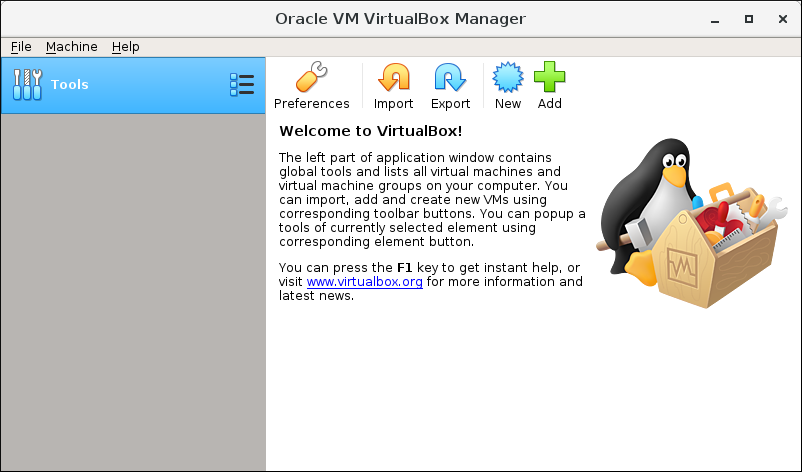
Now that VirtualBox is installed on your CentOS machine, you can start it from the command line by typing VirtualBox or by clicking on the VirtualBox icon (Activities -> Oracle VM VirtualBox). When VirtualBox starts up for the first time, a window like the one below should appear:

Conclusion :

Installing VirtualBox on CentOS 8 is a simple task. All you have to do is enable the Oracle repository and install the VirtualBox package with dnf.

How to install MariaDB on CentOS 8

MariaDB is a free and open-source relational database management system (RDBMS). It’s designed to be a drop-in replacement for MySQL, another popular RDBMS. Here’s a breakdown of what that means:

  • Relational Database: MariaDB stores data in a structured format with tables and relationships between them. This makes it efficient for organizing and querying large amounts of data.
  • Open-Source: The source code for MariaDB is freely available, allowing anyone to inspect, modify, and contribute to its development. This fosters a collaborative community and ensures transparency.
  • MySQL Replacement: MariaDB was created by some of the original developers of MySQL. It’s highly compatible with MySQL, meaning applications designed for MySQL can often run seamlessly on MariaDB.

Here are some key features of MariaDB:

  • Performance: MariaDB is known for its good performance and scalability, making it suitable for various applications.
  • Stability: It has a reputation for being stable and reliable.
  • Security: MariaDB offers various security features to protect your data, like user authentication and encryption.

Overall, MariaDB is a powerful and versatile option for anyone needing a free and open-source relational database solution.

Here’s how to install MariaDB on CentOS 8:

1. Update your system:

Before you begin, ensure your system is up-to-date using the following command:

sudo dnf update

2. Install MariaDB:

Use the following command to install MariaDB and its dependencies:

sudo dnf install @mariadb

3. Start and enable MariaDB service:

Enable and start the MariaDB service with these commands:

sudo systemctl start mariadb
sudo systemctl enable mariadb

4. Secure MariaDB:

MariaDB security:

The MariaDB server package performs several security-related operations and sets the master password with a script called mysql_secure_installation. Verify the script by typing the following command:

sudo mysql_secure_installation

You will be prompted to set a password for the MariaDB root user. After doing this, the script will also ask you to remove the anonymous user, restrict root access to the local machine, and remove the test database. You must answer “yes” “Y” to all questions. You have installed and secured MariaDB on your CentOS server and are ready to use it.

5. Verify the installation:

To confirm MariaDB is installed and running correctly, use the following command:

sudo systemctl status mariadb

The output should show the service is “active (running)”.

6. Connect to MariaDB:

Finally, you can connect to the MariaDB shell as the root user using:

sudo mysql -u root -p

When prompted for the password, enter the one you set in step 4.

Additional Tips:

  • If you don’t want to use the root user, create a new user with appropriate privileges for daily usage.
  • Edit the /etc/my.cnf file for further MariaDB configuration.

Conclusion :

In this tutorial, we showed you how to install and secure MariaDB on CentOS 8 and how to connect to the MariaDB server from the command line. Now that your MariaDB server is up and running, you can connect to the MariaDB shell and start creating new databases and users.
support hosting100