Is my computer hard drive HDD or SSD? SSD drive diagnosis guide
SSD drives have been used as a reliable alternative to old HDDs in the computer and laptop industry for several years. But how to recognize the SSD drive in the computer?
SSD memories are superior to old HDDs in terms of data transfer speed and reliability, but the capacities of SSDs in the current market are lower than the capacities of HDDs, although this difference is expected to decrease in the future.
If you have an old computer or laptop that is more than 10 years old, it probably used an HDD. But if you have a newer system, you have to use special methods to determine what type of storage drive it has.
Your laptop may be old, but you have updated it by upgrading the laptop hard drive to SSD. The important question is, how to identify an SSD drive? In this article, we want to explain to you some tricks to identify the type of computer storage drive, SSD or HDD.
With the help of these tricks, which are sometimes done with the help of SSD or HDD drive detection software, there is no need to open the computer case and check the appearance of the hard drive because in some systems, especially laptops, accessing the hard drive driver is difficult and has its own risks.
If you want to know how to detect SSD drive in computer, stay with us until the end of this text.
SSD drive detection in Windows 7, 8 ,10 and 11
There are different ways to detect the SSD drive, some of which can be done with the help of Windows’ own features, and others are used using third-party software.
As for Windows methods, in different versions such as Windows 7 or 10, the working method may be slightly different, but the general principles of SSD drive detection are almost the same in all versions of Windows operating system. In this section, we explain these methods separately.
There are similar methods for detecting the SSD drive in Windows versions. We explain each of these methods briefly in this section:
1. Use Disk Defragmenter to detect SSD drive
A simple way to detect an SSD drive in older versions of Windows is to use Disk Defragmenter. To do this, open the Run window by pressing Win + R and type dfrgui and press enter.
In the Disk Defragmenter window, in the Media type column, you can see the type of hard drive used in your computer or laptop.
In this column, if the term Solid state drive is written, the type of work is SSD, and if Hard disk drive is written, the desired hard drive type is HDD. Some computers may have a combination of both drives.

2. Using PowerShell
Another quick way to detect the SSD drive in laptops and computers is to use the PowerShell tool, which is included in Windows 10 and later versions.
To use this tool, right-click the Start button and click PowerShell (Admin).
Then in the PowerShell page, type Get-PhysicalDisk and press Enter. As soon as the command is executed, a list of your system’s hard drive type will be displayed in the Media Type column.

3. Using System Info
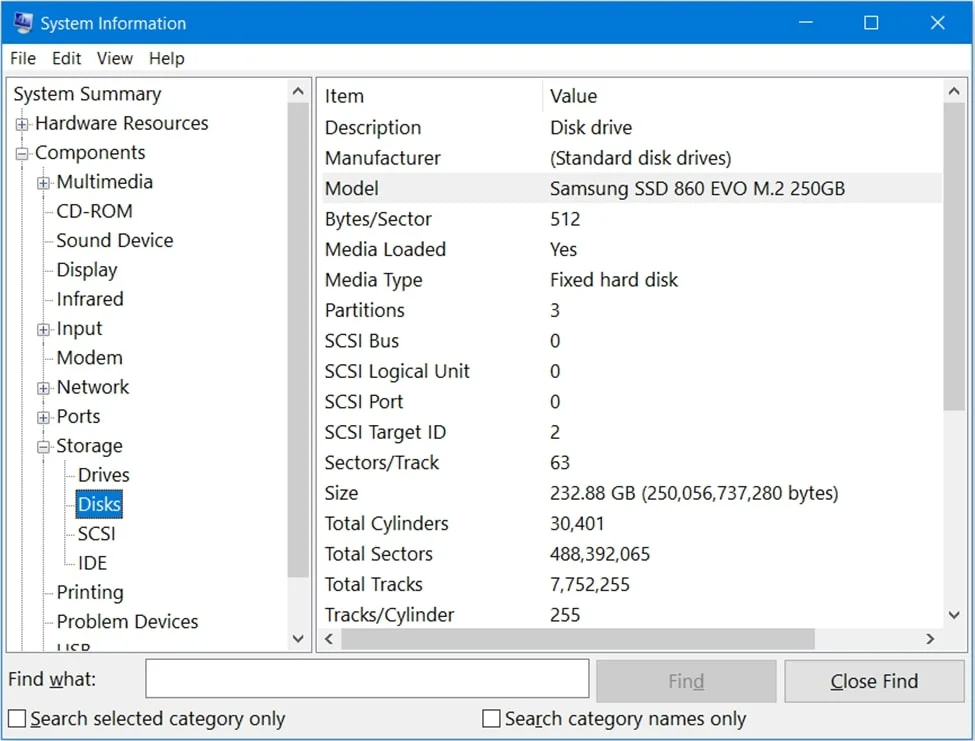
There is another method in Windows to detect the type of hard drive and detailed information about the type of hard drive, RAM, processor and other parts. For this purpose, it is enough to enter the System Information page to see all this information.
To use this feature, right-click on the Start button and select Run. In the Run window, type msinfo32 and press Enter.
On the next page, go to Components > Storage > Disks from the left panel and on the right page of this section, complete specifications of your hard disk are provided. Usually, in front of the term Model, the type of hard drive and the brand of its manufacturer can be seen.

4. Using Command Prompt
One of the other ways to detect SSD drive in computer and laptop is to use Command Prompt. With the help of this method, other additional information can be seen such as head number, capacity, etc. To use this method, press Win+S to open the search toolbar.
Then type cmd and press enter. In the search results, look for the Command Prompt application and right-click on it, and select Run as Administrator. Copy the following command into the Command Prompt window and press Enter:
wmic diskdrive get serial number, model, size, media type
By doing this, the specifications related to the hard drive will be displayed, including the manufacturer’s name, serial number, capacity and other specifications. Also, in the mode column, the type of disk work including SSD or HDD can be recognized.

5. Using Device Manager
Using Device Manager is another simple way to detect SSD drive in Windows. To access this section, press Win+X keys. Then select Device Manager from the displayed bar and open Disk drive from the left panel.
In the drop-down menu of this section, right-click on the name of your hard drive and select Properties. In the window that opens in the General tab, the specifications of your system’s hard drive can be seen.

6. Using Task Manager
One of the easiest ways to detect the SSD drive of a laptop and computer is to use Task Manager. To access this section, press Ctrl+Alt+Del and go to the Performance tab in the Task Manager window.
In this section, graphs related to the use of computer resources such as CPU, memory and hard drive are displayed. Click on Disk 0 in the left panel. On the right page, all information about the hard drive will be visible. If the system has an SSD drive, then the word SSD will be displayed in front of the Type.

7. Using Windows Explorer
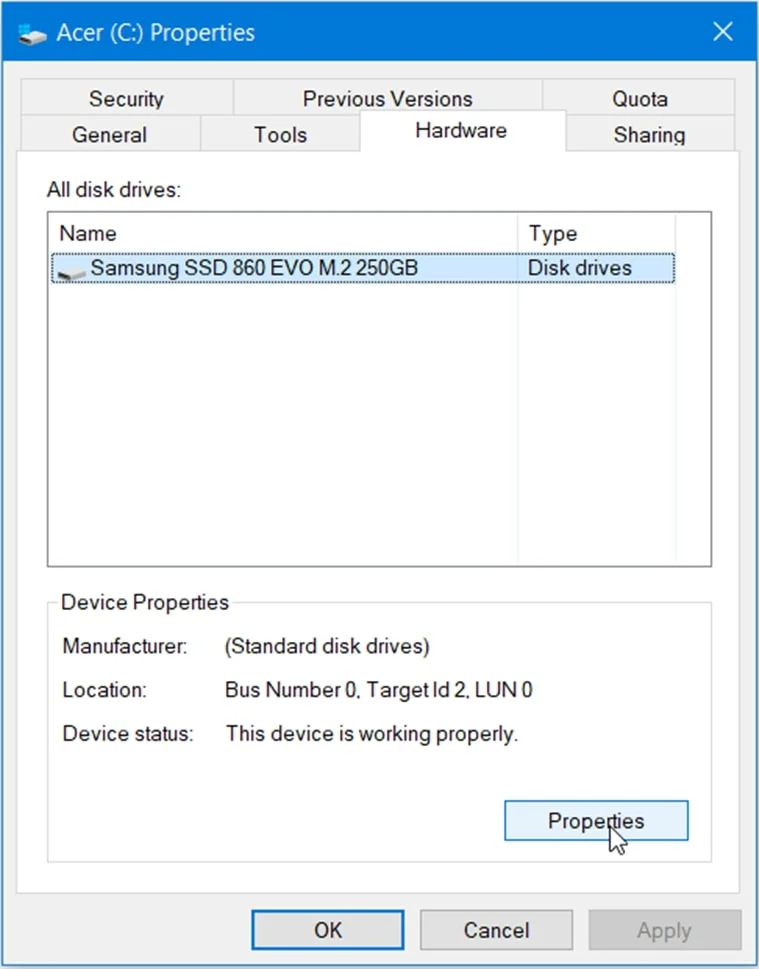
You can also identify the SSD drive by referring to Windows Explorer. For this purpose, enter Windows Explorer by clicking on the Taskbar menu, or by pressing the Win+E keys. In File explorer, right-click on the first displayed drive and select Properties from the desired menu.
Then select the Hardware tab in the Properties window. In this section, your system hard drive is shown. For more information, you can also click the Properties button at the bottom of the window.

SSD drive detection in Windows 11
All the solutions mentioned in the previous section can also be used to detect the SSD drive in Windows 11. But another simple method is provided for users in this Windows through Settings, which can easily identify the hard system.
For this purpose, select Settings from the Start menu. Then select System from the left panel and then Storage. In the next step, click Advanced storage settings and select Disks & volumes. In this section, information about your storage drive will be displayed.

SSD drive detection software
Finally, we will introduce softwares that are provided to detect SSD drives in laptops and computers.
The most famous program is CPU-Z, which gives you comprehensive information about all computer hardware, including the hard drive.
Also, other popular programs such as Speccy, HWiNFO and PC Wizard are provided for this purpose. Working in the environment of these programs requires practice, and it may not be possible to distinguish at first glance which section contains the information related to the hard drive or other parts. Also, the major drawback of some SSD drive detection programs is that they are not free.
Therefore, our recommendation is to identify the information about the hard drive of your laptop or computer from the Windows tools that we talked about in the previous section.
final word
There are different ways to detect the SSD drive in Windows. Fortunately, the Windows environment itself has several tools for detecting the SSD or HDD installed on the system, which are easily and freely available.
In this article, we explained some tricks to detect the type of computer hard disk, SSD or HDD, most of which can be used in Windows 7 and later versions. We also introduced some SSD drive detection software in laptop or computer.
In general, if you are using the Windows operating system, our recommendation is to use its tools such as Device Manager or PowerShell to detect the SSD or HDD drive. This work takes less time and does not have the problems related to software installation, including the lack of access to free versions and the complexity of the work environment.

