Archive

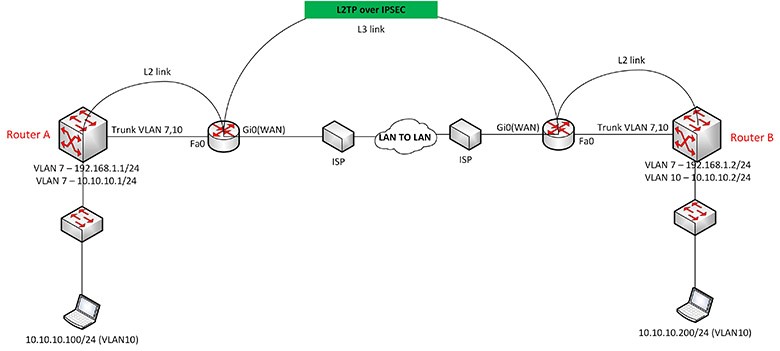
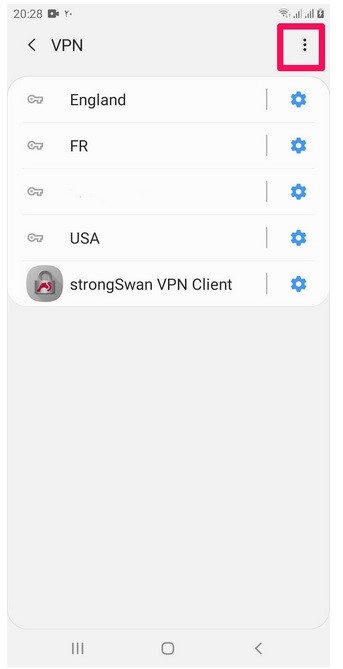
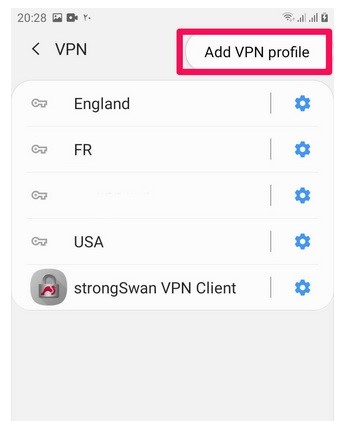
Virtual server for your business

 dedicated and virtual servers. What are the differences between these two servers? Which of these servers will bring more benefits to the business? Stay with us in the rest of this article to get to know the efficiency of the virtual server for your business and its countless benefits.

Getting to know the virtual server for your business

This server, also known as VPS, is a part of a dedicated server. All businesses need promotion to grow and expand further. For this reason, they should have instant, safe and high-efficiency service. Also, the desired service must give the user the necessary access.

A virtual server is a type of web server that shares computer resources with virtual servers. For this reason, it is not considered a dedicated server independently. In other words, using a virtual server does not make the computer belong to a server software. In fact, this resource is divided between two or more servers separately.

In other words, a server can be considered an always-on computer or system. This system is ready to respond to users 24/7. Also, in the conditions of increased site traffic, it makes your website load faster.


What are the benefits of using a virtual server for your business?

By using this server in the shortest possible time, you will see extensive changes. In addition to increasing productivity, the use of VPS also increases the level of security. In the following, we will examine some of the most important advantages of these servers.

It increases business productivity

As we mentioned, using a virtual server increases the speed. This advantage is due to the simultaneous execution of several processes. The speed of using the Internet and the virtual world in general today has an extremely high position. Also, speed plays a significant role in increasing the ranking in Google. All these things increase the efficiency and productivity of your activities in business.

Reduces additional costs

Buying a virtual server for your business will not cost much. Although you can have a dedicated server at a higher cost, you will probably face a loss in the long run. On the other hand, according to today’s needs of businesses, shared hosting is not very efficient despite the lower price. The virtual server brings more savings and better performance for businesses. It also does not require heavy capital and additional costs.

Increases business security

With the anticipated web security measures activated and implemented by experts, the servers are protected against all kinds of traffic fluctuations, destructive codes, etc. In this way, you will be safe from cyber attacks and you will do your activities with complete security.

Increases flexibility

You can have more resources by using a virtual server. As you know, with the passage of time and business growth, you will need more space to store information. For this reason, by using VPS, you can easily upgrade your RAM space in the fastest time. Of course, this possibility is also available in shared hosting, but it is limited. However, a virtual server allows your business to scale without limits.

It gives freedom of action in choosing the software

By using a virtual server, it is possible to install different operating systems, such as Linux and Windows. In this way, the management and control of the server is provided to the user and you can choose the facilities you want; An important feature that is not available in shared hosting.

Checking the domain term in the virtual server

All sites need a domain to design and run. Basically, after determining the goal and planning for website design, the next step will be domain registration. It can be said that the domain is actually your profile and internet address. Users can find your site easily with the help of this name and address.

The domain consists of two parts, name and extension, and there are no special restrictions for choosing a name. However, the choice of extension has limitations. In fact, the extension specifies the type of site; For example, the extension ORG is used for various organizations and bodies. In this way, the domain can be considered unique to you. Also, keep in mind that the purchase and registration of these domains has a time limit and after its completion and non-renewal, it will be assigned to another site.

Examining hosting terms in virtual server

Host actually means a host that refers to the location of information. The space where you place your site on the Internet will be your host. In this case, you need a device to display your site information to users on the Internet 24/7. This device is called a server, which can be dedicated or virtual. Virtual server has more benefits for your business. However, choosing the type of hosting or server depends on the type of site and your facilities.

Using a virtual server for hosting services is much more popular among users. These servers provide adequate space and volume for your website information at a much lower cost than dedicated servers.

Review some important points before purchasing a virtual server for your business

After getting to know the concept of this server and the advantages of using it, it is time to check some important points before buying a virtual server. In the following, we will examine some important points about purchasing virtual servers.

1. Choose a suitable location with your own virtual server

Before getting a virtual server, it is better to clearly define your goals and needs. In fact, you should know what you are buying a virtual server to do. This helps a lot to choose an virtual server. Each of these servers has its own performance and advantages. You can buy according to these advantages.

2. The virtual server must have proper support

Most of the companies that provide a virtual server for your business have the possibility of support. However, the quality of support is of utmost importance. The provider company must respond to your needs in the fastest time and in the best way. In this way, you can solve the problems as soon as possible. On the other hand, be careful that the company providing the server must have an electronic symbol.

3. Pay attention to the quality of virtual server hardware

The presence of high-quality virtual server hardware for your business also increases the speed. For example, the hard drive of the server has a great impact on the speed; Therefore, it is better to choose it from the SSD type. In general, try to use up-to-date hardware. This will increase the speed of your virtual server. Usually, companies provide you with virtual server hardware information through the support team.

Choosing the right company to buy a virtual server for your business

As we mentioned, many companies are active in this field. Choosing the right host, domain and server requires a high level of specialized knowledge. For this reason, it is very important for internet business owners to choose the right and reliable company to receive these services.

Before buying a virtual server, be sure to pay attention to the company’s trust marks. Many companies do these specialized activities without having enough expertise. For this reason, it is better to be more careful and sensitive in this field.

final word

Buying a virtual server has many advantages for your business. These servers are much less expensive than dedicated servers. However, they also have high quality and speed. Also, by using a virtual server, the security of your data will be much higher. In this way, you will be relieved about cyber attacks, web fluctuations, etc. On the other hand, the virtual server will significantly increase the productivity of your business. These servers have the ability to perform several processes at the same time.

How to install SSL certificate in IIS

Looking for a tutorial on how to install an SSL certificate in IIS? Stay with us until the end of this article so that we can give some tips about training and how to install SSL certificate in IIS. SSL, which is a type of security certificate, stands for Secure Sockets Layer. The security of the data that is transmitted in the network must be ensured. This security protocol is used for this purpose. IIS or Internet Information Service are Microsoft’s proprietary servers designed for Microsoft .NET.

Before learning how to install an SSL certificate in IIS, it’s good to know why we should use an SSL certificate at all ? Strengthening the site’s security layers is always one of the main concerns of website owners. One of the available solutions to provide more security for any website is to install an SSL security certificate on that site. The purpose of using this security protocol is to change HTTP to HTTPS.

HTTPS stands for Hypertext Transfer Protocol Secure. Therefore, it can be defined as a fully secure hypertext data transfer protocol. In general, the purpose of using the SSL protocol is to encrypt the data so that it cannot be accessed by hackers and attackers. IIS is also a powerful web server with special features provided by Microsoft. If you don’t know how to enable SSL in IIS, read on.

Install SSL certificate in IIS

The first thing to learn about installing an SSL certificate in IIS is to know that before anything you need to install an intermediate level SSL certificate on your Windows server. What is an intermediate SSL certificate? Intermediate Certification is part of the Windows Server certification chain. In other words, if we divide this chain into three parts, the first part of the chain is the Root Certificate, the middle part is the Intermediate Certificate, and the last part of this chain is the End User Certificate. After installing the intermediate certificate, you need to install SSL in IIS. Follow the steps below:

  1. First, save the SSL certificate on the server where you generated the CSR. The extension of this file should be
  2. Enter the iis software and select the desired server from the box on the left side of the IIS server manager page.

  1. Then, select the Server Certificates item from the middle box among the items.
  2. After selecting the above item, a box will be displayed on the right side of the screen. From this box, click on Complete Certificate Request… option.

  1. First find the CRS file path on the server and then select it.
  2. A box called Friendly name will open and you should choose a name for your certificate and enter it in this box.
  3. In the next box, two options will be displayed. If you want to install a standard certificate, click on the Personal option. Choosing the Web Hosting option is for when the certificate can be issued on several SNI names.

  1. Finally, by selecting the OK option, the installation of the SSL certificate will be completed.

Now that you have learned how to install an SSL certificate in IIS, you should know how to assign this certificate to the desired website in IIS after installing this security certificate on IIS.

Enable SSL on the website

The work is not finished with the tutorial on installing an SSL certificate in IIS. In the next step, you need to activate SSL on the website. To enable SSL on the website in IIS, do the following steps in order:

  1. Again, on the IIS Server Manager page, from the box you see on the left side of the page, click on the third option, the site section.
  2. By clicking on this section, you will see the Default Web Site option, which you should click on.
  3. By clicking on this option, select the .. option in the right box.
  4. Selecting this item will open a page called Site Bindings. In the right box, select the first option, i.e. Add.

  1. Then several boxes will be displayed. In the Type box, select https. The port should also be set to 443 by default.

  1. A little lower you will see a box titled SSL certificate. The name of this SSL certificate is actually the same Friendly name that you set in the fifth step of the SSL certificate installation tutorial in IIS. In front of this box, you will see two options called Select and View. Click on Select.
  2. Finally, select OK.

After you have gone through the above steps, the settings will be displayed in the Site Bindings section. If https was set to port 443, you have followed the steps correctly and managed to enable ssl on the website.

How to fix the error in activating SSL certificates in IIS

After installing the ssl certificate in iis you may encounter an error. Sometimes it happens that after installing and activating ssl on Windows servers, the certificate is not activated correctly on the desired domain or it shows a different certificate instead of the original certificate. If you are using the Plesk control panel, you are more likely to encounter this error.

But why does this error occur? The point that you should pay attention to in the tutorial on installing an SSL certificate in IIS is that if the binding of a certificate on port 443 is left in the IIS settings, you will see this error. You have to fix this problem through cmd. To fix this error, do the following steps:

  1. First, enter the following command with administrator access:

netsh http show sslcert > C:\certificates.txt

  1. Now you should see the txt file. If there is a binding for port 443, you need to run the following command to remove it:

netsh http delete sslcert ipport=203.0.113.2:443

  1. At the end of these steps, you need to reset IIS. You can easily do this with the iisreset command.

By performing the above steps correctly, the error will be fixed and the SSL certificate will be successfully activated in IIS.

buy ssl; What is the best type of SSL?

Now that you have learned how to install an SSL certificate in IIS, it is good to know that there are different types of SSLs. Knowing them will help you choose and buy the most suitable one for your website. The types of SSL security certificates are:

  • SSL DV
  • SSL OV
  • SSL EV
  • SSL Wildcard
  • SSL MDC

SSL DV

If you want an SSL certificate that can be authenticated and verified quickly, you should choose SSL DV. SSL Domain Validation is one of the most popular ssl certificates among users. The authentication of this certificate is through the domain and is done in the shortest possible time.

SSL EV

If you are a large organization or company, it is better to use SSL EV. SSL Extended Validation authentication is done only by providing an organizational certificate and identity documents of a company or organization. Although authentication and installation of this certificate is a longer and time-consuming process for large organizations, the best option for large organizations is this type of SSL.

SSL OV

If you are a small company or organization and don’t want to get involved in the lengthy authentication process of SSL EV, you can use SSL OV. The SSL Organization authentication process is less expensive than SSL EV and can be done in a shorter period of time.

SSL Wildcard and SSL MDC

If you want to put the subdomains of your website under the SSL certificate in addition to the main domain, you must use the Wildcard SSL certificate. SSL MDC can also be used for up to 100 different domains, domains that are set on the same IP.

Can SSL certificate be used for free?

All websites can use a free SSL security certificate. We reviewed the tutorial on installing an SSL certificate in IIS a little while ago. Installing free ssl on iis is the same. But the thing you have to remember is the limited time period of using the free version of SSL. After this period of time has passed and the validity of the free version of SSL has expired, you must purchase one of its types. Buying ssl is one of the necessary measures to maintain the security of any website.

How is TSL different from SSL?

If you want a newer, more advanced version with more security, you can use TSL instead of SSL. Just like SSL, TSL is a security protocol between user and software. This protocol is used to maintain security between two systems on the Internet. In terms of application, TSL and SSL are similar; With the difference that TSL can be considered an updated version of SSL.

Note that TSL is not a separate protocol; This protocol is based on SSL. So if you buy the latest version of SSL, you have actually bought a TSL protocol. If you are looking for a tutorial on how to install a TSL certificate in IIS, there is no difference with enabling TSL in IIS in the tutorial on how to install an SSL certificate in IIS that we reviewed a little while ago.

Why should we take SSL seriously?

Why is it so important to learn how to install an SSL certificate in IIS? Site security is the most important issue that you should never neglect. There are 2 very important reasons that will definitely force you to activate SSL in IIS. How to know if a site uses this certificate or not?

When you open a page of a site, if you see https in the page address, it means that the site in question uses an SSL certificate. This certificate has advantages for both the user and the website owners that we have mentioned below.

1. Getting the user’s trust

When you install the SSL certificate on your website, an s will be added to the HTTP protocol in your website address and it will be displayed as HTTPS. If your site visitors know about these things, they will know that you are using an SSL certificate. If your site’s field of activity is such that it requires receiving information from the user, having this certificate will have a great impact on gaining the user’s trust.

2. Positive points for SEO

If you use this certificate, Google will also notice that your site is safe. Therefore, it gives more value and credibility to your site. Showing your site results by Google over sites that do not have this certificate is a priority for this search engine. With these interpretations, it is better to activate this certificate right now by learning how to install an SSL certificate in IIS.

Increasing Linux server security

What are the solutions to increase the security of the Linux server? A Linux server is a server on which one of the distributions of the Linux operating system is installed. This server can be considered a type of computer always connected to the Internet, which has a special type of software and hardware. If you also use a Linux server, increasing its security is definitely one of your concerns. Although one of the main reasons for people’s acceptance of Linux servers is their high security, there are solutions with the help of which you can improve this security to the maximum extent.

But why is security so important in Linux servers? Linux server can be used for web hosting, mail server, file storage, etc. That is why it is very important to talk about high security in these servers. One of the advantages of Linux is its open source. Therefore, its security bugs are easily identified and fixed. Considering that hackers may always be able to find a way to infiltrate your server and system, it is essential to strengthen the security layers of your Linux server in several ways. In this article, we have mentioned 13 of the most practical possible solutions to increase the security of the Linux server.

Solutions to increase Linux server security

In what ways can we improve the security of the Linux server? Although one of the main features of Linux is its high security, but for your peace of mind, you have the possibility to adjust the security of this server according to your needs through solutions. Since hackers can always find a way, it is not bad to know these solutions and by doing them, try to improve the security of your Linux server to the maximum extent. In the following, we will introduce 13 practical solutions.

1. Enable open_basedir

One of the ways to increase the security of this server is to activate one of the php services called open_basedir. This system is a kind of security feature in PHP that prevents hackers. With the help of open_basedir, it is possible to make the access of a user through php only limited to the same user. In other words, when a hacker succeeds in penetrating a part of the server, if this feature is enabled, the hacker’s access is limited to that part and he cannot access other parts of the server.

2. Taking help from safe_mode

You are probably familiar with the Safe Mode status on your mobile phone. But this feature is not specific to mobile phones and is also available for operating systems. This mode is designed to remove malicious programs, viruses, find software errors, restore operating system settings, etc. In simpler words, it can be said that Safe Mode is a state of the operating system in which, if it is active, only essential files can be executed.

Enabling safe mode prevents malicious programs from running. If a malicious program is installed on your Linux server, it will run every time Windows boots. Most viruses and malicious programs that infiltrate systems with the intention of hacking servers are designed in such a way that they can disable or remove antiviruses. Therefore, if a malicious program has entered the server, the best solution to prevent it from running is to set Windows to safe mode.


3. Disabling remote code execution

One of the methods that hackers use to break into systems is to execute code remotely in the desktop service, which is called Remote Desktop Services. A hacker can run any code they want on your system. For example, it can install its own malicious programs on the server, and in this way, it can learn about the server’s data and even change them. To increase the security of the Linux server, it is better to disable Remote Desktop Services. In general, deactivating services that do not work for the system increases its security.

4. Disable display_error

Display error is a type of error report in php that some programmers activate with the intention of viewing and being informed of php errors. Due to security issues, it is better to disable this service because its activation makes it easier for unauthorized attackers to penetrate the server. Therefore, if you are looking for a way to improve the security of your Linux server, we recommend that you disable this error report and use another solution to view php errors.

5. Input size limitation

One of the ways to increase Linux security and prevent web attacks is to limit the input size. But what does limiting the input size mean? As you probably know, in the php language and in the post method, the data in the HTTP request is hidden in the header.

Sending malicious codes in parts of the site that takes input from the user on the post method is one of the hackers’ methods to penetrate the system. In such a situation, if you limit the input size in the config file, you can prevent attackers from sending these malicious codes.

6. Resource limitation

DOS attacks, which are shortened to Denial of Service attack, are known as Denial of Service attacks. These attacks are carried out by attackers or hackers. The purpose of these attacks is to temporarily or permanently suspend or interrupt the services of the servers hosting a site. One of the solutions that can be used to protect against these attacks to some extent and ensure the security of the Linux server is limiting resources.

7. Disabling some functions

Another way to prevent web attacks is to disable some functions. If you are using shared servers, it is better to close the functions that are threatening to the Linux server. Some of these functions are:

  • curl_multi_info_read
  • curl_multi_init
  • curl_multi_remove_handle
  • curl_multi_select

These functions are located in a file called php.ini.

8. Using the magic_quotes_gps function

Inputs that are sent from the user side to the server may be a security bug for the server for various reasons. Therefore, one of the things that can be done to increase the security of the Linux server is to use the magicquotesgpc function. This function provides the programmer or site developers with the ability to secure user-side inputs to the server to a great extent. To activate and use this function, you must access the php.ini file.


9. Disable expose_php

One of the ways to prevent attackers and hackers from infiltrating the server is to prevent them from accessing our server facilities. But how can this be done? Note that whenever php starts, it adds a message containing its version number to the server header. In order to hide this data from hackers, you can set the expose_PHP variable to off. By disabling this feature, the data and web server facilities are not easily available to hackers.

10. Installation of CSF firewall

As another way to increase Linux server security, you can install CSF firewalls, which are also known as firewalls. This system can be considered as one of the best server security services that have been very successful in its kind so far. If you are looking for one of the strictest security elements to improve server security, be sure to install CSF Firewall. As the name suggests, this system works exactly like a firewall.

In other words, after installation, at the entrance of a server, it carefully checks all incoming requests to it. You can enable any security settings you want on the firewall. After that, if any of the incoming requests to the server contradicts the information and settings registered in the firewall, the requests are deleted and prevented from being sent to the server. A firewall is powerful enough to filter and process thousands of gigabytes of data in just a fraction of a second.

11. Installation and configuration of CLAMAV antivirus

If you are looking for one of the best antivirus for Linux operating system, install CLAMAV Antivirus, which has the ability to detect a large number of viruses at the same time. Another advantage of this antivirus is that it is free. In addition to this, the database of this antivirus can be updated automatically. Despite the powerful tools such as the scanner provided by this antivirus, you no longer need to use graphical environments to scan your server; Rather, you can scan the server with the help of this antivirus’s own scanner. Installing CLAMAV antivirus is recommended as one of the ways to increase Linux server security.


12. Installing the ModSecurity module

ModSecurity module is a firewall that is installed on the hosting servers. Along with other software and hardware firewalls that you install to keep your server secure, adding this module can also act as a double layer of security. This module is able to control various attacks on the server to a great extent. Note that installing the security mode module alone is not enough to maintain the security of the server, but this module should be used along with other security firewalls to increase the site’s security level.

One of the positive features of this module is its programming power. The security mode can identify and block things that have already damaged the security of the site. Among the applications of this security module, the following can be mentioned:

  • Ability to detect malicious bots and block them
  • Checking any requests sent to the site, such as membership requests from the user
  • Managing site traffic and checking them to ensure the absence of any security bugs
  • Preventing the uploading of some files and managing any uploaded files on the site
  • Managing the execution of commands and preventing the execution of malicious commands

13. Install CXS

As the last way to increase the security of the Linux server in this article, we should mention the installation of CSX. ConfigServer eXploit Scanner is a tool that can scan all files uploaded to the server. You can use this tool to prevent unauthorized attackers from exploiting the site and Linux server. The following are the positive features of this tool that help to maintain the security of the Linux server:

  • CSX tool is able to block loading of suspicious PHP and Perl scripts. These downloads are usually done with the purpose of sending spam or malicious attacks.
  • It has the ability to identify uploaded roots in user accounts.
  • It is able to increase the efficiency and scalability of the server.

Zero to hundred Nginx web server optimization

Today, due to the dependence of most business practices on site processes, Nginx web server optimization can be among the popular and obscure trends. In fact, the main reason for this is the popularity of the Nginx web server among users.

In such a situation, getting to know the process of optimizing the Nginx web server can be a great help in improving the performance of the web server. Therefore, in the rest of this article, we will provide more explanations regarding the optimization of the Nginx web server and the process related to this optimization.

What is Nginx web server optimization?

The first question that concerns most people’s minds in the field of web server optimization is related to what this process is and the result of it! In fact, it should be said that Engine X web server optimization is a specific technical process that is used to improve the efficiency of data processing and program configuration.

As a result, people can optimize the Nginx web server to make this server-browser communication path work as well as possible so that data processing processes can be done at a high speed and properly. Especially since this web server is introduced and known among the popular types for responding.

The first part of the Nginx web server optimization process

Considering that the Nginx web server has special capabilities that distinguish it from other types of web servers, by optimizing Nginx in line with the Worker changes in Nginx, it is possible to increase the utilization of the capabilities of this web server.

  1. Correctly setting the number of workers

In order to optimize Nginx, you can first adjust the number of workers and its connections correctly. For this, it will be necessary to follow a simple path. For this purpose, first of all, it is necessary to enter the Nginx configuration file through the command “vi /etc/nginx/nginx.conf” and change the value of worker_process to 1. Of course, you should note that changing the number of workers must be done according to the number of CPU cores.

  1. Connections of workers

In the following, you can enter the worker connections into the optimization process. For this purpose, you can see the limit of your server core through the ulimit -n command and replace the number 4096 with 512 in the Worker_conncetion section.

In this process, you can even replace the expression: “events {worker_connections 4096;use epoll;multi_accept on;}” for Worker Connection. In this case, the speed of the Nginx web server will increase to a great extent.

  1. Keep Alive optimization

Another process that comes up in the discussion of optimizing the Nginx web server is related to the optimization of Keep Alive in Nginx. In the nginx.conf file, you can check the related settings.

In the nginx.conf file, there are various control sections related to Keep Alive, which can include Keepalive_timeout, keepalive_requests, SendFile, tcp_nopush and tcp_nodelay. Each of the paths are used to adjust and apply private processes.

  1. Buffer settings

Buffer settings are another part of the Nginx web server optimization process, which is also defined in the nginx.conf file. Buffer settings depend on components such as hard disk speed, site traffic, and site information volume.

The reason for this issue is related to the type of function that is proposed for buffer settings. In fact, a buffer is a part of memory that stores data. By setting this section of the nginx.conf file, you can fully implement the Nginx optimization process.

For this purpose, it is necessary to enter various parameters during the changes. client_max_body_size, large_client_header_buffers, output_buffers and client_header_buffer_size are examples of the mentioned parameters that need to be changed.

The second part of the Nginx web server optimization process

The continuation of the Nginx web server optimization process can be explained and reviewed in the second part. Therefore, in order to complete the optimization process, it is necessary to go through the steps mentioned in this section.

  1. Changing the connection queue in the Nginx config file

Changing the connection queue in the Nginx configuration file is among the trends that are proposed to optimize the Nginx web server. The connection queue is located in the Nginx configuration file and can be changed by changing two variables in this file. The issue raised in relation to this section is related to the possibility of changing the number if a system error is observed in the Nginx log.

In this case, it is possible to prevent errors. So that if a system error is observed, it is necessary to use the numerical variable of the expressions:

net.core.somaxconn = 65536

net.ipv4.tcp_max_tw_buckets = 1440000

in the Nginx config file. In this case, you will be able to avoid errors.

  1. Using Gzip in Nginx

Using the Gzip function in Nginx is one of the other processes that are discussed in the discussion of optimizing the Nginx web server. This feature is used to increase the loading speed of the site. So that by using Gzip you can compress all the files that can be compressed.

In this case, the size of the files is reduced and thus the speed increases. As a result, in order to implement the Gzip feature in the Nginx web server, you can define the following codes in the Nginx configuration file so that the mentioned feature works for you:

gzip on;

gzip_min_length 1000;

gzip_types: text/html application/x-javascript text/css application/javascript text/javascript text/plain text/xml application/json application/vnd.ms-fontobject application/x-font-opentype application/x-font-truetype application /x-font-ttf application/xml font/eot font/opentype font/otf image/svg+xml image/vnd.microsoft.icon;

gzip_disable “MSIE [1-6]\.”;

Since site loading speed is among the most important issues related to its activity, it is necessary to pay special attention to Gzip functionality. Because in general speed increase is one of the main goals of Nginx web server optimization. Of course, consider the fact that Gzip is not the only way to increase site speed. But there are other effective components.

  1. Setting timeouts in Nginx

Setting the timeouts in Nginx is one of the other components that adjust the speed of the site. Client_body_timeout and Client_header_timeout are among time control variables. So that defining the time to perform a process by the user and sending the Request time out error in case of timeout is done through these variables.

It should also be noted that another variable called Send_timeout is placed in this section, which determines the time of the request. These variables are all related to the speed of the site and have a direct impact on its performance. For this reason, the optimization process of Nginx web server largely depends on these things.


The third part of the web server optimization process

Another part that comes up in the web server optimization process can be explained in the form of the third part. In this part, we can mention different components, each of which has a different effect on the optimization process. It should be noted that the commands of this section are defined in the sysctl.conf file.

  1. Set temporary ports

The setting of temporary ports is one of the components that is discussed in the third part of the optimization process. This is the case when using an Nginx web server as a proxy server. Regarding these variables, it should be noted that the settings are applied in the limits.conf file.

  1. Set file descriptors

Setting file descriptors to set connections and open files can be part of the Nginx web server optimization process. This item is placed in the sysctl.conf file like any variable related to the third section. It should be noted that these settings are necessary for a system that responds to a high number of connections.

  1. Disconnecting to respond to lost customers

Disconnecting from the response of lost customers by entering the code “reset_timedout_connection on; In the sysctl.conf file, you can free the memory allocated to the socket.

In addition to the items mentioned for the third part of the Nginx web server optimization process, options for collecting packets before dropping and TCP window size are among the mentioned processes that can affect the performance of the web server.

The fourth part of the Nginx web server optimization process

The end of the optimization path will be associated with the application of the settings of the fourth section, which includes the processes of error logging, conditional logging, general disabling of logging and monitoring of server activities.

  1. Error logging

Logging errors that are placed in the Nginx.conf file is one of the important steps that must be taken into account in relation to the optimization of the Nginx web server. Regarding the logging of errors, two main parameters logs/error.log and Error_log are set to determine the location of the log file.

So that by changing a variable in the code defined in the Nginx.conf file, the logging level can be changed arbitrarily or depending on the need. In this case, it will be possible to receive information about the status of the server, depending on the changes applied.

  1. Conditional logging

Conditional logging is another process related to web server optimization that can be used to log specific requests if needed.

  1. Disable logging altogether

Disabling logging altogether is when the server administrator uses an alternative logging method. In this case, you can use the command “server { listen 80; server_name example.com; access_log off; error_log off; }” was used to completely disable logging.

  1. Monitor server activities

Server activity monitoring is a variable that can be enabled on a server to help administrators see JSON responses immediately.

In general, by applying processes related to Nginx web server optimization, you can greatly help the website to perform better and faster. Especially since the activity of the site largely depends on these components.


Examples of server performance enhancement files

Nginx’s official site has proposed the ideal configuration by providing examples of nginx.conf file, sysctl.conf file and limits.conf file; But it should be kept in mind that these examples are presented as a general template and things like workers or other processing items need to be adjusted according to the server’s power.

  • sysctl.conf file

net.core.somaxconn = 65536

net.ipv4.tcp_max_tw_buckets = 1440000

net.ipv4.ip_local_port_range = 1024 65000

net.ipv4.tcp_fin_timeout = 15

net.ipv4.tcp_window_scaling = 1

net.ipv4.tcp_max_syn_backlog = 3240000

  • The limits.conf file

soft nofile 4096

hard nofile 4096

  • The nginx.conf file

pid /var/run/nginx.pid;

worker_processes 2;

events {

worker_connections 65536;

use epoll;

multi_accept on;

http {

keepalive_timeout 65;

keepalive_requests 100000;

send file on;

tcp_nopush on;

tcp_nodelay on;

client_body_buffer_size 128k;

client_max_body_size 10m;

client_header_buffer_size 1k;

large_client_header_buffers 4 4k;

output_buffers 1 32k;

postpone_output 1460;

client_header_timeout 3m;

client_body_timeout 3m;

send_timeout 3m;

open_file_cache max=1000 inactive=20s;

open_file_cache_valid 30s;

open_file_cache_min_uses 5;

open_file_cache_errors off;

gzip on;

gzip_min_length 1000;

gzip_buffers 4 4k;

gzip_types text/html application/x-javascript text/css application/javascript text/javascript text/plain text/xml application/json application/vnd.ms-fontobject application/x-font-opentype application/x-font-truetype application/ x-font-ttf application/xml font/eot font/opentype font/otf image/svg+xml image/vnd.microsoft.icon;

gzip_disable “MSIE [1-6]\.”;

# [ debug | info | Notice | warn | error | Crit | alert | emerg]

error_log /var/log/nginx.error_log warn;

log_format main ‘$remote_addr – $remote_user [$time_local] ‘

‘”$request” $status $bytes_sent ‘

‘”$http_referer” “$http_user_agent” ‘

“$gzip_ratio”‘;

log_format download ‘$remote_addr – $remote_user [$time_local] ‘

‘”$request” $status $bytes_sent ‘

‘”$http_referer” “$http_user_agent” ‘

“$http_range” “$sent_http_content_range”‘;

map $status $loggable {

~^[23] 0;

default 1;

server {

listen 127.0.0.1;

server_name 127.0.0.1;

root /var/www/html;

access_log /var/log/nginx.access_log main;

location /

proxy_pass http://127.0.0.1/;

proxy_redirect off;

proxy_set_header Host $host;

proxy_set_header X-Real-IP $remote_addr;

proxy_set_header X-Forwarded-For $proxy_add_x_forwarded_for;

proxy_connect_timeout 90;

proxy_send_timeout 90;

proxy_read_timeout 90;

proxy_buffer_size 4k;

proxy_buffers 4 32k;

proxy_busy_buffers_size 64k;

proxy_temp_file_write_size 64k;

proxy_temp_path /etc/nginx/proxy_temp;

location ~* .(woff|eot|ttf|svg|mp4|webm|jpg|jpeg|png|gif|ico|css|js)$ {

expires 365 days;

Why should we use SSL?

The benefits of SSL in terms of increasing site security have made obtaining an SSL certificate one of the challenges of site management. Currently, sites are an important part of all types of businesses, and most business systems are driven by sites. For this reason, security has become one of the important components for different people and businesses.

Since sites with more advanced goals and programs are introduced to the world day by day, various risks try to destroy the security of these sites and access to their information. For this reason, various methods are proposed to define security parameters for sites. This is where the use of https protocol and SSL certificate is at the top of security practices.

What is an SSL certificate?

SSL certificate is a security protocol that guarantees data security by creating a special mechanism and encrypting data. So that the existence of this security certificate causes the encryption of exchange information and thus, it becomes very difficult to access them. For this reason, the security of various information on the site is well maintained.

In fact, a site that uses an SSL certificate changes its protocol from http to https. You may ask what is the difference between http and https protocols? In this regard, it should be said that the http protocol stands for Hyperr Text Transfer Protocol and the HTTPS protocol stands for Hyperr Text Transfer Protocol Secure. In the meantime, the term Secure in the safe sense is the distinguishing factor of the mentioned protocols.

Therefore, the https protocol is introduced and recognized as one of the most familiar components for identifying secure sites. Generally, sites that are in contact with their users or have store and service activities, use this protocol to secure the conditions, in this way users can be sure of the security of their information.

Benefits of SSL and the importance of using https protocol on the website

As mentioned in relation to the SSL certificate, this certificate is of great importance due to the creation of security conditions for all types of information available on the site, and it can implement all the activities of the site in a protected manner; But it should be noted that establishing security is not the only operational goal through the https protocol!

In fact, it should be said that your site can benefit from wider benefits due to the security factor. Among these benefits, you can pay attention to the following:

  1. Attract users

There are different sites, each of which operates in a different field. So that their audience can be separated and users of any type of site activity can be defined according to their taste, purpose of visit and needs. Meanwhile, similar sites can succeed when they attract the attention of unique users.

In such a case, the definition of security conditions, in the form of a positive point, will cause the growth of your site. It does not matter what the purpose and type of activity of your site is. You only need to have the necessary factors to attract the audience. In this case, if your site is a type of store, your sales will definitely increase.

  1. Professional activity of the site

Among the other advantages of using the https protocol, we can mention the professional activity of the site. In fact, it should be said that security acts as a guarantee for the protection of users’ private data; With this account, a site that provides this guarantee to its users will have a much more professional activity.

  1. The growth of businesses related to the site

Since various businesses need to obtain audience information, maintaining security can give people the confidence that their data and assets are not threatened, which makes it easier for them to trust your site and your business. This is where your site can surpass its competitors by gaining the trust of its users.

In addition to the things mentioned about the benefits of SSL, you can add more options, each of which will have a different and unique effect on your site’s performance. For this reason, nowadays, all prominent sites have taken advantage of the SSL certificate in order to validate their activity.


SSL certificate and security to improve site SEO

In addition to adding positive features and benefits to your site’s functional features, the https protocol can provide some of the features, capabilities, and features required for a successful site. So that these features are introduced and recognized as a part of the authentic site.

Improving SEO is one of these things. Search engines such as Google pay special attention to the presence of SSL certificates and raise this issue as a site ranking factor. Based on the new mechanism provided by Google, there are valid and visible sites that use the https protocol to secure data.

According to this way of ranking, you will see that at the top of the searches, sites that have an SSL certificate will be displayed first. As a result, in order to improve the SEO of your site in this category of search engines, it is necessary to use the https protocol.

Due to this issue, the Google search engine often excludes sites that do not have an SSL certificate and use the HTTP protocol from the search results. This can cause a big blow to the site’s activity. Because the number of visitors and users of the site decreases.

Application presentation in app stores

Providing the application in the app stores is not related to the activity of the site! Rather, it is defined for different programs and applications. Regarding the design and launch of various mobile or computer applications, installing an SSL certificate allows you to present the application in various app stores.

In fact, the reason for the need to install this certificate for the designed application is the conditions for presenting the application in app stores. Because programs and applications that do not benefit from SSL certificates cannot be published in app stores. For this reason, if they do not install an SSL certificate, they lose the point of selling the application and earning money.

Therefore, one of the most important measures for designers and programmers is to define the SSL certificate in order to create the opportunity to present the application in the app stores.

SSL certificate, the need to receive an electronic trust symbol

If you are looking to set up a store site, you need to get an electronic trust token. Currently, this symbol is required for the operation of various store sites and acts as a license for the operation of this category of sites. On the other hand, in order to receive the electronic trust symbol, factors and conditions are raised that make the process of obtaining the said symbol somewhat difficult.

Having an SSL certificate is one of the conditions and necessity of receiving an electronic trust symbol. Therefore, it is necessary to use the https protocol for the sites that have a store activity to obtain the electronic trust symbol. Since it is mandatory for store sites to find the electronic trust symbol, it is not possible to ignore the issue of using the https protocol for store sites.

This is not only mandatory in order to receive the electronic trust symbol, but it can also be of great importance in terms of site development and its growth and expansion. Because the audience of store sites are buyers. Therefore, gaining their trust can be considered among the site activity requirements.

 Reasons to buy an SSL certificate

According to what has been discussed so far regarding the SSL certificate and the HTTPS protocol, the reasons for buying an SSL certificate can be placed in the group. So that people go to buy an SSL certificate for two general reasons:

– Taking advantage of SSL

– Necessity to purchase an SSL certificate

In fact, the reasons for obtaining an SSL certificate are not outside of these two cases. Some people are looking to expand the activity of their site and want to attract the attention of the audience or the Google search engine to their site and content. This group of people take advantage of SSL certificate to grow their website.

SSL security certificate can increase the performance of a site by providing the necessary conditions. For this reason, most of the sites that have textual, news, educational content, etc., try to increase the number of visitors by defining the SSL certificate. These sites do not have to buy an SSL certificate and only use this opportunity to improve their site’s SEO.

On the other hand, a group of sites, such as stores, need an SSL certificate for their activity. This certificate is part of the functional requirements of these sites and most of the purpose of site owners. However, the benefits of an SSL certificate also apply to e-commerce sites.

In any case, the existence of some conditions and the definition of some factors make people seek to secure their website activity. In the meantime, no security factor and method can influence the opinion of search engines as much as the SSL certificate. For this reason, nowadays most sites, regardless of the type of activity they have, use SSL certificates.

How to buy SSL and SSL certificate security

According to what was said about the SSL certificate and its benefits and features, one of the concerns raised by the owners of different sites is related to how to buy SSL and the security of the SSL certificate! Sites looking to set up this security certificate can purchase it through SSL certificate providers.

Regarding the purchase of an SSL certificate, it should be said that since this certificate has different types, the purchase price depends on the type of your certificate. In addition, each of these types has features that can suit your needs.

In addition, in order to purchase an SSL certificate, you need to provide documents. Among these documents, we can mention the proof of domain ownership. This document is of great importance in relation to the purchase of the said certificate. So that one of the conditions for obtaining an SSL certificate is that you own the domain of your site.

After the documents provided by your chosen site are submitted, the SSL code file will be sent to you. At this time, you should install and set up the SSL certificate to improve the activity of your site.

Considering what has been discussed so far regarding the benefits and features of the SSL certificate, it is recommended to purchase an SSL certificate right now for the growth and development of your site. In this way, you can expand the activity of your site and increase the rank of your site in the Google search engine.

How to install VMware Workstation Player on Ubuntu 20.04

 Workstation Player is a stable virtualization software that allows you to run multiple separate operating systems on a single machine. With VMware Player, you can create and run your own virtual machines and evaluate software distributed as a virtual appliance from many software vendors on VMware’s Solution Exchange. If you are looking for an open source virtualization platform, you should try Oracle’s VirtualBox. Join us in this article to introduce you to how to install VMware Workstation Player on Ubuntu 20.04.

prerequisites :

To install VMware Player, your system must meet the following requirements:

  • 1.3 GHz or faster 64-bit processor, launched in 2011 or later.
  • At least 2 GB of memory or 4 GB or more is recommended.

Installing VMware Workstation Player in Ubuntu:

The first step is to install the build prerequisites. Open your terminal and run the following commands:

sudo apt updatesudo apt install build-essential linux-headers-generic

The latest version of VMware Workstation Player is available for download from the VMware download page. Use the wget command to download:

wget --user-agent="Mozilla/5.0 (X11; Linux x86_64; rv:60.0) Gecko/20100101 Firefox/60.0" https://www.vmware.com/go/getplayer-linux

This command downloads the latest version of VMware Player, which is version 16.1.0.0 at the time of writing this article. After the download is complete, run the installed file:

chmod +x getplayer-linux

Installation is very simple, just run the program and follow the on-screen instructions:

sudo ./getplayer-linux --required --eulas-agreed

The -required option displays only the required questions. Installation may take a few minutes. During installation, you will see progress information:

Extracting VMware Installer...done.  Installing VMware Player 16.1.0      Configuring...  [######################################################################] ۱۰۰%  Installation was successful.

At this point, you have installed VMware Workstation Player on your Ubuntu system. To launch the Player, open the Activities search bar, type “VMware Workstation Player” and click the icon. When you launch the program for the first time, a window like the one below will appear asking if you would like to use VMware Workstation Player for free for personal, non-commercial use:

After selecting the desired option, click the OK button to start the Player.

Uninstall VMware Player:

If for some reason you want to remove VMware Player, use the following command:

sudo /usr/bin/vmware-installer -u vmware-player

You will be asked if you want to keep the config files:

All configuration information is about to be removed. Do you wish to  keep your configuration files? You can also input 'quit' or 'q' to  cancel uninstallation. [yes]: 

Press “Enter” to remove VMware Player from your system:

Uninstalling VMware Installer 3.0.0      Deconfiguring...  [######################################################################] ۱۰۰%  Uninstallation was successful.

Conclusion :

We have shown you how to install VMware Workstation Player on your Ubuntu system. Now you can browse the program options and create your first virtual machine.

How to configure Static IP address in Ubuntu 20.04

Typically, in most network configurations, IP addresses are dynamically assigned by a DHCP server. Static IP address setting may be required in various situations such as port forwarding configuration or media server implementation. Join us in this tutorial to introduce you to how to configure Static IP address in Ubuntu 20.04.

Static IP address configuration using DHCP:

The easiest and most recommended way to assign a static IP address to a device on your LAN is to configure static DHCP on your router. Static DHCP or DHCP reservation is a feature found on most routers that causes the DHCP server to automatically assign an IP address to a dedicated network device each time the device requests an address from the DHCP server. It works by assigning a static IP to a device’s unique MAC address. DHCP reservation configuration steps vary from router to router.

Netplan:

Ubuntu 17.10 and later versions use Netplan as the default network management tool. Previous versions of Ubuntu used ifconfig and its configuration file /etc/network/interfaces for network configuration. Netplan configuration files are written with YAML command with .yaml file extension. To configure a network card with Netplan, you need to create a YAML description for the network card, and Netplan will create the required configuration files for the selected provider tool. Netplan supports two providers, NetworkManager and Systemd-networkd. NetworkManager is mostly used on desktop machines, while Systemd-networkd is used on non-GUI servers.

Static IP address configuration on Ubuntu server:

In Ubuntu 20.04, the system identifies NICs using “predictable NIC names”. The first step to setting up a static IP address is to identify the name of the Ethernet card you want to configure. To do this, use the ip link command:

ip link

The command displays a list of all available network cards. In this example, the user card name is ens3:

۱: lo: <LOOPBACK,UP,LOWER_UP> mtu 65536 qdisc noqueue state UNKNOWN mode DEFAULT group default qlen 1000      link/loopback 00:00:00:00:00:00 brd 00:00:00:00:00:00  ۲: ens3: <BROADCAST,MULTICAST,UP,LOWER_UP> mtu 1500 qdisc fq_codel state UP mode DEFAULT group default qlen 1000      link/ether 08:00:27:6c:13:63 brd ff:ff:ff:ff:ff:ff

Netplan configuration files are stored in /etc/netplan directory. You will probably find one or more YAML files in this directory. The file name may be different in different systems. Usually the file name is 01-netcfg.yaml, 50-cloud-init.yaml or NN_interfaceName.yaml, but it may be different on your system. If your Ubuntu cloud instance has cloud-init, you need to disable it. To do this, create the following file:

sudo nano /etc/cloud/cloud.cfg.d/99-disable-network-config.cfg
network: {config: disabled}

To assign a static IP address on the network card, open the YAML configuration file with your text editor:

sudo nano /etc/netplan/01-netcfg.yaml
network:    version: 2    renderer: networkd    ethernets:      ens3:        dhcp4: yes

Before changing the config, let’s briefly explain the code.

Each Netplan Yaml file starts with a network key that contains at least two required elements. The first required element is the version of the network config template and the second is the device type. The device type can be ethernets, bonds, bridges, or vlans. Under Device type (ethernets), you can specify one or more network interfaces. In this example, we have only one ens3 interface configured to obtain an IP address from a DHCP4 server: dhcp4:yes.

To assign a static IP address to the ens3 interface, edit the file as follows:

  • Set DHCP to dhcp4:no.
  • Specify a static IP address. Under Addresses: you can add one or more IPv4 or IPv6 IP addresses that will be assigned to the network interface.
  • Specify the gateway.
  • Under nameservers, set the nameservers IP addresses.
network:  version: 2  renderer: networkd  ethernets:  ens3:  dhcp4: no  addresses:  - ۱۹۲٫۱۶۸٫۱۲۱٫۲۲۱/۲۴  gateway4: 192.168.121.1  nameservers:  addresses: [8.8.8.8, 1.1.1.1]

When editing Yaml files, make sure you follow YAML code indentation standards. If it is not true, the changes will not be applied. After finishing the work, save the file and apply the changes by running the following command:

sudo netplan apply
Confirm the changes by typing the following commands:
ip addr show dev ens3
۲: ens3: <BROADCAST,MULTICAST,UP,LOWER_UP> mtu 1500 qdisc mq state UP group default qlen 1000      link/ether 08:00:27:6c:13:63 brd ff:ff:ff:ff:ff:ff      inet 192.168.121.221/24 brd 192.168.121.255 scope global dynamic ens3         valid_lft 3575sec preferred_lft 3575sec      inet6 fe80::5054:ff:feb0:f500/64 scope link          valid_lft forever preferred_lft forever

You have assigned a static IP to your Ubuntu server.

Fixed IP address configuration in Ubuntu desktop:

Setting up a static IP address on Ubuntu desktops requires no technical knowledge.

On the Activities page, search for “settings” and click on the icon. This will open the GNOME Settings window. Click on Network or Wi-Fi depending on the interface you want to change. Click the cog icon next to the interface name to open interface settings. In the “IPV4” tab, select the “Manual” method and enter your static IP address, Netmask and Gateway. When you are done, click the “Apply” button.

ip addr

The output shows the IP address of the network card:

...  ۲: wlp1s0: <BROADCAST,MULTICAST,UP,LOWER_UP> mtu 1500 qdisc noqueue state UP group default qlen 1000      link/ether 50:5b:c2:d8:59:7d brd ff:ff:ff:ff:ff:ff      inet 192.168.121.221/24 brd 192.168.31.255 scope global dynamic noprefixroute wlp1s0         valid_lft 38963sec preferred_lft 38963sec      inet6 fe80::45e3:7bc:a029:664/64 scope link noprefixroute 

Conclusion :

We have shown you how to configure a static IP address in Ubuntu 20.04.

Redirect http to https

Redirecting http to https is one of the important actions that must be done after preparing ssl . You may ask what is redirect? Redirect means the process by which the user is transferred to the new address of the site. This change of direction is sometimes permanent and sometimes temporary. Since after making changes to the site address or domain, redirecting users to the new address or domain is very necessary.

In the rest of this article, we will examine the method of redirecting http to https and vice versa. We will also introduce you all the pieces of code that you need to redirect different parts of the site.

Redirect http to https in htaccess

There is no need to use special plugins to redirect http to https in htaccess because the desired changes are supposed to be made by changing the site’s htaccess file. For this, you must first go to your host and then click on the file manager option to access the file management section. After that, you have to click on the setting option and check the Show Hidden Files (dotfiles) option so that the htaccess file is visible to you.

Then, by entering the list of files, you should go to the public_html folder and apply the necessary changes to the htaccess file. To change this file, you must click on the edit option and enter the Zira code.

RewriteEngine On

RewriteCond %{HTTPS} off

RewriteRule ^(.*)$ https://%{HTTP_HOST}%{REQUEST_URI} [L,R=301]

Redirect https with www (https://www to without www

Another point that is important in redirecting http to https is redirecting https with www (https://www to without www), for which you need to go through the following steps:

  • Refer to the control panel
  • Select the File Manager option
  • Enter the public_html folder
  • Click on the htaccess option
  • Right click and select edit option
  • Enter the following code snippet

RewriteEngine On

RewriteCond %{HTTPS} off [OR]

RewriteCond %{HTTP_HOST} ^www. [NC]

RewriteRule ^ https://okex.ir%{REQUEST_URI} [L,NE,R=301]


Redirect https to http in htaccess

In order to redirect from the secure HTTPS protocol to the HTTP protocol, you must follow the following path:

  • Login to the host
  • Click on the File Manager option
  • Go to the Public_html folder and select the htaccess option
  • Right click on the htaccess file
  • Select the edit option
  • Write the code below

# Redirect HTTPS to HTTP

RewriteCond %{HTTP:X-Forwarded-Proto} =https

RewriteRule ^(.*)$ http://%{HTTP_HOST}%{REQUEST_URI} [L,R=301]

Redirect site address without www to address with www

If you want the address of your desired site to be opened for users only with www, you must enter the following piece of code in the .htaccess file. Then you need to save these settings by clicking the Save Changes option.

RewriteEngine on

RewriteCond %{HTTP_HOST} ^example.com [NC]

RewriteRule ^(.*)$ http://www.example.com/$1 [L,R=301,NC]

Important note: the example.com part is for the domain name, so you should enter the domain address of the desired site instead.

Redirect site address with www to address without www

Among the path changes that you may need in http to https redirect, is the site address redirect. If you want the address of your site to be opened for the user without www, as in the previous section, you must enter the following code in the .htaccess file. Don’t forget to put the domain address of the desired site instead of example.com.

RewriteEngine on

RewriteCond %{HTTP_HOST} ^www.example.com [NC]

RewriteRule ^(.*)$ http://example.com/$1 [L,R=301,NC]

Redirect http to https except a directory or folder

To redirect http to https except for a directory or folder, you must enter the following code in the edit section and put the name of your desired directory instead of demo.

<IfModule mod_rewrite.c>

RewriteCond %{HTTPS} on

RewriteRule ^%{HTTP_HOST}/demo(.*) http://%{HTTP_HOST}/demo/$1 [R=301,L]

RewriteRule ^index\.php$ – [L]

RewriteCond %{REQUEST_FILENAME} !-f

RewriteCond %{REQUEST_FILENAME} !-d

RewriteRule . /index.php [L]

</IfModule>

Redirect only one folder of the site on the https platform

If you intend to redirect http to https only one folder of the site on the https platform, just put the following piece of code in the edit section. Just keep in mind that you should put the name of the desired folder instead of folder. Also, replace www.example.com with the domain name of the desired site.

RewriteEngine On

RewriteCond %{SERVER_PORT} 80

RewriteCond %{REQUEST_URI} folder

RewriteRule ^(.*)$ https://www.example.com/folder/$1 [R,L]

Redirect subdomain on main domain

To redirect the subdomain on the main domain, you must first enter the subdomain folder and remove the hidden files from the hidden mode by going to Settings > and activating the Show Hidden Files option. After this step in the .htaccess file

You must use the following code. Just remember to put your subdomain name instead of Your SubDomain and the main domain name in Example.com.

#Options+FollowSymlinks

RewriteEngine On

RewriteCond %{HTTP_HOST} ^sub.domain.com$ [OR]

RewriteCond %{HTTP_HOST} ^www.sub.domain.com$

RewriteRule (.*)$ http://domain.com/$1 [R=301,L]

Redirect a file in htaccess

When redirecting http to https, in order to redirect a file in htaccess, you must first remove this file from hidden mode. In fact, to do this, you must go through the following steps:

  • Enter the public_html section
  • Click on the settings option
  • Tick ​​show hidden files
  • Enter the code below

RedirectMatch 301 /oldurl /newurl

Redirect all addresses of a domain to a specific address

In the process of redirecting http to https by entering the following piece of code, a permanent redirect occurs and all addresses of a domain are redirected to a specific address. Usually, after making these changes, when the user tries to enter an old URL, this change will redirect him to a specific address.

RedirectMatch 301 / /newurl

302 redirect in .htaccess

In the http to https redirect process, the 302 redirect is a temporary change because it redirects search engines and users to new locations for a limited time. In general, it should be said that redirect 302 in htaccess. It is considered a very simple redirection because it can be done with the help of a meta tag or in JavaScript and requires less time for changes than 301 redirect. The following code is considered as the main code fragment of redirect 302.

Redirect 302 / http://domain.com/

Redirect old domain to new domain

In order to redirect the old domain to the new domain, you need to go to CPanel > public_html > htaccess file. and put the following code in its edit section. Just don’t forget to put the old domain name in the domain.ir section and put the new domain name instead of domain.com.

RewriteEngine on

RewriteCond %{HTTP_HOST} ^ domain.ir [NC,OR]

RewriteCond %{HTTP_HOST} ^www.domain.ir [NC]

RewriteRule ^(.*)$ http://domain.com/$1 [L,R=301,NC]

Redirect one page to another page

When redirecting http to https, you need to use the following code to redirect one page to another. Just note that instead of old-index.html, enter the name of the previous page and the name of the new page in the mynewwebsite field.

Redirect /old-index.html http://www.mynewwebsite.com/foldername/new-index.html

Redirect parked domain to subdomain

To redirect the parked domain to the subdomain, you must enter the path of the code below and insert the name of the parked domain instead of parkdomain.com. Also, instead of main domain/subdomain, put the address of the subdomain.

RewriteEngine on

RewriteBase /

RewriteCond %{HTTP_HOST} ^(www.)?parkdomain.com$ [NC]

RewriteRule ^(.*)$ http://main domain/subdomain [L]

Redirect main domain to subdomain

To redirect the main domain to the subdomain, you must enter the following code in the edit section. At the same time, you must replace the domain name and its extension with domain and .com and put the name of the subdomain in the sub.domain.com field.

Options +SymLinksIfOwnerMatch

RewriteEngine on

RewriteCond %{HTTP_HOST} ^(www\.)?domain\.com$ [NC]

RewriteRule ^ http://sub.domain.com[R,L ]

Redirect webmail

To change webmail.domian.com to domain.com/webmail, you must enter the following code:

RewriteEngine on

RewriteBase /

RewriteCond %{HTTP_HOST} ^(www.)?webmail.domain.com/$ [NC]

RewriteRule ^(.*)$ http:// domain.com/webmail/ [L]

It is necessary to remember that instead of domain.com, you must put your desired domain name.

Redirect subdomain to ip with port

If you put the name of the parked domain instead of parkdomain.com in the code below and put the address of the subdomain in the main domain/subdomain section, the subdomain will be redirected to the IP with the port.

RewriteEngine on

RewriteCond %{HTTP_HOST} ^subsonic.mydomain.com$ [NC]

RewriteRule ^(.*)$ http://ip:4040/$1 [R=301]

Redirect all server traffic to https

By putting the following code in the edit section of the htaccess file, all traffic will be redirected to https://www.example.com .

RewriteEngine On

RewriteCond %{SERVER_PORT} 80

RewriteRule ^(.*)$ https://www.example.com/$1 [R,L]

Redirect a specific extension of the site pages to another extension

By writing the following code, pages like http://domain.com/Page.html will be redirected to http://domain.com/Page.php. In other words, it can be said that the specific extension of the site pages changes the path to another extension. Of course, it should be noted that this change of path is a permanent change and the path of the site changes permanently. This method is also useful for SEO purposes because search engines understand that the site’s path has changed forever.

RedirectMatch 301 (.*)\.html$ http://domain.com$1.php

Domain Redirect in cPanel

To redirect the domain in cPanel, you must follow the steps below.

  • First, enter cPanel
  • After that, go to the “Domain” menu and click on the “Redirects” link.
  • After that, you will see a window that has different fields in which you must enter information.
  1. Usually, the first field you see is called “Type” where you have to choose the type of redirection. In fact, you have to say that you intend to redirect your site permanently (301) or temporarily (302).
  2. You must enter your domain name in the second field.
  3. The third field is also for redirecting specific files.
  4. In the Redirects to field, enter the name of the domain you want to be redirected to.
  5. After completing the fields at the bottom of the page, there is a section called “Redirection” through which you must choose the type of management of www redirects.
  • After applying all the changes, just click on the Add option to apply all the included changes.

Online Htaccess code generator

Among the actions that can help keep your site in Google is changing the path or redirecting files and pages. If you need htaccess codes to redirect http to https and you don’t know about them. You can get the special codes instantly by visiting the following two websites.

L2TP tutorial

The use of secure protocols on the Internet is one of the most important issues in the field of communication. One of the most secure protocols in this field is the L2TP protocol . For this reason, learning and teaching L2TP is of great importance, and due to the ever-increasing expansion of network issues and remote communication issues, it is necessary to use a number of secure protocols in the Internet network.

In fact, high security and advanced encryptions in the field of protocols should be of great importance in order to be able to communicate and send information at a suitable speed from any geographical point. In this article, we are going to fully examine the L2TP protocol and its advantages and disadvantages, and we will provide explanations regarding L2TP training and the launch of this protocol; So stay with us until the end of the article.

What is L2TP  ?

Before the full review of L2TP training, it is necessary to provide explanations about the L2TP protocol and understand what this protocol is and what it is used for. The L2TP protocol is actually a layer tunneling protocol that can be used to fully support VPN services. In fact, Internet service providers can use this tunneling to support VPN. Needless to say, L2TP does not do any encryption on your data and your content and is only used for communication on the VPN platform.

Because L2TP does not have any special authentication and encryption process, IPsec protocol will be used to increase its security and perform the encryption process. In fact, IPsec can encrypt between L2TP endpoints. Some VPNs also use this protocol to provide service and it is several years old.

Application of L2TP in the network

In order to know what L2TP training is and how it is, we must first familiarize ourselves with its application. In fact, the use of L2TP in computer networks is often used for network support, and this communication and support occurs in a secure platform and it will not make a difference in what geographical area it is used. Therefore, there will be no restrictions regarding the connection distance

On the other hand, this protocol allows the users of a set to remotely work in a safe and specific environment and only people who are in a set of networks can see the data and contents and the possibility They can be changed or edited for network users.


Advantages of L2TP

Using the L2TP protocol can have advantages. This is why L2TP is so popular and so many users use it; Therefore, before teaching it and building a protocol in this field, we will examine the advantages of L2TP:

L2TP security

One of the important advantages of using L2TP is its security. In fact, L2TP does not show any vulnerability in terms of information leakage, and its encryption, which is done by IPsec, is of 256-bit type. This type of encryption makes it impossible for other people to leak information or access the geographic location.

High compatibility

Another advantage of using the L2TP protocol is its compatibility with various platforms. Also, in order to use L2TP, there is no need to install a special software in different operating systems and you can easily start using L2TP.

Very easy to set up

In the L2TP training section, we will say that setting up the L2TP protocol will be easier and simpler than other VPN protocols. The reason for this is because of its full support for different operating systems. On the other hand, security settings such as Firewall are also very simple and can be set up easily. It is also very easy to switch protocols in L2TP.

L2TP tutorial

Now that we are familiar with the L2TP protocol and its advantages, we will teach this protocol. Since the majority of L2TP usage is on smart phones, here we will discuss how to set up L2TP on Android phones:

At the beginning of the work, you need to enter the phone settings and select the Connection section.

Then we will enter the More Connection Settings section in the settings and go through the next steps.

After entering the More Connection Settings section, we will go to the VPN section and apply some settings.

By entering the VPN section, we click the three dots option on the top of the right image.


Then we will click on the Add VPN Profile option to enter the main settings.


After entering the above settings, we will click the Save option and then connect.

As you can see, we were able to set up the L2TP protocol easily and we can use it well. You can refer to other articles on this site to set up L2TP in other operating systems and make sufficient use of its contents.

Disadvantages of L2TP

Along with the advantages of using L2TP, this protocol can have disadvantages that are worth knowing. It is necessary to provide an explanation. Among the disadvantages of L2TP, the following can be mentioned:

L2TP protocol speed

Due to the increased encryption process in L2TP and re-encapsulation of information, its connection speed may decrease; Therefore, it is necessary to use protocols such as Open VPN to increase the speed in L2TP so that we do not see the speed drop and we can use it easily.

Mismatch regarding security and encryption keys

The L2TP protocol actually uses two-way authentication for its encryption and authentication. This causes L2TP communication to be completely disconnected if both parties do not use the same security key.

Limitations on communication ports

The ports used in the L2TP protocol are limited. The same issue can cause the ports to be blocked and ultimately the L2TP protocol to be blocked in a connection.

Information Leakage

Although L2TP has a good encryption and authentication process, it is still possible for professional hackers to eavesdrop on information and data, and the information is in the hands of other people. This is why L2TP can be compromised by some malware.

cracking

Some research and studies show that L2TP can be weakened or cracked by the NSA after some time. This cracking can increase the damage to the encryption security of the L2TP protocol and compromise its security.

History of the L2TP protocol

The L2TP protocol, or layer 2 tunneling protocol, has been developed since 2000. This protocol was proposed as an RFC standard this year. The roots of L2TP are actually two old protocols for tunneling through point-to-point communication. Over time, with the development of communication and network technology, protocols such as Cisco Layer 2 or L2F and another protocol called PPTP established a newer version related to L2TP. In fact, updating and creating new protocols related to L2TP has added more security features to L2TP and increased its security. Also, the L2TP protocol can switch with the other mentioned protocols in a fraction of a second, and data encapsulation will be done quickly.

One of the important things about L2TP is that unlimited communication occurs in any geographical area and this is considered an advantage. Over time and with the expansion of technology and network, naturally, using the L2TP protocol along with other protocols can make users communicate more easily and quickly in a secure platform.

How does the L2TP protocol work after L2TP training?

After the L2TP process and setting up this protocol in different operating systems, we must have information to use it and its work. When we use L2TP to send a series of data, a general link will be formed for two-way communication. This connection is initially a PPP connection established by your computer or phone with the end user and the service company. On the other hand, two-way communication of PPP type will be established with the service provider and the end user.

On the side of the primary user or the user that sends data, a LAC will be formed to establish PPP to the destination operating system, and in fact, this will make the final connection easily formed. Now, a question may arise, what is the main task of LAC?

In fact, LAC is responsible for forming a security tunnel along with authentication for secure communication in the L2TP platform, which can organize the formed communication in a completely secure and encrypted platform. This is the reason why in such a process, of course, depending on the speed of the Internet, there may be disturbances in terms of work speed.

In fact, the main use of L2TP is to create a secure tunnel between two points on the network platform, where confidentiality of information is the priority of this protocol.


L2TP use cases and performance

Some of the most important uses of the L2TP protocol include:

  1. Support for L2TP services is implemented as a configuration protocol for VPN services.
  2. Full support for services related to setting up a personal VPN in a secure platform for a specific connection in a specific network.
  3. Providing delivery services for internet service providers. In fact, this protocol uses IP addresses of service providers to transfer user information from one place to another.
  4. Full connectivity to local networks as well as easy remote communication are other features of L2TP.


L2TP protocol agreement

L2TP protocol will encrypt L2TP using IPsec protocol. In fact, L2TP has components including contracts. The service contracts are in the secure platform and in the form of two main contracts ESP and AH. These contracts can do important things such as data access control, authentication of users, confidentiality of user information and even encryption of the type of Internet traffic.


Important features of the L2TP protocol agreement

  • L2TP/IPSec protocol uses 3DES or AES encryption method for encryption.
  • One of the important features of the L2TP contract is the use of a new encryption method, namely DES 3 or AES, which is remarkable in its own way.
  • L2TP protocol has lower speed for tunneling compared to protocols like Open VPN.
  • Another important feature of the L2TP protocol agreement is that L2TP is an advanced protocol in the field of VPN, which, of course, requires a lot of effort regarding its security and increasing its security.
  • Perhaps the downside of L2TP is that it can be easily filtered and blocked. Because this protocol uses fixed ports.
  • Layer 2 tunneling contract cannot be considered a stable contract due to its many complications.
  • The L2TP protocol contract cannot be considered as a stable contract due to its complexities.


The difference between WAF and firewall

This article explains the difference between WAF and firewall.

What is WAF or Web Application Firewall?

A WAF is a firewall for HTTP applications and applies a set of rules to HTTP traffic to protect it from common attacks such as XSS and SQL Injection.

WAF applications

  • Firewalls generally monitor network traffic, which means an extra layer of protection that scans all site traffic and defends the network against malicious bots and multi-vector attacks.
  • WAFs not only monitor the activities constantly, but also continuously strengthen the weaknesses of the web applications, the WAF scans the vulnerable points and will find and patch these points long before the user notices the weakness in the network.
  • Patching is not a permanent or long-term solution, but it gives the user the opportunity to fix the problem and prevent future network intrusions.


Advantages of WAF

Here are some of the benefits that a web firewall has for users and why having this system on your site is a great long-term investment:

  1. Prevents customer data from being compromised

A web application firewall ensures that customer data is not exposed to any malicious attacks and potential vulnerabilities.

  1. Wafs of acceptance cause desirability

This firewall ensures that data is handled strictly in accordance with HIPAA and PCI standards to ensure that data is fully organized and in order by blocking opportunities and weaknesses that give hackers the opportunity to attack.

  1. It saves resources

By automatically running security tests and monitoring traffic, WAF will save significant resources for the user.

  1. It prevents attacks

A web application firewall will prevent many attacks such as SQL Injection, Cross-Site Scripting (XSS) and Distributed Denial of Service (DDoS) attacks by monitoring traffic, running security tests and patching vulnerabilities.


The difference between WAF and firewall

And now the main topic of this discussion; The difference between WAF and firewall. The most important differences between the two are the following:

  1. They work in different ways

As we know, the firewall runs on the network, while the web application firewall is usually installed next to the applications, and these two have completely different functions. The firewall ensures the security of the network traffic of the applications, but the firewall focuses on the network itself and monitors and takes care of the traffic.

  1. They are located in different places in the network

In general, firewall is placed at the edge of the network, which is a buffer between familiar and trusted networks and unknown networks. While WAF stands before the application and servers, which makes it able to protect the server against any threat. This is the most basic distinction between firewall and WOF.

  1. They protect the system against different threats

Generally, standard firewalls are designed for this purpose to allow or deny access to the network, which will prevent unauthorized access to the network. For example, blocking access to pornographic and suspicious content from the school computer can be mentioned as an example of a firewall. But WAF usually focuses on protecting HTTP/HTTPS applications and servers to prevent them from being compromised. such as XSS and DDoS threats.

  1. They focus on different layers of the OSI model

The Open Systems Interconnection or OSI layer represents the internal tasks and functions of the standard network, and is actually considered a road map of the network. Firewalls focus on Layer 3 (Network) and Layer 4 (Transport) of the OSI model. Layer 3 is usually about transferring packets between nodes in the network, and layer 4 is about transferring data from a source to a destination host. While the main focus of the web application firewall is on layer 7 (applications), which are closer to the user. Layer 7 is generally the software or interface with which the user interacts with the network.

  1. They are different in terms of access control

Another point of difference between WAF and firewall is that the task of firewall of web applications is to monitor the network to prevent attacks on applications, not to limit access. WAF has nothing to do with controlling or restricting access, while access control is the main thing that a firewall does. Firewall settings usually change according to users’ needs and often firewalls are implemented to prevent access to folders, websites, networks – only those with proper credentials will be allowed access.

  1. Different algorithms in the difference between WAF and firewall

Since firewall and WAF are different in terms of design and performance, the user might expect that these two have different algorithms, which is completely correct. WEF uses Anomaly Detection Algorithms, Heuristic Algorithms and Signature Based Algorithms. But standard firewalls use proxy algorithms, packet-filtering algorithms, and stateless/stateful inspection algorithms.

  1. They implement DDoS protection at different points

Distributed Denial of Service or DDoS attacks are a type of attack that disrupts a network. This attack, as the name suggests, prevents access to the network by dumping an extra load on network access points. Both firewalls offer protection against DDoS attacks, but their protection positions differ. As WAF primarily deals with applications, it provides DDoS protection at the application layer, which is layer 7 of the OSI model. But standard firewalls take care of this against layer 3 and 4 of the network.

  1. They have different operating modes

WAF works in two different modes:

  • Passive mode In this mode, the web firewall does not do anything and does not secure the program’s network. The disabled mode should be used only for testing.
  • Active Inspection Mode In this mode, the Wi-Fi constantly scans and protects against any type of threat.
  1. The standard firewall has two modes

  • Routed Mode : This mode, which is the default firewall, implements static and routing protocols on level 3 and works like a network router.
  • Invisible mode ( Transparent Mode ): It works only on layer 2 and because of the connection of interfaces, it provides the possibility of sending invisible data and completely bypasses layer 3.
  1. There are different program protection levels

Just as these two firewalls differ in terms of design, function and location, they also differ in terms of the type of application-level protection. The firewall operates at layer 3 and 4 of the model and does not pay much attention to the application layer, which allows it to transfer data between networks. But the main task of WAF is to protect the layer 7 model or the application layer of the network, which means the security of the entire application layer, including applications, software, servers and interfaces that give the user direct access to the network.

  1. They have different uses

A WOF is placed in an area connected to the Internet and protects HTTPS/HTTP applications and servers. The purpose is to protect servers and applications. While the firewall means to protect each user as well as the network of people. A firewall is an effective element, but it generally takes care of the basic levels of the network. That’s why WAF is included to further protect the multiple layers of the network. With multiple firewalls, the network will be stronger and more secure.

A note on the difference between WAF and firewall

In this article, we have tried to explain the difference between WAF and firewall. Firewall and Web Application Firewall (WAF) are completely different in terms of functionality and design to make the network infrastructure secure and resilient for users. Knowing these differences will help you design and implement the best scenario for your business.

support hosting100