Archive

How to change remote desktop port in Windows Server

Using the RDP protocol is a common method for remote access to Windows servers . The default port used is 3389. You may want to change this port to increase server security. In this tutorial we will set the new port to 13276. Stay with us.

Changing the remote desktop port:

First, connect to the server and press Windows + R keys to open the Run window. Next, type regedit and press Enter.

Then follow the path below:

HKEY_LOCAL_MACHINE\System\CurrentControlSet\Control\Terminal Server\WinStations\RDP-Tcp

Find the PortNumber file and click on it twice and on the opened page, select Decimal from the Base section and set the Value data to 13276.

Next, port 13276 must be opened in the firewall.

Open a new RDP port in the firewall:

In the Windows search field, type firewall and enter the Windows Firewall with Advanced Security section and click on Inbound Rules and then click New Rule

Then select the Port option and click Next.

Next, enter the number 13276 in the corresponding box and click Next. (Note that the right options are selected by default)

Click Next again on the next page. (Note that the correct option is selected by default)

On the next page, according to network settings and connection type, select the desired option or options and click Next.

Then enter a desired name for it in the Name field and click on Finish. (In this tutorial, we chose the name NewRDP)

Next, restart the operating system.

Finally, enter Remote Desktop Connection and after the server IP, put the character: and then enter port 13276.

For example, as follows

216.58.208.78:13276

Here you are connected to the Windows server using the new port.

Note: If you ever want to return the RDP port to the default value, just do the above steps from the beginning.

Set the Value data to 3389, then enter the firewall and delete the value created in this tutorial named NewRDP from the Inbound Rules section, and finally restart the operating system.

How to Activate ionCube in cPanel

Activating ioncube is usually required for PHP-based programs and protects against cracked and unlicensed code execution and increases site speed. It is possible to activate ioncube in cPanel through ssh host control panel manually or through WHM. In this article, we will learn how to install and activate ioncube in cPanel through WHM.

What is ioncube?

ioncube Loader  is a PHP language module that was created with the purpose of preventing the display and the possibility of editing the code. ionCube module helps speed and security of your site. Basically, ionCube is a dedicated PHP encoder for protected functions in PHP programs.

ionCube converts readable source code in PHP files to unreadable bytecode. For this, Loader  ioncube must be installed on the server and available to PHP. ionCube Loader is free and available for almost all operating systems like Windows, Linux, FreeBSD, etc.

To check if ionCub is installed on your virtual server, create a page with the following content and read the generated report:

<?php phpinfo(); ?>

If the ionCube Loader is not active, you may encounter the site error: the ioncube php loader needs to be installed error when loading the site or template, as shown in the image below.

To install WordPress templates, this loader must be active on your site so that you can launch any type of WordPress site. In recent years, the number of store sites that have been launched with WordPress has increased. If you are a business owner or want to earn money by designing a website, WordPress store training is for you to learn from the basic concepts to the SEO of a store website.

2- Building a database on the local host

Activate  ionCube in cPanel

As we said, to use ioncube encoded and PHP encoded files, the ionCube Loader file is needed on the server. Ioncube Loader is usually installed on shared servers and virtual servers that use PHP5. Otherwise, ask your hosting support to enable this on your hosting.  we installed the ionCube module on Laragon’s local host.

We will check the activation of ioncube in cPanel host around the method:

  • Activating ioncube in cPanel is through the control panel
  •  Activate ioncube in cPanel through WHM

Activating ioncube in cPanel is through the control panel

  • Log in to your cPanel host and click on ” Select PHP Version ” from the ” SOFTWARE ” section.
  •   Check the Ioncube_loader ,  Pdo ,  Soap  and  Sourceguardian options according to your needs

  • Click save after making changes.

Activate ioncube in cPanel through WHM

WHM stands for Web Host Manger, meaning web hosting manager, the name of a powerful program from cPanel and is used alongside cPanel. WHM is accessible to senior and middle managers. You can also use WHM to install ioncube loader on the host.

  • Log in to WHM as root user.
  •  Go to   Home->Software->EasyApache 4  Click on EasyApache in the left bar .

  • Click the Customize  button in the Currently Installed Packages section.
  • In the left menu, go to PHP Extensions and select the desired ionCube . For example (ionCube 10 loaders for PHP 7.0).
  • To see the changes being applied, go to Review and click the Provision button to apply them .
  •  ionCube loader will be installed.

  • Go to Server Configuration -> Tweak Settings -> PHP .
  • In the CPanel PHP loader, check the ioncube option.
  • Click the save button.

By activating Ioncube, you will help increase the speed and  security of your site. Installing ioncube on cPanel can be configured manually through ssh. In this article, we discussed the activation and installation of ioncube loader on the Cpanel host through the control of Penny Cpanel and WHM. Share your questions and problems about ioncube and its installation and activation in the comments.


How to install CPanel and WHM in simple language

How to install Cpanel? Hello, in this part of the tutorials for installing control panels, I want to install cpanel / whm on the traditional OS 7 distribution. This tutorial is for vps and real servers. We will start by logging in as the root user through ssh. The first task in each The Linux system is easy to update the repositories and install an editor, well with the command

yum update


We update the repositories. Now with the order

yum -y install nano 

We will install the nano editor because it is needed, then we can also use the vi editor, but it is difficult for me to work with it. Well, now we have to assign a half host to the server, and it is better to set this half host with the command Assign a half-host to it in the following format

hostname server.youtdomin.com

For example

hostname server01.tosinso.com

Well, now we have to install the Perl package which is a prerequisite. I will install it with the following command

yum -y install perl

After the installation, go to the home folder.

cd / 
cd /home

And at this stage, we need to download the cpanel / whm installation file. There are 2 ways to get the installation file

1- Download manually and transfer it with a software like winscp

2- Download through the command inside the terminal

I use the second way, which is easier

There are two ways to download through the command, one through wget and one through curel.

yum -y install wget

And then we type this command to download the installation file

https://securedownloads.cpanel.net/latest

We enter the following command through curel

curl -o latest -L https://securedownloads.cpanel.net/latest

Now it’s time to install the file, we will install the file with the following command

sh latest

At the end of the successful installation, you will see a message like this

Thank you for installing cPanel & WHM

Congratulations, you have successfully installed cpanel / whm to access the whm panel through the address in the following format

https://your-server-ip:2087

In your browser, where the password is your root password and the user is root, it is available on the cpanel from the address in the following format

https://your-server-ip:2083

Is my computer hard drive HDD or SSD? SSD drive diagnosis guide

SSD drives have been used as a reliable alternative to old HDDs in the computer and laptop industry for several years. But how to recognize the SSD drive in the computer?

SSD memories are superior to old HDDs in terms of data transfer speed and reliability, but the capacities of SSDs in the current market are lower than the capacities of HDDs, although this difference is expected to decrease in the future.

If you have an old computer or laptop that is more than 10 years old, it probably used an HDD. But if you have a newer system, you have to use special methods to determine what type of storage drive it has.

Your laptop may be old, but you have updated it by upgrading the laptop hard drive to SSD. The important question is, how to identify an SSD drive? In this article, we want to explain to you some tricks to identify the type of computer storage drive, SSD or HDD.

With the help of these tricks, which are sometimes done with the help of SSD or HDD drive detection software, there is no need to open the computer case and check the appearance of the hard drive because in some systems, especially laptops, accessing the hard drive driver is difficult and has its own risks.

If you want to know how to detect SSD drive in computer, stay with us until the end of this text.

SSD drive detection in Windows 7, 8 ,10 and 11

There are different ways to detect the SSD drive, some of which can be done with the help of Windows’ own features, and others are used using third-party software.

As for Windows methods, in different versions such as Windows 7 or 10, the working method may be slightly different, but the general principles of SSD drive detection are almost the same in all versions of Windows operating system. In this section, we explain these methods separately.

There are similar methods for detecting the SSD drive in Windows versions. We explain each of these methods briefly in this section:

1. Use Disk Defragmenter to detect SSD drive

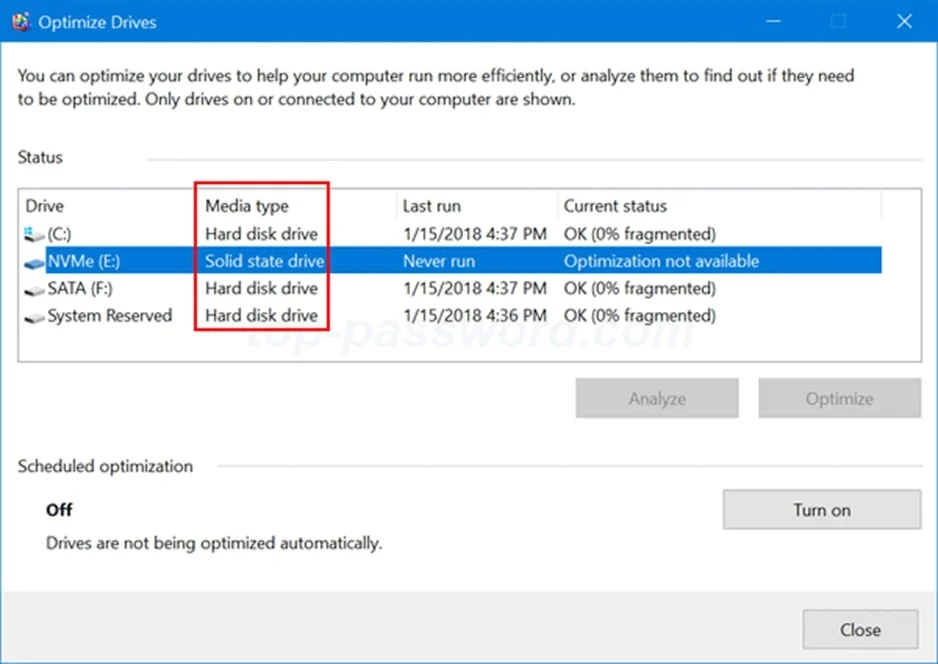
A simple way to detect an SSD drive in older versions of Windows is to use Disk Defragmenter. To do this, open the Run window by pressing Win + R and type dfrgui and press enter.

In the Disk Defragmenter window, in the Media type column, you can see the type of hard drive used in your computer or laptop.

In this column, if the term Solid state drive is written, the type of work is SSD, and if Hard disk drive is written, the desired hard drive type is HDD. Some computers may have a combination of both drives.
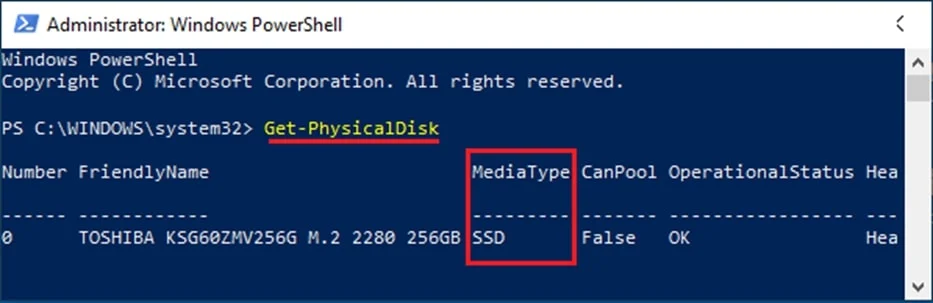
2. Using PowerShell

Another quick way to detect the SSD drive in laptops and computers is to use the PowerShell tool, which is included in Windows 10 and later versions.
To use this tool, right-click the Start button and click PowerShell (Admin).

Then in the PowerShell page, type Get-PhysicalDisk and press Enter. As soon as the command is executed, a list of your system’s hard drive type will be displayed in the Media Type column.

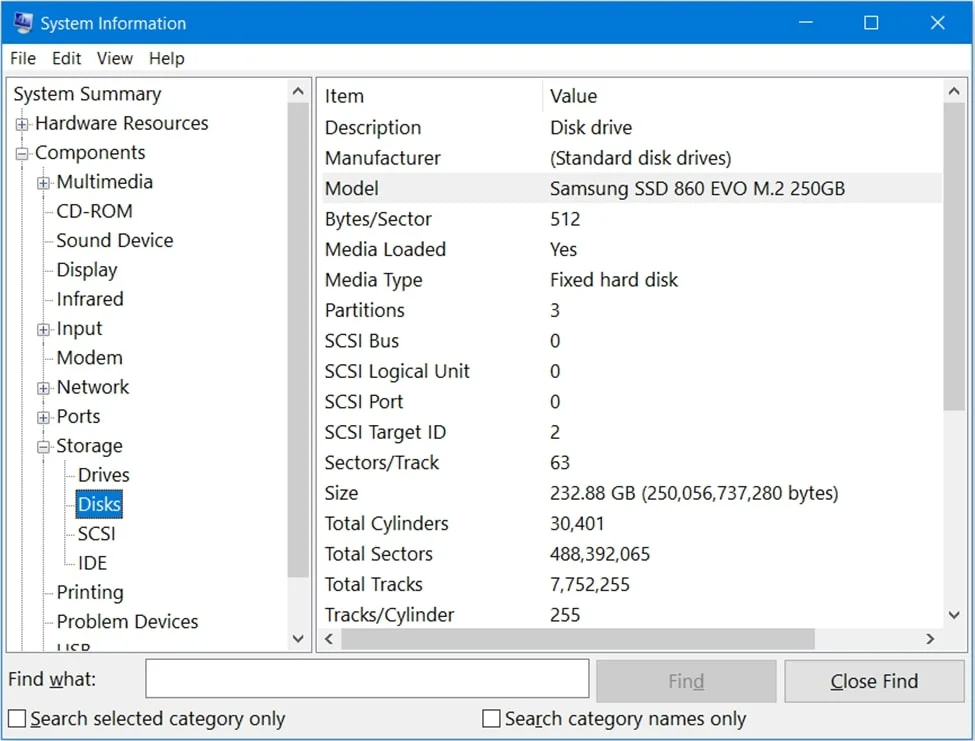
3. Using System Info

There is another method in Windows to detect the type of hard drive and detailed information about the type of hard drive, RAM, processor and other parts. For this purpose, it is enough to enter the System Information page to see all this information.

To use this feature, right-click on the Start button and select Run. In the Run window, type msinfo32 and press Enter.

On the next page, go to Components > Storage > Disks from the left panel and on the right page of this section, complete specifications of your hard disk are provided. Usually, in front of the term Model, the type of hard drive and the brand of its manufacturer can be seen.

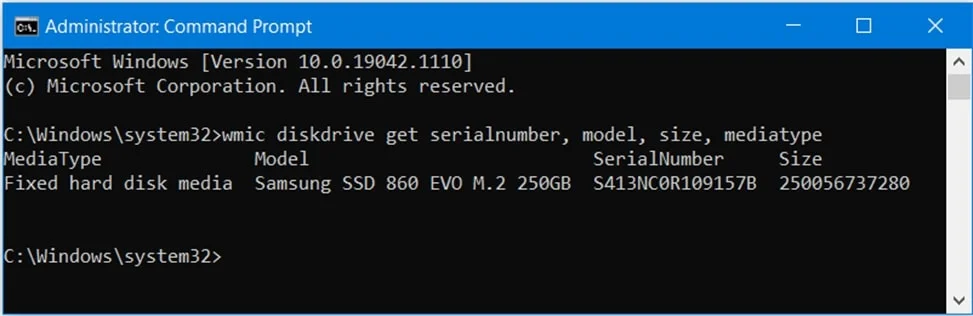
4. Using Command Prompt

One of the other ways to detect SSD drive in computer and laptop is to use Command Prompt. With the help of this method, other additional information can be seen such as head number, capacity, etc. To use this method, press Win+S to open the search toolbar.

Then type cmd and press enter. In the search results, look for the Command Prompt application and right-click on it, and select Run as Administrator. Copy the following command into the Command Prompt window and press Enter:

wmic diskdrive get serial number, model, size, media type

By doing this, the specifications related to the hard drive will be displayed, including the manufacturer’s name, serial number, capacity and other specifications. Also, in the mode column, the type of disk work including SSD or HDD can be recognized.

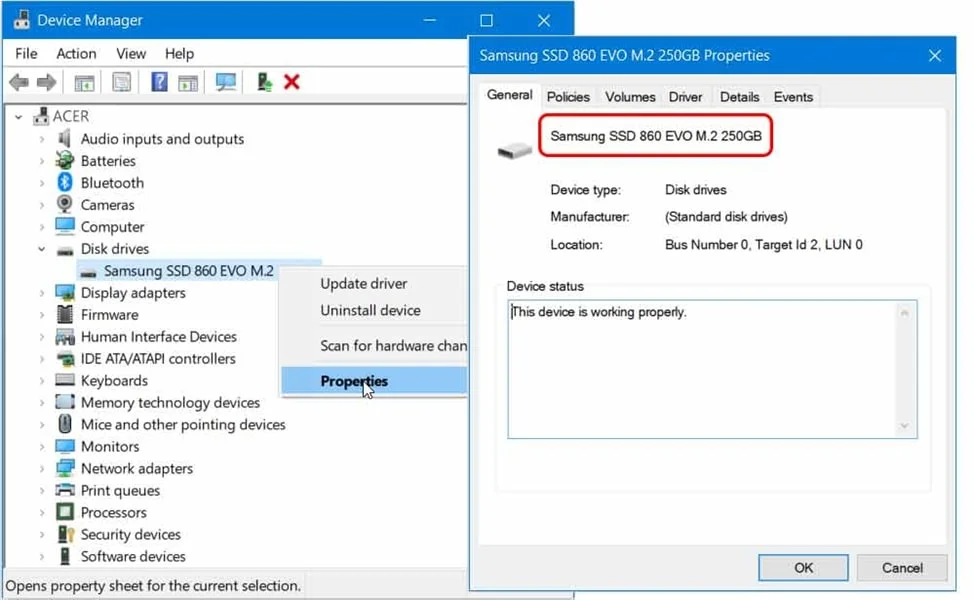
5. Using Device Manager

Using Device Manager is another simple way to detect SSD drive in Windows. To access this section, press Win+X keys. Then select Device Manager from the displayed bar and open Disk drive from the left panel.

In the drop-down menu of this section, right-click on the name of your hard drive and select Properties. In the window that opens in the General tab, the specifications of your system’s hard drive can be seen.

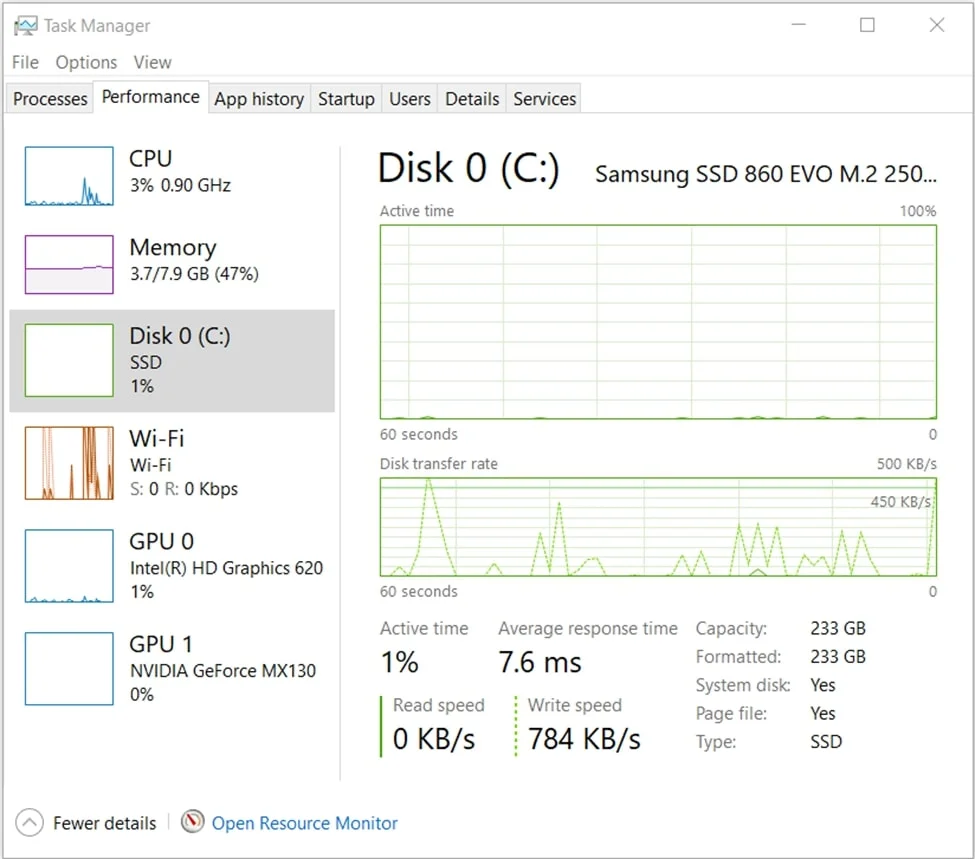
6. Using Task Manager

One of the easiest ways to detect the SSD drive of a laptop and computer is to use Task Manager. To access this section, press Ctrl+Alt+Del and go to the Performance tab in the Task Manager window.

In this section, graphs related to the use of computer resources such as CPU, memory and hard drive are displayed. Click on Disk 0 in the left panel. On the right page, all information about the hard drive will be visible. If the system has an SSD drive, then the word SSD will be displayed in front of the Type.

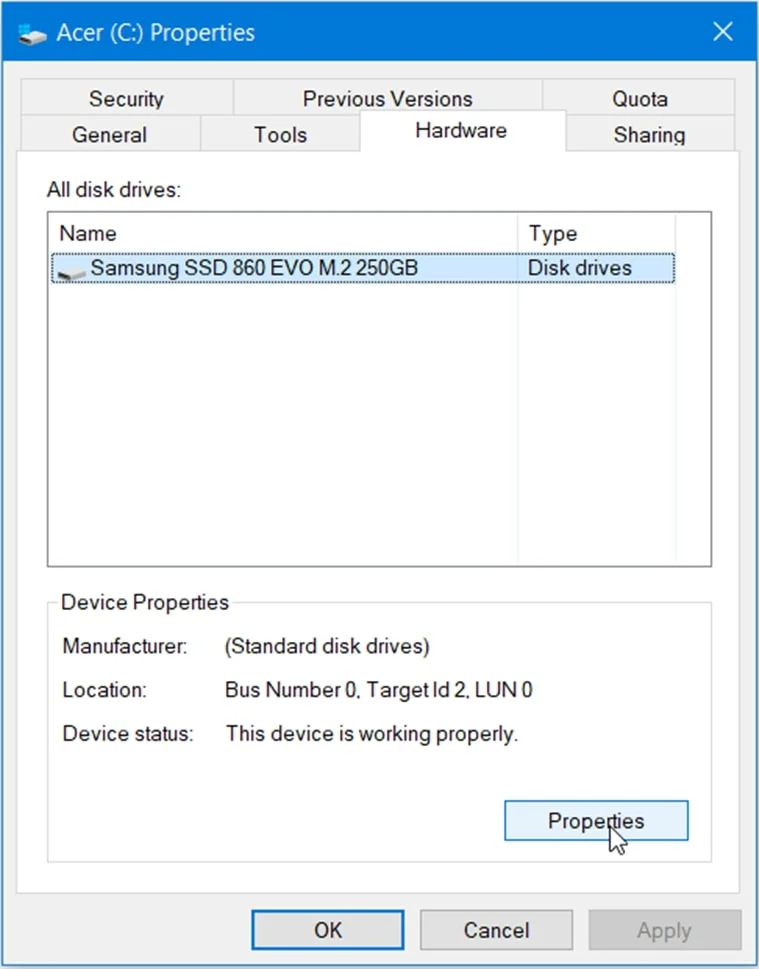
7. Using Windows Explorer

You can also identify the SSD drive by referring to Windows Explorer. For this purpose, enter Windows Explorer by clicking on the Taskbar menu, or by pressing the Win+E keys. In File explorer, right-click on the first displayed drive and select Properties from the desired menu.

Then select the Hardware tab in the Properties window. In this section, your system hard drive is shown. For more information, you can also click the Properties button at the bottom of the window.

SSD drive detection in Windows 11

All the solutions mentioned in the previous section can also be used to detect the SSD drive in Windows 11. But another simple method is provided for users in this Windows through Settings, which can easily identify the hard system.

For this purpose, select Settings from the Start menu. Then select System from the left panel and then Storage. In the next step, click Advanced storage settings and select Disks & volumes. In this section, information about your storage drive will be displayed.

SSD drive detection software

Finally, we will introduce softwares that are provided to detect SSD drives in laptops and computers.

The most famous program is CPU-Z, which gives you comprehensive information about all computer hardware, including the hard drive.

Also, other popular programs such as Speccy, HWiNFO and PC Wizard are provided for this purpose. Working in the environment of these programs requires practice, and it may not be possible to distinguish at first glance which section contains the information related to the hard drive or other parts. Also, the major drawback of some SSD drive detection programs is that they are not free.

Therefore, our recommendation is to identify the information about the hard drive of your laptop or computer from the Windows tools that we talked about in the previous section.

final word

There are different ways to detect the SSD drive in Windows. Fortunately, the Windows environment itself has several tools for detecting the SSD or HDD installed on the system, which are easily and freely available.

In this article, we explained some tricks to detect the type of computer hard disk, SSD or HDD, most of which can be used in Windows 7 and later versions. We also introduced some SSD drive detection software in laptop or computer.

In general, if you are using the Windows operating system, our recommendation is to use its tools such as Device Manager or PowerShell to detect the SSD or HDD drive. This work takes less time and does not have the problems related to software installation, including the lack of access to free versions and the complexity of the work environment.

How to change time zone in CentOS?

While setting up a new server, you may often have to set the time zone. In certain cases, you may want to change your time zone.

Setting the correct time zone on servers is something that many of us forget. Setting the wrong time zone will affect your server log and logs. That’s why in this tutorial, we will show you how to set a time zone in CentOS 8.

Setting the correct time zone for your CentOS-based VPS is important to accurately log time events, otherwise you may end up with a wrong date and time event being logged in the error log.

Apart from logging and reporting, another very important factor is the time set for cron jobs and automated items. By setting an inappropriate time zone, the trends may be considered at a different time than the real time. Fortunately, if you want to set the time zone on CentOS 8, you only need to use a few simple commands!

In general, not setting the correct time zone won’t kill your performance, but it will definitely improve your workflow and easily avoid unclear reports.

So let’s learn how to set time zone in CentOS 8.
How to check the zone set in CentOS 8

First of all, we need to access your VPS server using SSH. If you have problems, refer to the tutorial on how to use PuTTY – SSH Terminal!

You can check your current time zone as shown below:

date

This command outputs the time in the following format:

Fri Mar 15 14:52:20 UTC 2024

You can also use the timedatectl command. This command can do the following for you:

Review dates and times
Change the date and time
Set a time zone for the system
Enable automatic clock synchronization based on a remote server

The main command is as follows:

timedatectl

Local time: Fri 2019-03-15 14:54:51 UTC
 Universal time: Fri 2019-03-15 14:54:51 UTC
       RTC time: n/a
      Time zone: Host (UTC, +0000)
    NTP enabled: n/a
NTP synchronized: yes
RTC in local TZ: no
     DST active: n/a

It contains information such as local time, world time and time zone.
How to list timezones in CentOS 8

Once you see your current time zone, you may want to list all available time zone options. The following command can be used to list all time zone options:

timedatectl list-timezones

You will get a long list showing all the time zones in alphabetical order.
You can refine your search by adding filters using grep patterns.
One of these examples is as follows:

timedatectl list-timezones | grep Pacific

How to synchronize the clock in CentOS 8

Network Time Protocol (NTP) is an Internet protocol commonly used to synchronize system clocks on different computers. The timedatectl command can configure the system time zone to automatically synchronize with a remote server using NTP.

To enable this, we must first install NTP on the system. To start synchronizing with a remote NTP server, use the following command:

timedatectl set-ntp true

If you want to revert these changes, use the following command. This disables time synchronization:

timedatectl set-ntp false
support hosting100