Archive

How to install and configure phpMyAdmin on Ubuntu Linux

In this article, we are going to learn how to install and configure phpMyAdmin in Ubuntu Linux. phpMyadmin is the best web-based client to access MySQL servers. This client is available for free to download and install on the server.

You can use this tool on any server running Apache and PHP. It should be noted that phpMyAdmin is written in PHP and its current version is compatible with PHP 7.1 and MySQL 5.5 or MariaDB 5.5 and newer.

Step 1) Install Apache and PHP

Here we assume that you have already installed MySQL server on Ubuntu system. Therefore, we install only other necessary packages. These packages will be required to launch and access phpMyAdmin.

1
2
3
sudo apt install apache2 wget unzip
sudo apt install php php-zip php-json php-mbstring php-mysql

After completing the installation, activate and run the Apache web server.

1
2
3
systemctl enable apache2
systemctl start apache2

Step 2) Install phpMyAdmin on Linux Ubuntu 20.04

Of course, phpMyAdmin is also available in default package sources, but in many cases, these sources contain old versions. In this tutorial, you will get the latest version of phpMyAdmin and set it up in the system.

Now your system is ready to install phpMyAdmin. You can download the latest archive of phpMyAdmin from its official page or use the following commands to download phpMyAdmin 5.0.2 on your system.

After receiving the archive, extract it and move it to the appropriate place.

1
2
3
4
5
wget https://files.phpmyadmin.net/phpMyAdmin/5.0.2/phpMyAdmin-5.0.2-all-languages.zip
unzip phpMyAdmin-5.0.2-all-languages.zip
mv phpMyAdmin-5.0.2-all-languages /usr/share/phpmyadmin

Then create the tmp directory and set the necessary permissions.

1
2
3
4
5
mkdir /usr/share/phpmyadmin/tmp
chown -R www-data:www-data /usr/share/phpmyadmin
chmod 777 /usr/share/phpmyadmin/tmp

Step 3) phpMyAdmin settings in Ubuntu Linux

Now it’s time to set up the web server to serve phpMyAdmin on the network. Create an Apache configuration file for phpMyAdmin and edit it in a text editor.

1
vi /etc/apache/conf-enabled/phpmyadmin.conf

Add the following content to the file.

1
2
3
4
5
6
7
8
9
10
11
12
13
14
15
16
17
18
19
20
21
22
23
24
25
26
27
28
29
30
31
32
33
Alias /phpmyadmin /usr/share/phpmyadmin
Alias /phpMyAdmin /usr/share/phpmyadmin
<Directory /usr/share/phpmyadmin/>
AddDefaultCharset UTF-8
<IfModule mod_authz_core.c>
<RequireAny>
Require all granted
</RequireAny>
</IfModule>
</Directory>
<Directory /usr/share/phpmyadmin/setup/>
<IfModule mod_authz_core.c>
<RequireAny>
Require all granted
</RequireAny>
</IfModule>
</Directory>

Save the file and close it.

After you have made all the changes, be sure to restart the Apache server to restore all the settings.

1
2
3
sudo a2enconf phpmyadmin
sudo systemctl restart apache2

Step 4) FirewallD settings

In a system that has an active firewall, there is a need to allow the HTTP service through the firewall. You can open a port for the web server in the firewall using the following commands.

1
2
3
sudo firewall-cmd --permanent --add-service=http
sudo firewall-cmd --reload

Step 5) Access phpMyAdmin in Ubuntu

The job is done and you have installed phpMyAdmin on your Ubuntu Linux system. Now it’s time to access phpMyAdmin with server IP address or domain name.

1
http://your-server-ip-domain/phpmyadmin

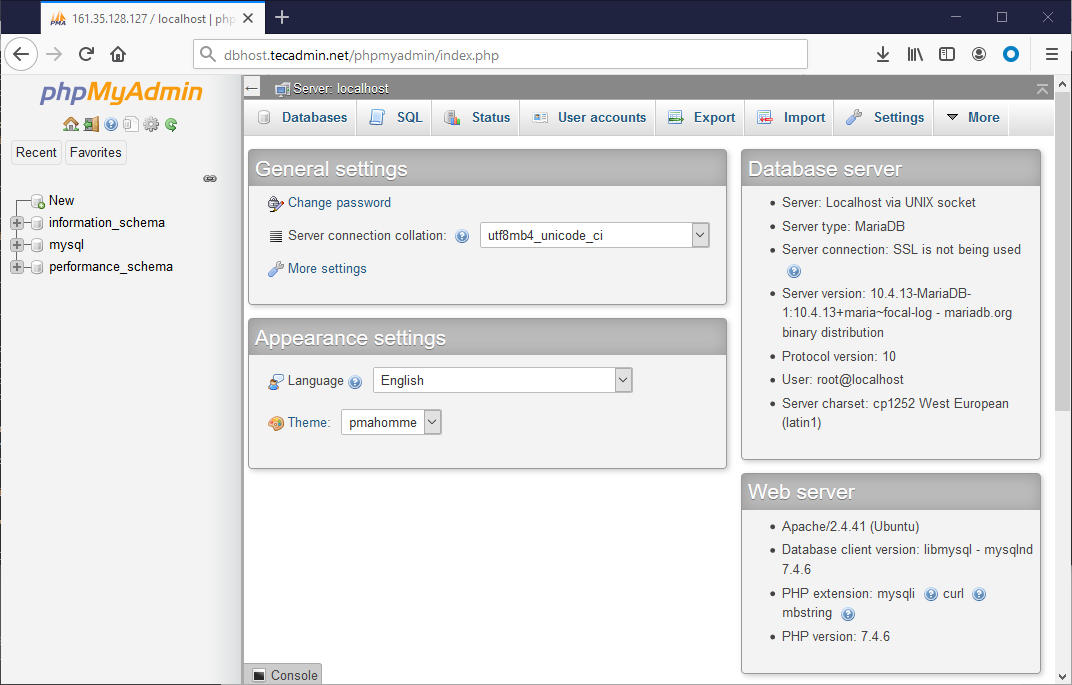
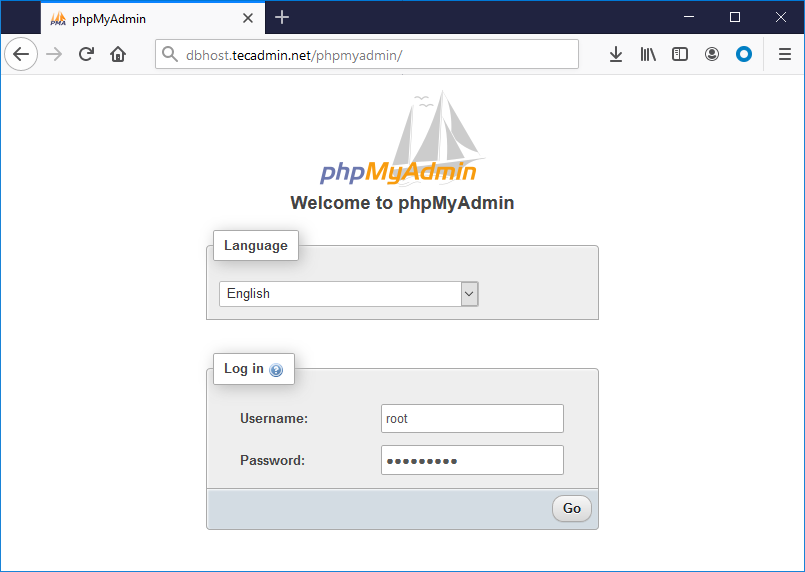
Replace your-server-ip-domain with localhost (for local systems) or system IP address for remote systems. Here the DNS is updated and dbhost.tecadmin.net is pointed to the server IP address.

How to install phpmyadmin on Ubuntu 20.04

Log in to the command line with the username and password to access MySQL.

Setting up phpmyadmin – Ubuntu 20.04

Conclusion

In this article, you learned how to set up phpMyAdmin in the Ubuntu system and you have successfully set it up. However, due to security considerations, you should disable root user login for phpMyAdmin.

Installing ionCube Loader on CentOS 8 Linux operating system

ionCube loader is a library used to run encrypted ionCube files on the server. Installing this library will be necessary to decode ionCube files. These files must be decrypted before execution. ionCube also provides the possibility to encode php scripts to secure them. This will prevent unauthorized access to them.

ionCube loader library

In this tutorial, we will help you learn how to setup ionCube loader with php on CentOS 8.

prerequisites

  • Shell access to a CentOS 8 system with a user account with sudo permission
  • Complete initial server configuration for newly installed systems.
  • Installing PHP and Apache on CentOS 8

Step 1) Download ionCube Loader

First of all, you need to install the latest version of this library on your system. One method for this is the ioncube download page . Meanwhile, you can also use the following command to get the ionCube loader archive for 64-bit systems.

1
wget https://downloads.ioncube.com/loader_downloads/ioncube_loaders_lin_x86-64.tar.gz

After receiving this file, extract it to /usr/local/ioncube directory. Of course, you can change this position as you wish.

1
2
3
tar xzf ioncube_loaders_lin_x86-64.tar.gz
sudo mv ioncube /usr/local/

Step 2) Activate the ionCube library in PHP

Edit the php.ini file and add the following line to its end. You can use the following command to find the php.ini file.

1
2
3
4
5
php -i | grep php.ini
Configuration File (php.ini) Path => /etc
Loaded Configuration File => /etc/php.ini

Now find the active version of php on your system.

1
php -v

According to the above results, edit the etc/php.ini file and add the following line to the end of the file.

1
zend_extension = /usr/local/ioncube/ioncube_loader_lin_7.2.so

Change the file /usr/local/ioncube/ioncube_loader_lin_7.2.so according to your php version.

Step 3) Check Ioncube Loader

Now it’s time to install and configure the Ioncube PHP module. For this purpose, run the command php –m in the shell.

1
2
3
4
5
6
7
8
9
php -v
PHP 7.2.11 (cli) (built: Oct  9 2018 15:09:36) ( NTS )
Copyright (c) 1997-2018 The PHP Group
Zend Engine v3.2.0, Copyright (c) 1998-2018 Zend Technologies
with the ionCube PHP Loader + ionCube24 v10.3.9, Copyright (c) 2002-2019, by ionCube Ltd.

Conclusion

Here, you learned how to configure ionCube loader with php in CentOS 8 operating system. We hope this article has been of use to you.

All about data backup on server

If you store customer or personal data on a virtual server, it will be important for you to back up the data at regular intervals. For various reasons, data may become unavailable or encounter problems. including accidental deletion, inappropriate settings, hacker intrusions, and software upgrades that change previous settings. Having a recent backup can make data recovery in these situations much easier.

Check needs

Data backups are not created equal for all systems. Before you make your first backup or plan to back it up at regular intervals, you should first find out exactly what tool is right for you.

What to back up?

What is on your server that would be difficult or impossible to replace if lost? Here are some examples to make predictions from the data.

  • CMS websites: Data-driven websites such as those built on WordPress, Drupal, or Magento that use a database to store content.
  • html websites: If you have a standard html website, it’s probably enough to just back up your public directory.
  • Email: If you are using a virtual server as an email server, you should back up the raw email files.
  • Multimedia files: Be sure to back up images, videos, and audio files.
  • Customer data: Sales data and customer financial transactions are usually stored in a database. Therefore, you should definitely consider a backup database storage location.
  • Custom setup: If your virtual server is particularly custom or takes a lot of time to set up, you should consider backing it up as a whole. Software settings are the minimum you should consider for data backup. Naturally, public content also includes this support.

Once you have identified the items to back up, locate them on the server. Note the specific paths and database of each item.

The type of support version you provide will also matter. Because the format affects what you can do with it. In this case, you should consider the data recovery conditions. Based on this, you will choose the right type of backup. There are two basic types of backups. File system backup and database dump.

System file backup

It will be useful to make a copy of all or part of the system files along with the structure and permissions for html files, software settings files, emails and multimedia files. If you later want to restore the copied system files to the virtual server, they will have the same functionality as before. A full-server snapshot is a comprehensive file system backup that captures all the characteristics of your server up to a specific point in time. If you back up files without their permissions, you will prolong the recovery process.

Database dump

Filesystem backups are not always the best choice for backing up data. A full server backup can restore your database, but be aware that the raw database files in the backup remain virtually unused. Accordingly, running a SQL dump or something like that will work better. In this case, you get a readable file of SQL commands that can be easily transferred to another server and another database of the same type.

Finally, select the backup type, which can be a filesystem dump, a database dump, or both. If both of them are intended to be used, a database dump must be prepared first, and then this dump file can be saved as part of the file system backup.

Time to back up data

The next thing to consider is the time intervals you want to back up your data. Your decision will depend on how often changes are made to your server and how critical these changes are to you. Here are some common time frames.

  • Online store: at least daily.
  • News site or blog: as often as you update.
  • Development Server: When you make changes.
  • Game server: at least daily.
  • Static sites with fixed content: every 6 months or after any major changes.
  • Email server: at least daily.

Your needs in this field will make you perform backup manually or automatically.

Where to store backups?

Now you need to think about where to store the data after it is backed up. Here are some of the most common backup storage locations.

  • Same Server: This is the easiest place you can use to store backups. But keep in mind that if your server is attacked at the root level or your data is accidentally deleted, your backup copy will also be unavailable.
  • Another server: You can store your backup data on another server. This is one of the safest solutions in this field.
  • Personal device: You can back up your desktop computer to a portable hard drive. However, your home office cannot be as secure as a professional data center. You should also consider the hardware quality of your hard drive.

You should also consider how many backups will fit on your storage platform. Many people want to have at least two backups (an older, reliable version, and the latest version) or even all versions. The more of these backups you can have, the better off you will be; Of course, as far as the capacity of your storage space allows.

Backup circulation

Finally, you need to decide how many backups you want to keep and how many to keep at a time. Of course, having a backup is better than no backup at all. However, most people want to have at least two backups. For example, if you replace backups daily and don’t keep any older versions, you’ll have no chance if you notice a hack in the week before. The safest option is to store backups at consecutive intervals without overwriting each other as much as possible. You just have to be careful that the size of the data backup storage does not exceed the amount of memory you have available for this purpose. Also, a variety of backups that include compression and other optimizations will make things easier for you.

Choosing the right tool for data backup

Once you have a good understanding of your backup needs, you need to choose a suitable tool for this purpose. At this point, you should have a good understanding of the following.

  • What files and databases you want to back up.
  • When do you want to make new backups?
  • Where do you want to store your backups?
  • How many of your old backups you want to keep as files.

In this tutorial, we will examine 4 different tools for data backup and see how these tools meet the criteria.

Rsync


Rsync is a free file copy tool that we recommend using. This tool is considered one of the best tools for data backup for a reason. Including:

  • Simple settings. Meanwhile, many advanced settings are also available.
  • Easy settings to do things automatically. Rsync commands can be configured as cron jobs.
  • high efficiency. Rsync only updates files that have changed; A topic that saves time and disk space.

Meanwhile, you need to master the basic level of working with the command line to perform backups and restore files.

  • Backup Data: You specify the path for this filesystem backup.
  • Backup time: The base command is manual. At the same time, you can set it to run automatically. Next, we will learn how to set up Rsync for daily backups.
  • Storage location: You specify the destination. You can save in another folder on the server, another Linux server or your home computer. As long as you can SSH between the two systems and both can run Rsync, you can store your backup anywhere.
  • Circulation of Versions: Basic circulation is manual. However, if you make the right settings, you can store all the older backups in a small space.

MySQL backups

Data stored in a database can change rapidly. Running a MySQL dump is probably the best way to back up a database. If you only take a snapshot or any other backup that copies your files, the raw database files will remain intact and should be properly exploited during a full server recovery. But maybe you don’t expect such a thing.

  • Backup data: databases and tables
  • Backup time: The base command is manual. At the same time, you can set it to run automatically.
  • Storage location: By default, the backup file is downloaded on the storage server or on your home computer. In any case, it will be possible to change the storage location of this file.
  • Circulation of Versions: Basic circulation is manual.

Follow these instructions to make readable backups of databases and move them to a new database server.

Tar

The Tar tool can copy and compress your files and store them in a small backup file on the server. As a result, you will have the following advantages.

  • Save system disk space.
  • Reducing backup data transfer volume if using remote storage.
  • Ease of working with the backup copy due to the existence of a separate file.

Also note that you need to unzip the backup file to use it for recovery. You cannot easily open it and search its folders.

  • Backup Data: You specify the path for this filesystem backup.
  • Backup time: The base command is manual. At the same time, you can set it to run automatically.
  • Storage location: By default, the backup file is stored on the server. If you want to save it somewhere else, you have to do it manually.
  • Circulation of Versions: Basic circulation is manual. The compact nature of backup files makes it easier to maintain multiple copies of them.

Here is the basic tar command.

1
tar pczvf my_backup_file.tar.gz /path/to/source/content

Explanation of the options in the tar command

p or –preserve-permissions: Preserve permissions

c or –create: Create a new archive

z or –gzip: Compress the archive with gzip

v or –verbose: Show files being processed

f or –file=ARCHIVE: The next argument will be the name of the new archive

Rdiff-backup

Rdiff-backup is a tool designed to perform “staggered” backups. As its website explains, the idea behind this tool is to combine the best features of mirrored and staggered backups. You end up with a copy of your system files that you can still access older files in.

  • Backup Data: You specify the path for this filesystem backup.
  • Backup time: The base command is manual. At the same time, you can set it to run automatically.
  • Storage location: You specify the destination. You can save in another folder on the server, another Linux server or your home computer.
  • Version rotation: All old and new backups are kept.

Manual backup with Rsync

In this part of the tutorial, we will discuss how to use Rsync in the form of an example. For other tools introduced above, the working steps are similar. This backup is done manually and once. The files are saved on the system where you run the command. So make sure you are logged in to the computer or server where you want to save the backup.

Here, we refer to the server where you want to back up the data as production_server, the server or computer where you want to store the backups as backup_server or personal_computer. Examples will be for production_server based on Ubuntu 12.04 LTS and various types of servers and PCs.

Follow the steps below to manually back up the server.

1) Install Rsync on backup_server and your server using the following command.

1
sudo apt-get install rsync

2) Now run the rsync command through backup_server or personal_computer.

1
rsync -ahvz user@production_server:/path/to/source/content /path/to/local/backup/storage/

3) When the corresponding message appears, enter the SSH password for production_server. Here you can see the list of files that will be copied. Finally, you should see a confirmation message similar to the one below.

1
2
3
sent 100 bytes  received 2.76K bytes  1.90K bytes/sec
total size is 20.73K  speedup is 7.26

simply! You can double-click on the folder you assigned to your local storage to verify the correctness of the copied data. In the next parts of this tutorial, we will discuss how to automate data backup.

Setting up automatic backups on a Linux server

In this section, we will use the Rsync tool to perform daily backups. We will save these backups in separate folders with the title of different days. In this case, you will only need a little more space from the production server. Because you save similar files as “hard links” and not as separate files. Of course, if you have large files that change constantly, you will need more space.

This process is ideal for those who want to automatically store their backups on another Linux server. In fact, this is the easiest and safest way to do this. It can also be used to back up a PC. For example, whenever the computer starts up, the data backup will start.

  • Backup Data: You specify the path for the filesystem backup.
  • Backup Time: This is an automatic daily backup.
  • Storage Location: The files are stored on the system where you run the command. So be sure to log in first to the server or computer you want to save the backups to.
  • Version rotation: All old backups are kept. Disk space is optimized by using hardlinks to create similar files.

Follow the steps below to set up automatic data backup to a Linux server.

1) Install rsync on both servers using the following command.

1
sudo apt install rsync

2) On backup_server, create an SSH key without a password using the following command. When prompted for a password, press Return. Do not enter any password.

1
ssh-keygen

3) Copy the public key to production_server via backup_server. This is done according to the following commands.

1
2
3
scp ~/.ssh/id_rsa.pub user@production_server:~/.ssh/uploaded_key.pub
'ssh user@production_server 'echo `cat ~/.ssh/uploaded_key.pub` >> ~/.ssh/authorized_keys

4) Try to connect to production_server through backup_server by running the following command.

1
ssh user@production_server 'ls -al'

5) Create a directory to store backups in backup_server.

1
mkdir ~/backups/

6) Now create a manual backup of the data and save it to ~/backups/public_orig/. This is the version against which all future backups are checked. From backup_server, enter the following command.

1
rsync -ahvz user@production_server:~/public ~/backups/public_orig/

Now you should see a set of folders. You will also see a confirmation message similar to the one below.

1
2
3
sent 100 bytes  received 2.76K bytes  1.90K bytes/sec
total size is 20.73K  speedup is 7.26

7) Now you need to create a command to backup data automatically and scheduled. Below is an example of this command that you can modify to suit your needs. Run the following command manually from backup_server to avoid any errors.

1
rsync -ahvz --delete --link-dest=~/backups/public_orig user@production_server:~/public ~/backups/public_$(date -I)

8) The output should look something like what was previously produced in step 6. Be sure to check the ~/backups/ folder to make sure you did it correctly.

9) Add the command to cron to run automatically every day. Edit the cron file in backup_server using the following command.

1
crontab -e

Tip: If this is your first time running this command, choose your favorite text editor.

10) Add the following line to the end of the file. This is the same line that was added in step 7 with the same cron information as in the beginning. Using this command, cron will automatically run rsync to back up the data on the top server at 3am.

1
0   3   *   *   *   rsync -ahvz --delete --link-dest=~/backups/public_orig user@production_server:~/public ~/backups/public_$(date -I)

Backup is now set for you automatically. If anything goes wrong with the server, you can always restore it from a backup.

Set up data backup to a desktop computer

Now that you know how to back up from one server to another Linux server, it’s time to back up to the desktop computer. There are several reasons for doing this. One of the reasons is that it is cheap. You can store everything on your home computer without paying for two virtual servers. Also, this option will be very useful for those who want to have their own development environment.

  • Backup Data: You specify the path for the filesystem backup.
  • Backup Time: This is an automatic daily backup.
  • Storage Location: The files are stored on the system where you run the command. So be sure to log in to the computer you want to save the backups to first. In this section, data backup is supposed to be done on the desktop computer.
  • Version rotation: All old backups are kept. Disk space is optimized by using hardlinks to create similar files.

Make sure rsync is installed on your desktop computer. Linux users can also run one of the following commands.

1
2
3
sudo apt-get install rsync
sudo yum install rsync

Also, Mac OS X has rsync installed by default.

Linux

Linux users should follow the instructions earlier in the section on setting up automatic backups to a Linux server.

Mac OS X operating system

OS X users can also refer to the guide for setting up automatic backup to a Linux server in the previous sections. The only difference in this field is the lack of rsync installation and the need to change the date variable. The final rsync command in step 7 will look something like below.

1
rsync -ahvz --delete --link-dest=~/backups/public_orig user@production_server:~/public ~/backups/public_$(date +%Y-%m-%d)

The last crontab entry in step 9 is also similar to below.

1
0      3       *       *       *       rsync -ahvz --delete --link-dest=~/backups/public_orig user@production_server:~/public ~/backups/public_$(date +\%Y-\%m-\%d)

Note: If you get a permission error message in cron settings and this error did not occur when you entered the command manually, you probably have a password on the SSH key that is not working normally. Because you saved it to your Mac OS X keychain. To fix this, you need to create a new OS X user with a passwordless key.

Windows

The situation is slightly different in Windows. Here you need to install a set of different tools. While these tools are available by default in other systems. Also, remember that Windows does not own Linux files and permissions. Therefore, you will need to do some additional work to restore ownership and permissions from backups.

Follow the steps below to set up automatic data backup from the server to a Windows desktop computer.

1) Install the cwRsync program. You can get the latest version for free here. Be careful not to select the server version.

2) The SSH key must be executed by the same user as the cwRsync program. So, navigate to the directory where cwRsync is installed. This is possible through the Windows command window. for example:

1
cd C:\Program Files (x86)\cwRsync\bin

3) Now generate an SSH key for your computer.

1
ssh-keygen

4) Here you have to specify a proper file path to store the key. The default path will not work for you. For example, you can use the following path. Of course, make sure that the directories already exist.

1
C:\Users\user\.ssh\id_rsa

5) When the password prompt appears, just press the Return key. Now you should see the generated public and private keys in the directory you specified.

6) Now it’s time to send public keys to the server. Of course, you can use your favorite method to send the file, but here we use PSCP. PSCP is another program in the PuTTY family that allows you to use scp and you can get it here.

7) In the next step, you add PSCP and cwRsync to the environment address so that they can be used directly from the command line. The work steps in Windows 7 and 8 will be as follows.

  • From the Start menu, open Control Panel.
  • Select the “System and Security” option.
  • Now select System.
  • From the left bar, click Advanced system settings.
  • Go to the Advanced tab.
  • Click the “Environment Variables…” button.
  • In the System variables section, scroll down to see the “Path variable” option. Activate it and click on Edit…
  • Do not delete anything. You want to add something here.
  • Add paths to bin directory for exe and cwRsync. Separate paths with a semicolon (;). You can see an example of this below.
1
C:\Program Files (x86)\PuTTY;C:\Program Files (x86)\cwRsync\bin;
  • Click OK to return to the Control Panel.
  • Run the command window again if you have it open.

8) Use PSCP to send the key. In the Windows command window, enter the following command.

1
pscp -scp C:\Users\user\.ssh\id_rsa.pub user@production_server:/home/user/.ssh/uploaded_key.pub

9) On the production_server, attach the new key to the authorized_keys file using the following command.

1
echo `cat ~/.ssh/uploaded_key.pub` >> ~/.ssh/authorized_keys

10) Create a directory in the Windows system to save data backup.

1
mkdir %HOMEPATH%\backups

11) Create a manual backup by saving to C:\Users\user\backups\public_orig\. This is the version against which all future backups are checked. From the Windows system, type the following command.

1
rsync -hrtvz --chmod u+rwx user@production_server:~/public /cygdrive/c/Users/user/backups/public_orig/

Note that these commands are Linux-style, even on Windows.

1
یعنی C:\Users\user\backups\public_orig\  تبدیل به  /cygdrive/c/Users/user/backups/public_orig/می‌شود.

This time you will be prompted to enter the production_server password. As a result, you should see a confirmation message as below.

1
2
3
sent 100 bytes  received 2.76K bytes  1.90K bytes/sec
total size is 20.73K  speedup is 7.26

In the meantime, you can check the contents of the %HOMEPATH\backups\public_orig\ directory with the dir command to make sure everything is copied.

12) Add the latest version of the command to the cwrsync.cmd file and run it manually once to check the performance. Then set it to run automatically.

  • From the Start menu, in the All Programs section, open the cwRsync folder.
  • Right click on Batch example and select “Run as administrator” option.
  • As a result, the cmd file will be opened for editing.
  • Do not change any of the default settings.
  • At the bottom of this file, add the following line.
1
rsync -hrtvz --chmod u+rwx --delete --link-dest=/cygdrive/c/Users/user/backups/public_orig user@production_server:~/public /cygdrive/c/Users/user/backups/public_%DATE:~10,4%-%DATE:~4,2%-%DATE:~7,2%
  • Save the file.
  • Now run the file via command line.
1
"C:\Program Files (x86)\cwRsync\cwrsync.cmd"

This results in today’s backup and the right environment for connecting a passwordless SSH key.

  • As a result, you should see an output similar to step 11.

13) Finally, add cwrsync.cmd as a daily task in the Task Scheduler. for this purpose:

  • From the Start menu, go to All Programs > Accessories > System Tools > Task Scheduler.
  • On the Create Basic Task… button. Click to open the Task Wizard window.
  • Complete the title and description. For example: “rsync backups”.
  • Select “Daily” from the drop-down list.
  • Choose the start day today and the backup time so that your server is free or your computer is on.
  • Select the “Start a program” option.
  • In the Program/script field, enter the following address.
1
"C:\Program Files (x86)\cwRsync\cwrsync.cmd"
  • Click on Finish.

Keep in mind that these backups use up your dedicated bandwidth, and doing too many of them can cost you extra.

Now data backup is done daily and automatically for your server. As a result, any problem that happened to the server, you can restore it to the right point in time.

Restore Rsync backup

In this section we will look at how to use Rsync to restore a server from a backup. for this purpose:

  • Navigate to the backups directory on your backup_server or desktop.
  • Locate the folder with the appropriate date.
  • You have to choose whether you want to perform a general recovery or only some specific files.
  • Transfer the selected files via scp to the production_server with a tool like SFTP or rsync.
  • For Windows users, it should be said that proper Linux file ownership and permissions should be selected.

Maintenance of backup copies

Even if data backup is set to be automatic and properly configured, monitoring and maintaining backup copies will be important for you. As a result, possible surprises are avoided and the backup process is facilitated.

  • To back up data to a remote server or desktop (using rsync or any other tool) you should check their volume against your monthly traffic. Be aware of the amount of bandwidth usage so as not to incur additional costs.
  • To set another email to the cron job, add the following line to the top of the list of jobs in the cron file.
1
  • If you want to remove notification emails from cron jobs, add this line.
1
MAILTO=""
  • Make sure that your backup server has enough disk space. Sometimes it is necessary to delete previous backups. If you use rsync backup for this purpose and have large files that change frequently, your server will fill up quickly. If necessary, you can set automatic deletion of backups.
  • If you are using automatic rsync backups, you may need to change the –link-dest folder in the cron command to the new backup folder. Because you’ve probably made a lot of changes since the original backup. This saves time and disk space.

Concepts of the Rsync command

Although Rsync is a powerful tool, its array of options can be confusing. If you want to run this command in a more customized way or if you encounter errors, stay with us in this section. The basic command mentioned earlier is as follows:

rsync -ahvz user@production_server:/path/to/source/content /path/to/local/backup/storage/

rsync

A basic rsync command follows the following format.

1
rsync copyfrom copyto

You put the file or directory you want to back up in copyfrom and copyto is where you want to save the backup data. copyfrom and copyto are two necessary arguments for the rsync command. Below is an example of a basic rsync command with these two arguments.

1
2
3
4
5
6
7
8
9
rsync user@production_server:~/public ~/backups/mybackup
|---| |-----------------------------| |----------------|
^                 ^                          ^
|                 |                          |
rsync           copyfrom                    copyto

At the same time, there are other options for running the Rsync command. These options must be placed before the main arguments of the command.

1
rsync --options copyfrom copyto

-ahvz

Here are some standard rsync command options.

1
-ahvz

These are 4 rsync options rolled into one statement. Of course, you can use them separately as below.

1
-a -h -v -z

These options will have the following effects.

-a or –archive: Maintain ownership and permissions of files, reverse copies, etc.

-h or –human-readable: Number of human-readable outputs

-v or –verbose: Show more output

-z or –compress: Compress data files during transfer

You can add or subtract any rsync options. For example, if you don’t want to see all the output, you’d use the option below.

1
-ahz

When making a backup, the main option is –a or –archive.

Source location

The copyfrom location is the address you choose to back up the data on production_server. Here you need to put the path of the server content files.

1
2
3
4
5
6
7
8
9
user@production_server:~/public
|--------------------| |------|
^                ^
|                |
SSH login           path

Because you want to copy from a remote server (production_server), you must first provide SSH access. Then, after the quotation marks (:), enter the exact address of the folder you want to back up.

In this example, you are backing up the ~/public directory. This is the directory where your websites will be placed. Note that the ~ symbol stands for /home/user/. The / sign is also for backing up the public folder and not just its contents.

If you want to back up the root and the entire server, you should use the /* path. You should also delete some folders so that you don’t encounter many messages and warnings during data backup. For example, /dev, /proc, /sys, /tmp, and /run do not have permanent content, and /mnt is a mount point for other filesystems. To exclude an item from the rsync command, use the –exclude option at the end of the command.

1
--exclude={/dev/*,/proc/*,/sys/*,/tmp/*,/run/*,/mnt/*}

You will also need to use a user with root or sudo access to back up data to /* or higher level directories. If you are using the sudo user, you must either disable the password request or send it to the server.

Destination location

The copyto location is the path where you want to save the backup data on backup_server.

1
~/backups/mybackup

In the automatic backup command, a date variable is appended to the file path.

1
2
3
4
5
6
7
8
9
10
11
~/backups/public_$(date -I)
|--------| <- date variable
|-------------------------|
^
|
path

This is the local file path in backup_server and is used to store backups. The $(date -I) variable uses the built-in date operator to add the current date to the end of the file path. As a result, a new folder is created for each of the backup copies and they can be easily found in the storage location.

Cron

In addition to doing the previous example, the following command adds some other advanced options.

1
0   3   *   *   *   rsync -ahvz --delete --link-dest=~/backups/public_orig user@production_server:~/public ~/backups/public_$(date -I)

The series of numbers and asterisks indicate when the cron command should be executed. Note that this command has already been added to the crontab file.

1
2
3
4
5
6
7
0       3           *           *       *        Command
^       ^           ^           ^       ^           ^
|       |           |           |       |           |
Minute Hour     Day of Month  Month  Weekday   Shell command

For each of the five time categories (minutes, hours, days of the month, months, days of the week) you can use a special number or *. The sign * will mean “every”. In addition, you must use 24-hour numbers for the time variable. The example above specifies that the command should be executed at the first minute of the third hour of each day. Anything you add after the fifth number or asterisk is considered the main command. This command will be executed if you type it in the shell.

To test the execution of this command, you can set the cron command as * * * * *. In this mode, a new backup is created every minute. Backing up data like this can completely consume your traffic. Therefore, try to pay attention to the costs of doing this.

-delete

–delete is another option for the rsync command.

Using the –delete option, if the file has been deleted from your copyfrom location, it will not be included in the last copyfrom backup; Even if it exists in older backups. Of course, the file is not deleted from older versions. This will make it easier to access and find backups.

–link-dest

This is an option that increases the performance of older rsync backups.

1
--link-dest=~/backups/public_orig

–link-dest is another rsync command option that is important for staggered data backup plans. This option allows us to choose different names for each backup folder. We can also use this option to save several full backup copies without occupying a lot of disk space.

The specific argument of the –link-dest option will be as follows.

1
--link-dest=comparison_backup_folder

You can put anything instead of comparison_backup_folder. The more it resembles a personal (production) environment, the more optimal rsync will work.

The / is removed to match the destination path or copyto.

Different server locations

In this tutorial, we used a remote server named production_server and a local server named backup_server. However, rsync can also work for a local production_server and a remote backup_server. In this case, local backups can be saved to another folder on the same system or another remote server. Any remote server you want to use in this context will require an SSH login before entering the file path.

Running the rsync command from the backup server is called a “pull” backup, and from the local server is called a “push” backup. Local folders do not require SSH access. If SSH login and then quotation mark before the file path is required for remote folders. You can see other examples of the rsync command below.

1
2
3
4
5
6
7
8
9
rsync   copyfrom                copyto
rsync   /local1                 /local2/
rsync   /local                  user@remote:/remote/
rsync   user@remote:/remote     /local/
rsync   user@remote1:/remote    user@remote2:/remote/

rsync must be installed on all servers. Also note that each remote server must have an SSH server running.

Conclusion

Data backup can be vital to restore servers in the face of various problems. We hope that this relatively long tutorial was useful for you. Keep in mind that the content in this field can be more extensive than this and you may need to update your information from time to time. For example, the help page of the rsynce command is always at your disposal.
Introduction of FirewallD tool in CentOS Linux

The FirewallD tool is a control shell for iptables that is used to create static network traffic rules. This tool, which can be used both via the command line and through a graphical user interface, is available in the sources of many Linux distributions. Working with the FirewallD tool compared to using iptables directly has two main differences.

  • FirewallD uses zones and services instead of chains and rules.
  • The management of the set of rules is dynamic. In the sense that it allows the update without disturbing the current status and connection.

Note: FirewallD is a shell for iptables that makes it easier to manage its rules. Therefore, it is not a replacement for iptables. Of course, you can still use iptables commands in the FirewallD tool; But it is recommended that you only use the FirewallD command in FirewallD.

In this article, we intend to introduce you to the FirewallD tool, the concept of its areas and services, and some basic settings. Stay with us.

Installing and managing the FirewallD tool

FirewallD tool is present by default in CentOS 7 Linux operating system, but it is disabled. Its control will be the same as other parts of systemd.

To start the service and enable FirewallD at system startup, we have:

1
2
sudo systemctl start firewalld
sudo systemctl enable firewalld

The following commands are also used to stop and disable this service.

1
2
sudo systemctl stop firewalld
sudo systemctl disable firewalld

Check the firewall status. The output should show whether the service is running or not.

1
sudo firewall-cmd --state

To view the status of the FirewallD tool, we have:

1
sudo systemctl status firewalld

Sample output

1
2
3
4
5
6
7
firewalld.service - firewalld - dynamic firewall daemon
Loaded: loaded (/usr/lib/systemd/system/firewalld.service; enabled; vendor preset: enabled)
Active: active (running) since Thu 2019-08-08 15:11:24 IST; 23h ago
Docs: man:firewalld(1)
Main PID: 2577 (firewalld)
CGroup: /system.slice/firewalld.service
└─2577 /usr/bin/python -Es /usr/sbin/firewalld --nofork --nopid

To reload the FirewallD utility settings, type the following command.

1
sudo firewall-cmd --reload

FirewallD settings

The FirewallD tool is configured using XML files. Of course, you don’t need to change them unless you need a special configuration, and you should use firewall-cmd instead.

The configuration files are located in two directories.

  • /usr/lib/FirewallD contains settings such as default zones and common services. Be sure to avoid updating them; Because these files will change every time the firewalld package is updated.
  • /etc/firewalld contains system configuration files. These files are written as default settings.

A set of settings

The Firewalld tool uses two sets or series of settings; Instant (Runtime) and Permanent (Permanent) settings. Momentary settings are not saved after restarting FirewallD. This means that permanent changes will not be implemented for a system.

By default, firewall-cmd commands apply the current settings. But if you use the -permanent option in the command, the settings will be made permanently. To add and activate a permanent rule, you can use one of these two methods.

1) Adding the rule to both the current and permanent configuration series

1
2
sudo firewall-cmd --zone=public --add-service=http --permanent
sudo firewall-cmd --zone=public --add-service=http

2) Adding the rule to the series of permanent settings and restarting the FirewallD tool

1
2
sudo firewall-cmd --zone=public --add-service=http --permanent
sudo firewall-cmd --reload

tip

The reload command deletes all the current and momentary settings and applies the default settings. Of course, due to the dynamic nature of firewalld management, current situations and connections are not disrupted.

Firewall zones

Areas or zones are a set of predefined rules for different levels of assurance and are used for certain points or scenarios. After enabling the FirewallD tool for the first time, the default zone will be “Public”.

Zones can also be applied to different network user interfaces. For example, if there are two separate user interfaces for the internal network and the Internet, you can allow the DHCP protocol in the internal network, but allow only HTTP and SSH in the external area. Any user interface that does not have a specific region assigned to it will join the default region.

To view the default area we have:

1
sudo firewall-cmd --get-default-zone

To change the default region, the following command is used.

1
sudo firewall-cmd --set-default-zone=internal

To see the areas used by the interface or network interfaces:

1
sudo firewall-cmd --get-active-zones

Sample output

1
2
public
interfaces: eth0

To get all available settings for a particular zone, type the following command.

1
sudo firewall-cmd --zone=public --list-all

Sample output

1
2
3
4
5
6
7
8
9
10
11
12
13
public (active)
target: default
icmp-block-inversion: no
interfaces: eth0
sources:
services: ssh dhcpv6-client http
ports: 12345/tcp
protocols:
masquerade: no
forward-ports:
source-ports:
icmp-blocks:
rich rules:

And to get all available settings for all regions:

1
sudo firewall-cmd --list-all-zones

Sample output

1
2
3
4
5
6
7
8
9
10
11
12
13
14
15
16
17
18
19
20
21
22
23
24
25
26
27
trusted
target: ACCEPT
icmp-block-inversion: no
interfaces:
sources:
services:
ports:
protocols:
masquerade: no
forward-ports:
source-ports:
icmp-blocks:
rich rules:
...
work
target: default
icmp-block-inversion: no
interfaces:
sources:
services: ssh dhcpv6-client
ports:
protocols:
masquerade: no
forward-ports:
source-ports:
icmp-blocks:
rich rules:

Work with services

The FirewallD tool can allow incoming traffic based on predefined rules for specific network services. You can create custom service rules yourself and apply them to each of the areas. Configuration files for default services are located in /usr/lib/firewalld/services and configuration files for user-defined services are located in /etc/firewalld/services.

Use the following command to view the default available services.

1
sudo firewall-cmd --get-services

An example to enable and disable the HTTP service

1
2
sudo firewall-cmd --zone=public --add-service=http --permanent
sudo firewall-cmd --zone=public --remove-service=http --permanent

Allow an arbitrary port or protocol

For example, to allow or deny traffic to port 12345 we have:

1
2
sudo firewall-cmd --zone=public --add-port=12345/tcp --permanent
sudo firewall-cmd --zone=public --remove-port=12345/tcp --permanent

Port reference

The following example shows forwarding port 80 traffic to port 12345 on the same server.

1
sudo firewall-cmd --zone="public" --add-forward-port=port=80:proto=tcp:toport=12345

To direct the traffic of a port to a different server, the following method is used.

1) Activate the masking mode or masquerade in a desired area

1
sudo firewall-cmd --zone=public --add-masquerade

2) Adding the referral rule. In this example, local port 80 traffic is forwarded to port 8080 on a remote server at IP address 198.51.100.0.

1
sudo firewall-cmd --zone="public" --add-forward-port=port=80:proto=tcp:toport=8080:toaddr=198.51.100.0

You can replace -add with -remove to remove the rule. For example:

1
sudo firewall-cmd --zone=public --remove-masquerade

Create a series of rules or Ruleset with FirewallD tool

As an example, here we use the FirewallD tool to add basic rules to the server.

Add the dmz zone as the default zone to eth0. This area is considered as the best option to start working with FirewallD application; Because it allows only SSH and ICMP protocols to enter.

1
2
sudo firewall-cmd --set-default-zone=dmz
sudo firewall-cmd --zone=dmz --add-interface=eth0

Add service default rule for HTTP and HTTPS for dmz zone

1
2
sudo firewall-cmd --zone=dmz --add-service=http --permanent
sudo firewall-cmd --zone=dmz --add-service=https --permanent

Now you need to restart the FirewallD tool for the changes to take effect.

1
sudo firewall-cmd --reload

If you run the firewall-cmd –zone=dmz –list-all command, you will probably see the following output.

1
2
3
4
5
6
7
8
9
dmz (default)
interfaces: eth0
sources:
services: http https ssh
ports:
masquerade: no
forward-ports:
icmp-blocks:
rich rules:

This output tells us that the dmz zone is the default zone and is used for the eth0 interface, all network resources and ports. HTTP (port 80), HTTPS (port 443) and SSH (port 22) incoming traffic will be allowed and since there is no restriction on IP versions, this is done for both IPv4 and IPv6 protocols. There will be no port forwarding. No ICMP traffic is allowed. Also, all outgoing traffic is allowed.

advanced settings

Services and ports are suitable for basic configuration. But at the same time, they can limit the work for advanced scenarios. Tools called Rich Rules and Direct Interface allow you to add completely custom rules to the firewall for any zone and with any port and protocol.

Rich Rules

The rich rules format is very extensive, which is fully explained in the firewalld.richlanguage help page. At the same time, you can manage it using the –add-rich-rule, –list-rich-rules and –remove-rich-rule options in the firewall-cmd command.

Here are some of the most common examples.

Allow IPv4 traffic from host 192.0.2.0

1
sudo firewall-cmd --zone=public --add-rich-rule 'rule family="ipv4" source address=192.0.2.0 accept'

Block IPv4 traffic over TCP from host 192.0.2.0 to port 22

1
sudo firewall-cmd --zone=public --add-rich-rule 'rule family="ipv4" source address="192.0.2.0" port port=22 protocol=tcp reject'

Allow IPv4 traffic through TCP from host 192.0.2.0 to port 80 and refer it to port 6532

1
sudo firewall-cmd --zone=public --add-rich-rule 'rule family=ipv4 source address=192.0.2.0 forward-port port=80 protocol=tcp to-port=6532'

Forward all IPv4 traffic on port 80 to port 8080 on host 198.51.100.0 (masquerade must be enabled in the zone).

1
sudo firewall-cmd --zone=public --add-rich-rule 'rule family=ipv4 forward-port port=80 protocol=tcp to-port=8080 to-addr=198.51.100.0'

To view all the Rich Rules in the public area, we have:

1
sudo firewall-cmd --zone=public --list-rich-rules

Direct iptables user interface

For professional iptables users, the FirewallD tool provides a direct user interface that provides the execution of raw iptables commands. These rules will not be permanent; Unless they are combined with the -permanent option.

Use the following commands to view all chains or rules added to FirewallD.

1
2
firewall-cmd --direct --get-all-chains
firewall-cmd --direct --get-all-rules

Of course, the topic of iptables templates in the FirewallD tool is beyond the educational discussion in this article, and you may want to get help from the following sources for more information.

Setting up simultaneous remote entries in Windows Server

We will review the setting of simultaneous remote entries for Windows Server users in this short article. As a result, multiple users can connect simultaneously through a remote connection. Each of these users will have separate login statuses. Of course, the number of simultaneous connections should not be increased too much; Because they may reduce the level of performance for each user.

Steps to set simultaneous remote inputs in Windows

In the Run menu, type gpedit.msc and press Enter.

Follow the address below.

1
2
3
4
</pre>
Administrative Templates -> windows Component -> Remote Desktop Services ->
remote desktop session host -> connections
<pre>

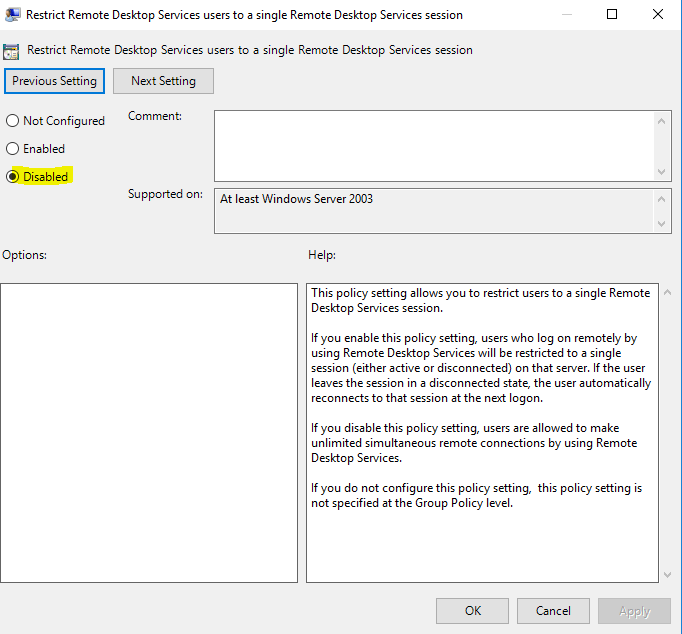
Now select the “Restrict Remote Desktop Services users to a single Remote Desktop Services Session” section.

Activate the “Disabled” option. Then you need to click the OK button.

Disable individual RDS users


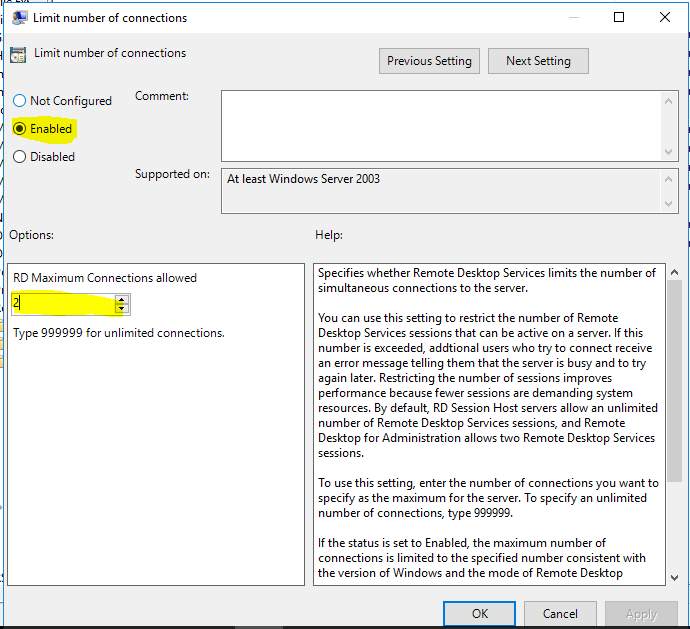
Go to the “Limit number of connections” section.

Now select the Enabled option. Then it’s time to set the value of ‘RD Maximum connections allowed’ to the desired value to set the simultaneous remote inputs.

Set up simultaneous remote inputs

As a result, the possibility of two simultaneous inputs for remote connection will be enabled. If Remote Desktop is not installed, the maximum simultaneous connections for remote login is 2.

Installing DNS server on CentOS 7

DNS stands for “Domain Naming System” and translates host titles or URLs to IP addresses. For example, if you type the address www.ariaservice.net into your browser, the DNS server will translate the domain name to its corresponding IP address. Since IP addresses cannot always be committed to memory, DNS servers play a decisive role. Because it will be much easier to remember a domain name than an IP address.

In this tutorial, we will help you to install a local DNS server on CentOS 7 system. Of course, the same steps are also applicable for installing DNS server in RHEL and Scientific Linux 7.

DNS server installation

Work steps scenario

In order to achieve the educational goals that we follow in this article, we use three point systems. One will act as the Master DNS server, the other will be the Secondary DNS and the third system will be our DNS client. Here we review the details of the three systems.

Master DNS server details

  • Operating system: CentOS 7 minimal server
  • Host titles: ariaservice.local
  • IP address: 168.1.101/24

Secondary or Slave DNS server details

  • Operating system: CentOS 7 minimal server
  • Host titles: ariaservice.local
  • IP address: 168.1.102/24

Client details

  • OS: CentOS 6.5 Desktop
  • Host titles: ariaservice.local
  • IP address: 168.1.103/24

Install the main DNS server

For this purpose, you need to install bind9 packages on your server.

1
yum install bind bind-utils -y

Step 1) DNS server settings

For this purpose, edit the ‘/etc/named.conf’ file.

1
vi /etc/named.conf

Add the items written in bold below.

1
2
3
4
5
6
7
8
9
10
11
12
13
14
15
16
17
18
19
20
21
22
23
24
25
26
27
28
29
30
31
32
33
34
35
36
37
38
39
40
41
42
43
44
45
46
47
48
49
50
51
52
53
54
55
56
57
58
59
60
61
62
63
64
65
66
//
// named.conf
//
// Provided by Red Hat bind package to configure the ISC BIND named(8) DNS
// server as a caching only nameserver (as a localhost DNS resolver only).
//
// See /usr/share/doc/bind*/sample/ for example named configuration files.
//
options {
    listen-on port 53 { 127.0.0.1; <strong>192.168.1.101;</strong>}; <strong>### Master DNS IP ###</strong>
#    listen-on-v6 port 53 { ::1; };
    directory     "/var/named";
    dump-file     "/var/named/data/cache_dump.db";
    statistics-file "/var/named/data/named_stats.txt";
    memstatistics-file "/var/named/data/named_mem_stats.txt";
    allow-query     { localhost; <strong>192.168.1.0/24;</strong>}; <strong>### IP Range ###</strong>
    allow-transfer{ localhost; <strong>192.168.1.102;</strong> };   <strong>### Slave DNS IP ###</strong>
    /*
     - If you are building an AUTHORITATIVE DNS server, do NOT enable recursion.
     - If you are building a RECURSIVE (caching) DNS server, you need to enable
       recursion.
     - If your recursive DNS server has a public IP address, you MUST enable access
       control to limit queries to your legitimate users. Failing to do so will
       cause your server to become part of large scale DNS amplification
       attacks. Implementing BCP38 within your network would greatly
       reduce such attack surface
    */
    recursion yes;
    dnssec-enable yes;
    dnssec-validation yes;
    dnssec-lookaside auto;
    /* Path to ISC DLV key */
    bindkeys-file "/etc/named.iscdlv.key";
    managed-keys-directory "/var/named/dynamic";
    pid-file "/run/named/named.pid";
    session-keyfile "/run/named/session.key";
};
logging {
        channel default_debug {
                file "data/named.run";
                severity dynamic;
        };
};
zone "." IN {
    type hint;
    file "named.ca";
};
<strong>zone "unixmen.local" IN {
type master;
file "forward.unixmen";
allow-update { none; };
};
zone "1.168.192.in-addr.arpa" IN {
type master;
file "reverse.unixmen";
allow-update { none; };
};</strong>
include "/etc/named.rfc1912.zones";
include "/etc/named.root.key";</pre>
<pre>

Step 2) Creating Zone files

In this step, we want to create the forward and reverse zones that we mentioned in the ‘/etc/named.conf’ file.

Construction of Forward Zone

Create forward.ariaservice file in ‘/var/named’ directory.

1
vi /var/named/forward.ariaservice

Add the following lines.

1
2
3
4
5
6
7
8
9
10
11
12
13
14
15
16
$TTL 86400
@   IN  SOA     masterdns.ariaservice.local. root.ariaservice.local. (
        2011071001  ;Serial
        3600        ;Refresh
        1800        ;Retry
        604800      ;Expire
        86400       ;Minimum TTL
)
@       IN  NS          masterdns.ariaservice.local.
@       IN  NS          secondarydns.ariaservice.local.
@       IN  A           192.168.1.101
@       IN  A           192.168.1.102
@       IN  A           192.168.1.103
masterdns       IN  A   192.168.1.101
secondarydns    IN  A   192.168.1.102
client          IN  A   192.168.1.103

Construction of Reverse Zone

Create reverse.ariaservice file in ‘/var/named’ directory.

1
vi /var/named/reverse.ariaservice

Now it’s time to add the following lines.

1
2
3
4
5
6
7
8
9
10
11
12
13
14
15
16
17
18
</pre>
<pre>$TTL 86400
@   IN  SOA     masterdns.unixmen.local. root.unixmen.local. (
        2011071001  ;Serial
        3600        ;Refresh
        1800        ;Retry
        604800      ;Expire
        86400       ;Minimum TTL
)
@       IN  NS          masterdns.unixmen.local.
@       IN  NS          secondarydns.unixmen.local.
@       IN  A           192.168.1.101
@       IN  A           192.168.1.102
@       IN  A           192.168.1.103
masterdns       IN  A   192.168.1.101
secondarydns    IN  A   192.168.1.102
client          IN  A   192.168.1.103</pre>
<pre>

Step 3) Setting up the DNS service

Activate and start the DNS service as follows.

1
2
systemctl enable named
systemctl start named

Step 4) Firewall settings

The default port number 53 of the DNS service must have the necessary permissions in the firewall. For this purpose, the following commands will help you.

1
2
firewall-cmd --permanent --add-port=53/tcp
firewall-cmd --permanent --add-port=53/udp

Step 5) Restart the firewall

Type the following command.

1
firewall-cmd --reload

Step 6) Setting permissions, properties and SELinux

Run the following commands one by one.

1
2
3
4
chgrp named -R /var/named
chown -v root:named /etc/named.conf
restorecon -rv /var/named
restorecon /etc/named.conf

Step 7) Test DNS server settings and Zone files

Testing the default DNS server settings can be done as follows.

1
named-checkconf /etc/named.conf

If nothing is displayed, your configuration file is valid and available.

Forward zone review

1
named-checkzone ariaservice.local /var/named/forward.ariaservice

Sample output

1
2
zone ariaservice.local/IN: loaded serial 2011071001
OK

Check the reverse zone

1
named-checkzone ariaservice.local /var/named/reverse.ariaservice

Sample output

1
2
zone ariaservice.local/IN: loaded serial 2011071001
OK

Now enter the DNS server details in your network interface settings file.

1
vi /etc/sysconfig/network-scripts/ifcfg-enp0s3

As follows:

1
2
3
4
5
6
7
8
9
10
11
12
13
14
15
16
17
18
TYPE=”Ethernet”
BOOTPROTO=”none”
DEFROUTE=”yes”
IPV4_FAILURE_FATAL=”no”
IPV6INIT=”yes”
IPV6_AUTOCONF=”yes”
IPV6_DEFROUTE=”yes”
IPV6_FAILURE_FATAL=”no”
NAME=”enp0s3”
UUID=”5d0428b3-6af2-4f6b-9fe3-4250cd839efa”
ONBOOT=”yes”
HWADDR=”08:00:27:19:68:73”
IPADDR0=”192.168.1.101”
PREFIX0=”24”
GATEWAY0=”192.168.1.1”
DNS=”192.168.1.101”
IPV6_PEERDNS=”yes”
IPV6_PEERROUTES=”yes”

Now it’s time to edit the /etc/resolv.conf file.

1
vi /etc/resolv.conf

Enter the IP address for the nameserver.

1
nameserver&amp;amp;nbsp;&amp;amp;nbsp;&amp;amp;nbsp;&amp;amp;nbsp;&amp;amp;nbsp; 192.168.1.101

Save and close the file.

Now restart the network service.

1
systemctl restart network

Step 8) DNS server test

1
dig masterdns.ariaservice.local

Sample output

1
2
3
4
5
6
7
8
9
10
11
12
13
14
15
16
17
18
19
20
21
22
23
24
25
26
</pre>
<pre>; <<>> DiG 9.9.4-RedHat-9.9.4-14.el7 <<>> masterdns.unixmen.local
;; global options: +cmd
;; Got answer:
;; ->>HEADER<<- opcode: QUERY, status: NOERROR, id: 25179
;; flags: qr aa rd ra; QUERY: 1, ANSWER: 1, AUTHORITY: 2, ADDITIONAL: 2
;; OPT PSEUDOSECTION:
; EDNS: version: 0, flags:; udp: 4096
;; QUESTION SECTION:
;masterdns.unixmen.local.    IN    A
;; ANSWER SECTION:
masterdns.unixmen.local. 86400    IN    A    192.168.1.101
;; AUTHORITY SECTION:
unixmen.local.        86400    IN    NS    secondarydns.unixmen.local.
unixmen.local.        86400    IN    NS    masterdns.unixmen.local.
;; ADDITIONAL SECTION:
secondarydns.unixmen.local. 86400 IN    A    192.168.1.102
;; Query time: 0 msec
;; SERVER: 192.168.1.101#53(192.168.1.101)
;; WHEN: Wed Aug 20 16:20:46 IST 2014
;; MSG SIZE  rcvd: 125

And with the following command:

1
nslookup ariaservice.local

Sample output

1
2
3
4
5
6
7
8
9
10
11
</pre>
<pre>Server:        192.168.1.101
Address:    192.168.1.101#53
Name:    unixmen.local
Address: 192.168.1.103
Name:    unixmen.local
Address: 192.168.1.101
Name:    unixmen.local
Address: 192.168.1.102</pre>
<pre>

Now the primary DNS server is ready to use and we need to configure ourselves for the secondary server installation.

Installing a secondary DNS server

Install the bind packages using the following command.

1
yum install bind bind-utils -y

Step 1) Secondary DNS server settings

For this purpose, you need to edit the ‘/etc/named.conf’ file.

1
vi /etc/named.conf

Make changes according to the lines marked in bold font below.

1
2
3
4
5
6
7
8
9
10
11
12
13
14
15
16
17
18
19
20
21
22
23
24
25
26
27
28
29
30
31
32
33
34
35
36
//
// named.conf
//
// Provided by Red Hat bind package to configure the ISC BIND named(8) DNS
// server as a caching only nameserver (as a localhost DNS resolver only).
//
// See /usr/share/doc/bind*/sample/ for example named configuration files.
//
options {
listen-on port 53 { 127.0.0.1; 192.168.1.102; };
listen-on-v6 port 53 { ::1; };
directory "/var/named";
dump-file "/var/named/data/cache_dump.db";
statistics-file "/var/named/data/named_stats.txt";
memstatistics-file "/var/named/data/named_mem_stats.txt";
allow-query&amp;amp;nbsp;&amp;amp;nbsp;&amp;amp;nbsp;&amp;amp;nbsp; { localhost; 192.168.1.0/24; };
.
.
.
.
zone "." IN {
type hint;
file "named.ca";
};
zone "ariaservice.local" IN {
type slave;
file "slaves/ariaservice.fwd";
masters { 192.168.1.101; };
};
zone "1.168.192.in-addr.arpa" IN {
type slave;
file "slaves/ariaservice.rev";
masters { 192.168.1.101; };
};
include "/etc/named.rfc1912.zones";
include "/etc/named.root.key";

Step 2) Setting up the DNS service

Setting up the DNS server is done with the help of the following commands.

1
2
systemctl enable named
systemctl start named

Now the forward and reverse zones are automatically copied from the primary DNS server to the address ‘/var/named/slaves/’ in the secondary DNS server.

1
ls /var/named/slaves/

Sample output

1
ariaservice.fwd&amp;amp;nbsp; ariaservice.rev

Step 3) Add DNS server details

In the network user interface settings file, enter the server details as below.

1
vi /etc/sysconfig/network-scripts/ifcfg-enp0s3


1
2
3
4
5
6
7
8
9
10
11
12
13
14
15
16
17
18
19
TYPE="Ethernet"
BOOTPROTO="none"
DEFROUTE="yes"
IPV4_FAILURE_FATAL="no"
IPV6INIT="yes"
IPV6_AUTOCONF="yes"
IPV6_DEFROUTE="yes"
IPV6_FAILURE_FATAL="no"
NAME="enp0s3"
UUID="5d0428b3-6af2-4f6b-9fe3-4250cd839efa"
ONBOOT="yes"
HWADDR="08:00:27:19:68:73"
IPADDR0="192.168.1.102"
PREFIX0="24"
GATEWAY0="192.168.1.1"
DNS1="192.168.1.101"
DNS2="192.168.1.102"
IPV6_PEERDNS="yes"
IPV6_PEERROUTES="yes"

Now it’s time to edit the /etc/resolv.conf file.

1
vi /etc/resolv.conf

Here you need to enter the IP address of the server.

1
2
nameserver 192.168.1.101
nameserver 192.168.1.102

Save and close the file.

Now you need to restart the network.

1
systemctl restart network

Step 4) Firewall settings

We must allow the default port number 53 of the DNS service to pass through the firewall.

1
firewall-cmd --permanent --add-port=53/tcp

Step 5) Restart the firewall

1
firewall-cmd –reload

Step 6) Permissions, ownership and SELinux settings

1
2
3
4
chgrp named -R /var/named
chown -v root:named /etc/named.conf
restorecon -rv /var/named
restorecon /etc/named.conf

Step 7) DNS server test

1
dig masterdns.ariaservice.local

Sample output

1
2
3
4
5
6
7
8
9
10
11
12
13
14
15
16
17
18
19
20
21
22
23
24
25
26
27
</pre>
<pre>; <<>> DiG 9.9.4-RedHat-9.9.4-14.el7 <<>> masterdns.unixmen.local
;; global options: +cmd
;; Got answer:
;; ->>HEADER<<- opcode: QUERY, status: NOERROR, id: 18204
;; flags: qr aa rd ra; QUERY: 1, ANSWER: 1, AUTHORITY: 2, ADDITIONAL: 2
;; OPT PSEUDOSECTION:
; EDNS: version: 0, flags:; udp: 4096
;; QUESTION SECTION:
;masterdns.unixmen.local.    IN    A
;; ANSWER SECTION:
masterdns.unixmen.local. 86400    IN    A    192.168.1.101
;; AUTHORITY SECTION:
unixmen.local.        86400    IN    NS    masterdns.unixmen.local.
unixmen.local.        86400    IN    NS    secondarydns.unixmen.local.
;; ADDITIONAL SECTION:
secondarydns.unixmen.local. 86400 IN    A    192.168.1.102
;; Query time: 0 msec
;; SERVER: 192.168.1.102#53(192.168.1.102)
;; WHEN: Wed Aug 20 17:04:30 IST 2014
;; MSG SIZE  rcvd: 125</pre>
<pre>

and the following command:

1
dig secondarydns.ariaservice.local

Sample output

1
2
3
4
5
6
7
8
9
10
11
12
13
14
15
16
17
18
19
20
21
22
23
24
25
26
27
</pre>
<pre>; <<>> DiG 9.9.4-RedHat-9.9.4-14.el7 <<>> secondarydns.unixmen.local
;; global options: +cmd
;; Got answer:
;; ->>HEADER<<- opcode: QUERY, status: NOERROR, id: 60819
;; flags: qr aa rd ra; QUERY: 1, ANSWER: 1, AUTHORITY: 2, ADDITIONAL: 2
;; OPT PSEUDOSECTION:
; EDNS: version: 0, flags:; udp: 4096
;; QUESTION SECTION:
;secondarydns.unixmen.local.    IN    A
;; ANSWER SECTION:
secondarydns.unixmen.local. 86400 IN    A    192.168.1.102
;; AUTHORITY SECTION:
unixmen.local.        86400    IN    NS    masterdns.unixmen.local.
unixmen.local.        86400    IN    NS    secondarydns.unixmen.local.
;; ADDITIONAL SECTION:
masterdns.unixmen.local. 86400    IN    A    192.168.1.101
;; Query time: 0 msec
;; SERVER: 192.168.1.102#53(192.168.1.102)
;; WHEN: Wed Aug 20 17:05:50 IST 2014
;; MSG SIZE  rcvd: 125</pre>
<pre>

Then the following command:

1
nslookup ariaservice.local

Sample output

1
2
3
4
5
6
7
8
9
10
11
</pre>
<pre>Server:        192.168.1.102
Address:    192.168.1.102#53
Name:    unixmen.local
Address: 192.168.1.101
Name:    unixmen.local
Address: 192.168.1.103
Name:    unixmen.local
Address: 192.168.1.102</pre>
<pre>

Client-side settings

Enter the DNS server details in the ‘/etc/resolv.conf’ file on all client systems.

1
vi /etc/resolv.conf

As follows:

1
2
3
4
# Generated by NetworkManager
search ariaservice.local
nameserver 192.168.1.101
nameserver 192.168.1.102

Now restart the network service or reboot the system.

DNS server test

Now you can test the DNS server with the help of one of the commands below.

1
2
3
4
dig masterdns.ariaservice.local
dig secondarydns.ariaservice.local
dig client.ariaservice.local
nslookup ariaservice.local

Our work ends here. Currently, primary and secondary DNS servers are ready to access and use.

Conclusion

In this tutorial, we looked at how to install a local DNS server on a CentOS 7 Linux distribution. We hope that this article has also been of interest to you.

Source: Unixmen.com

Installing xRDP for remote communication with CentOS 7 server

Installing the Gnome GUI on Linux

Linux admins spend a lot of time working in a terminal. While some are interested in continuing their work in a graphical user interface or GUI instead of a terminal. By default, CentOS 7 installs the minimum components required for a server, and to change the type of installation, there is definitely a need for user intervention. In this relatively short tutorial, we will show you how to install the Gnome GUI on a CentOS 7 server.

Before you install the Gnome GUI, create a local yum repository so you don’t need to fetch packages from the Internet.

Run the following command to find out the list of packages available for CentOS 7.

1
# yum group list

output

1
2
3
4
5
6
7
8
9
10
11
12
13
14
15
16
17
18
19
20
21
22
23
24
25
26
27
28
29
30
31
32
33
34
35
36
37
38
39
40
41
42
43
44
45
46
47
48
49
50
51
52
53
Loaded plugins: fastestmirror
There is no installed groups file.
Maybe run: yum groups mark convert (see man yum)
Loading mirror speeds from cached hostfile
Available Environment Groups:
Minimal Install
Compute Node
Infrastructure Server
File and Print Server
Basic Web Server
Virtualization Host
Server with GUI
GNOME Desktop
KDE Plasma Workspaces
Development and Creative Workstation
Available Groups:
Compatibility Libraries
Console Internet Tools
Development Tools
Graphical Administration Tools
Legacy UNIX Compatibility
Scientific Support
Security Tools
Smart Card Support
System Administration Tools
System Management
Done

Step 1) Install Gnome GUI packages with yum command

For CentOS 7 based system we have:

1
# yum groupinstall "GNOME Desktop" "Graphical Administration Tools"

For RHEL 7, it is done as follows.

1
# yum groupinstall "Server with GUI"

Step 2) Enable the Gnome user interface to run at system startup

On CentOS 7 / RHEL 7 systems, the system tool uses “targets” instead of runlevel. The /etc/inittab file is no longer used to change run levels. So, you can add the GUI to the system startup using the following command.

1
# ln -sf /lib/systemd/system/runlevel5.target /etc/systemd/system/default.target

Step 3) Restart the system to start working graphically

1
# reboot

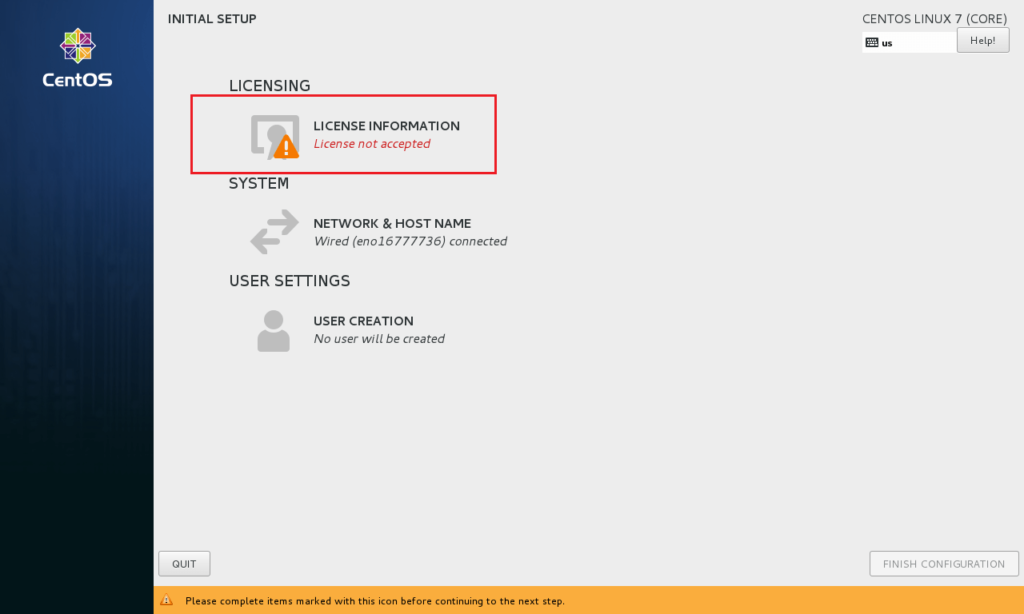
License Agreement

Accept the terms by clicking on the “LICENSE INFORMATION” option.

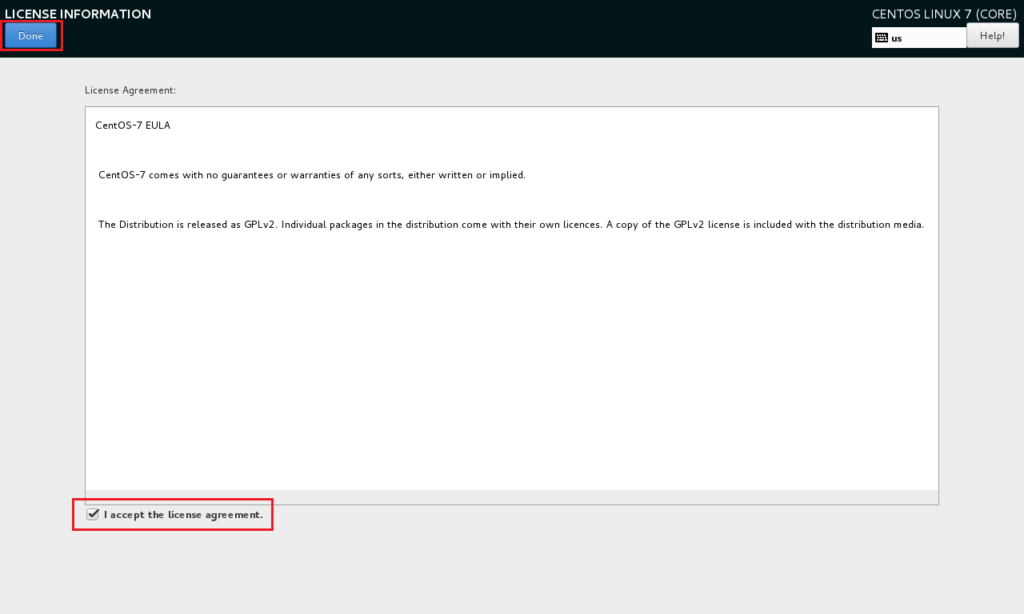
Gnome GUI installation agreement page

Check the “I accept the license agreement” option and click the Done button.

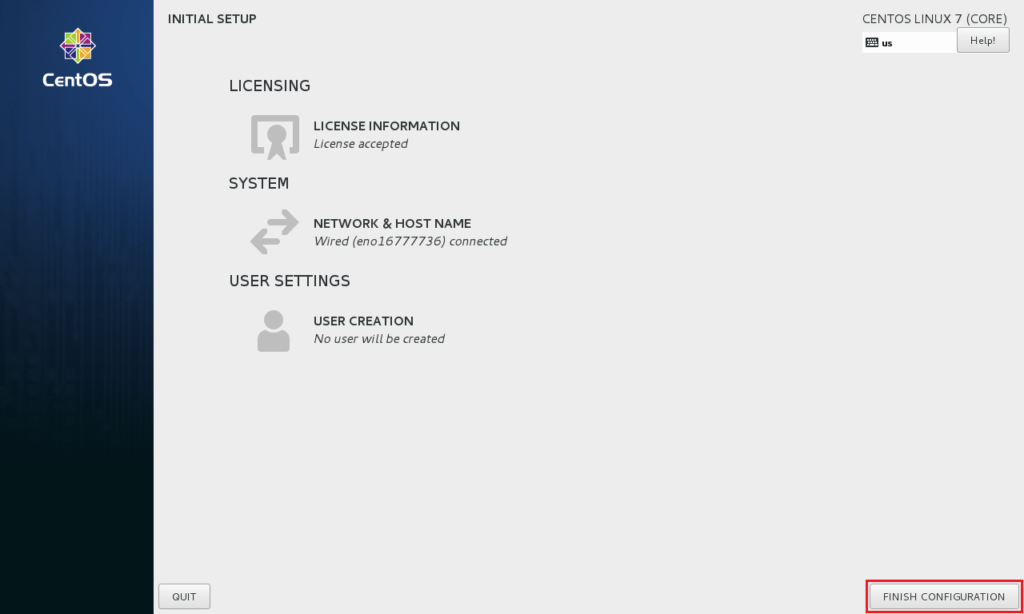
Now click on “FINISH CONFIGURATION” option to finish the configuration.

End of license agreement to install Gnome GUI

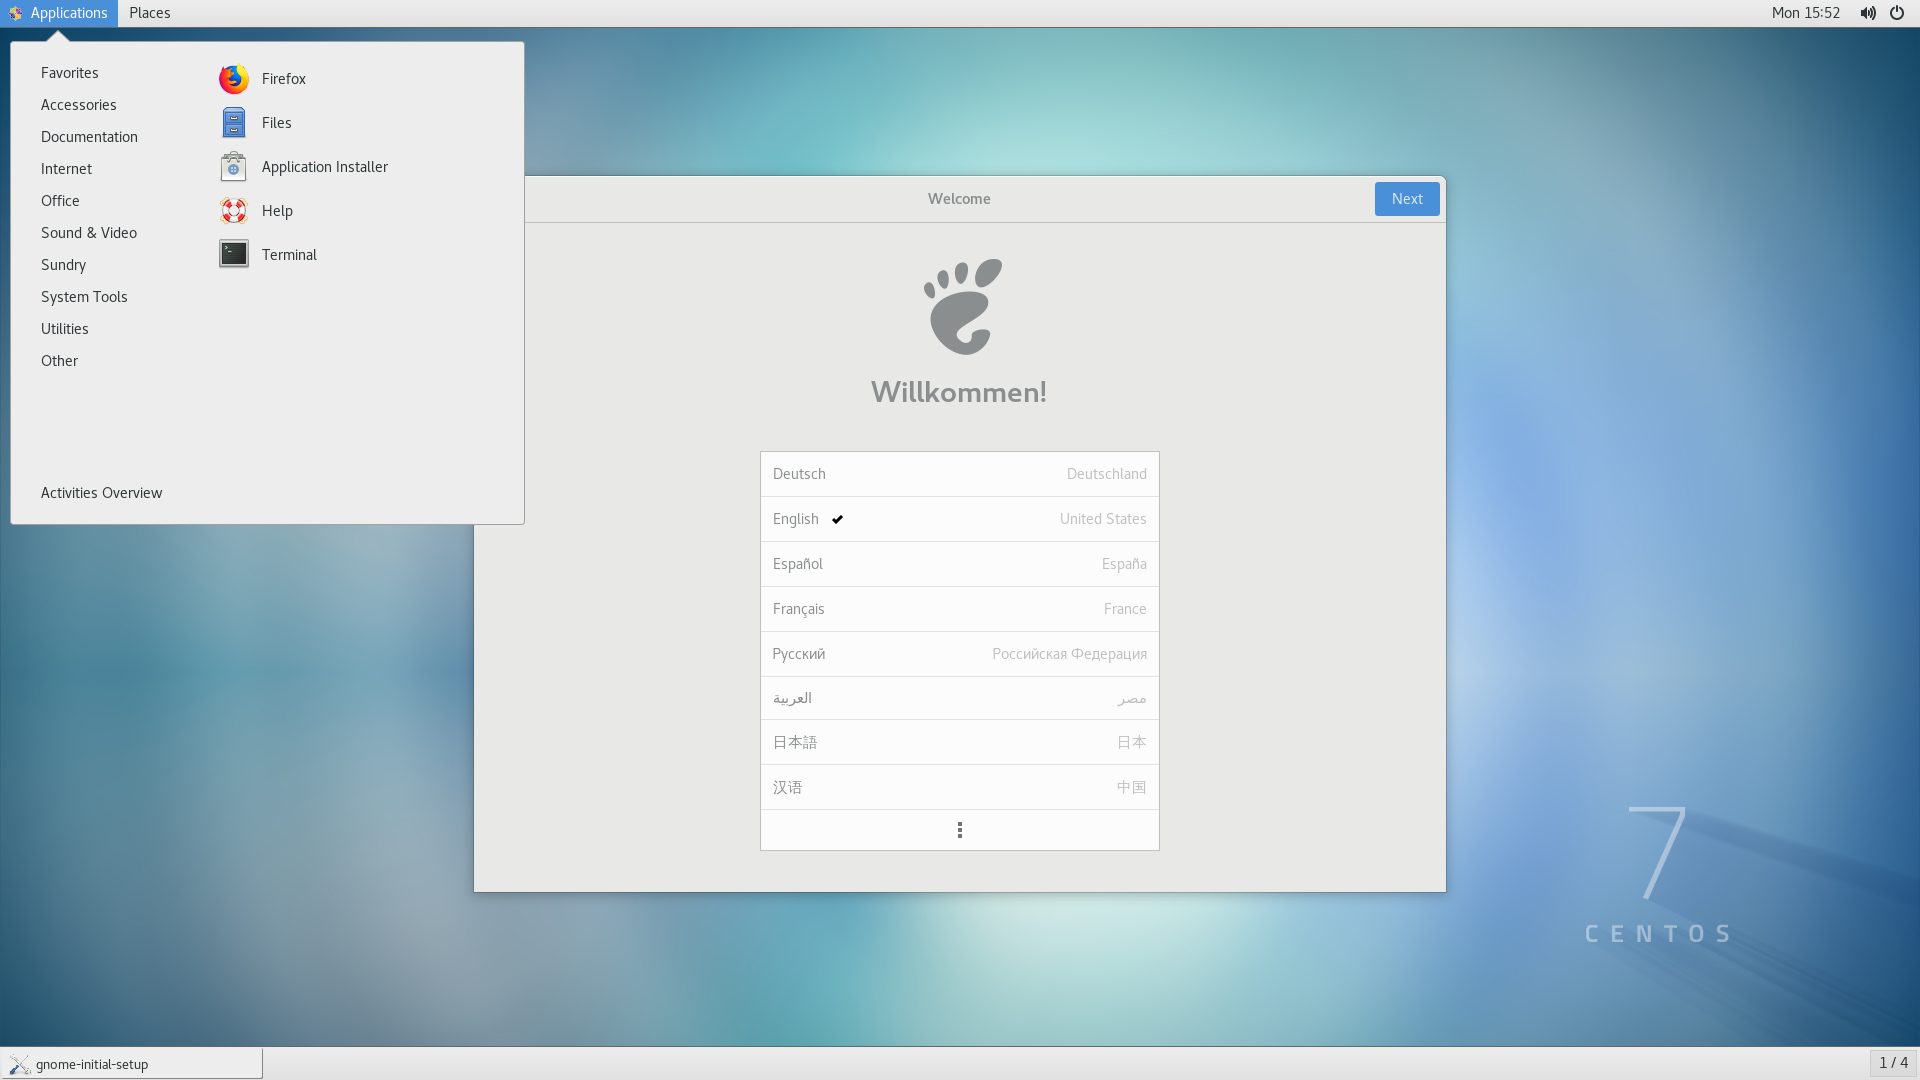
Next, you may need some basic settings such as creating the first user, setting the language, etc., which you must do.

Finally, you will be presented with the GUI desktop page.

GUI desktop page

In this way, Gnome GUI has been successfully installed on CentOS 7 / RHEL 7 Linux. We hope that this article has also received your attention.

An efficient solution to increase the security of WordPress

Now that we are witnessing the growth of site activities and the expansion of site-related businesses, WordPress site design and increasing WordPress security have become important issues. Because sites can be threatened by hackers depending on the type of activity they have. So that a large amount of their activity is always exposed to hacker attacks. Therefore, getting to know this group of risks and knowing the solutions to increase the security of WordPress can help the owners of these sites in order to have a secure site.

Why is WordPress security important?

Sites, as one of the most important components of Internet businesses, contain extensive data in their various sections, which often have a private and identity aspect. This issue is very prominent in relation to store or service sites. Because the users of this category of sites need to enter the information that is requested from them in the sections such as registration, order registration and other such things.

In such a case, sites with different users can be referred to as databases that attract the attention of many cyber thieves. Because hackers are looking for this information to use it to create threats and turn it into capital.

With this in mind, can’t we answer the question “Why is WordPress security important?” Did he give a correct and logical answer? In fact, it should be said that security, as the first and most effective credit parameter, increases the credit of your site. In a sense, you as the owner of the site are responsible for the data contained in it as well as the information of the users. So that any threat to these data can cause the loss of users and the activity of your site.

For this reason, increasing the security of WordPress is considered as one of the most important issues in the performance of the site. For this reason, solutions to increase WordPress security can prevent the risks of neglecting WordPress security.

Solutions to increase WordPress security

Since the dangers of not paying attention to WordPress security can seriously affect the successful performance of various sites, applying WordPress security enhancement solutions as a preventive solution will help a WordPress site stay away from threats. Therefore, in the following, some solutions to increase the security of WordPress, which can be very effective at the same time, will be presented.

  1. Use of security plugins

Certainly, in the discussion of WordPress activity, different plugins achieve the greatest possible functional role. With this account, in relation to increasing the security of WordPress, it will be possible to use security plugins to improve the safety level of the site. In fact, it should be said that WordPress site activity is not possible without plugins, regardless of its type.

The design of different types of plugins has made various processes related to WordPress sites easy and at the same time done well. As a result, in order to increase the security of WordPress, the discussion of using plugins will be discussed. Now the question that arises is related to how security plugins work!

As expected, security is achieved by checking, guarding and monitoring; But this is not possible by people. Because taking care of the site 24 hours a day is hard and impossible. This is where security plugins can prevent your site from hacking risks and threats by monitoring and guarding it 24 hours a day.

Among these plugins, the following can be mentioned:

  • All In One WP Security plugin
  • wordfence plugin
  • ithemes security plugin
  • Sucuri Security plugin

These plugins are among the best WordPress security plugins, each offering unique features to enhance WordPress security.

  1. Change the dashboard access URL

One of the other ways to increase the security of WordPress is to change the URL to access the dashboard. Normally, it will be possible to access the WordPress site dashboard by searching yoursite.com/wp-admin.

In this case, can we talk about security? Definitely not. Because hackers can easily access your site’s dashboard. As a result, you need to change the correct path to the dashboard. For this, you can use different methods.

  • Changing the URL through the database
  • Change the URL through the WordPress settings
  • Change the URL via wp-config.php

In addition to the mentioned methods, other solutions can be used to change the URL to access the dashboard. In any case, the choice of how to do this depends on the people themselves.

  1. Use strong passwords

The use of password is used with the aim of creating security in the registration and login process, and it is very important to increase the security of WordPress. With this account, it is necessary to upgrade the security level of WordPress, it will be required to use strong passwords. So that it is not easy to identify.

In fact, choosing simple and mundane passwords can become a big threat to your site’s activity. For this reason, you should be smart about choosing the right password. As a result, it is necessary to use complex passwords in the structure and combination of words. Because in this case, it will be difficult and impossible for hackers to guess them.

  1. Change the default username

In terms of security, the default mode can act as a threat. Because it includes familiar routes that hackers have traveled many times and are aware of its low and high. With this in mind, can we expect security from a WordPress site whose settings are in the default mode? Undoubtedly not.

With this definition, changing the username from the default state is among the ways to increase WordPress security and prevent the risks of neglecting WordPress security. The username of the WordPress site administrator is saved as admin by default, which can make it easier for hackers to identify and access the site. As a result, it is best to change this name and use a variety of unpredictable names.

  1. Setting limits for failed logins

You must have faced the limit of the number of unsuccessful logins when entering some sites. So that users can only have a few unsuccessful logins and after a few unsuccessful attempts, the possibility of logging in is limited for a temporary period of time. As a result, hackers cannot continuously take advantage of failed logins.

For this reason, today most sites, especially WordPress sites, have defined this entry limit to increase WordPress security. Definitely, with this, the security of your site will increase to a great extent. Therefore, you can set the number of failed logins and the limit to 5 or any number to discourage hackers from logging in.

  1. Two-step authentication

Another solution that strongly plays a role in the process of increasing the security of WordPress is related to the definition of two-step authentication to increase the security level of entering the site. Sites that use this login system can better protect themselves against cyber attacks and avoid the risks of not paying attention to WordPress security.

This authentication system is generally used for store sites and various trading sites. So that by creating a two-step barrier, it eliminates the possibility of simple access to users’ accounts. For this reason, the two-step authentication system has many fans in order to maintain the security of users’ accounts.

  1. Using correct and safe templates

In relation to WordPress sites, there are very diverse and beautiful templates, each of which is selected according to its appearance characteristics; But in some cases, there are templates that use codes in their structure that can disrupt the performance of your site. This category of formats, which are introduced and known as cracked formats, are distributed by stealth, which can be problematic.

Therefore, it is recommended to use templates that are prepared by professional developers and have no problems for your WordPress site. This is very important in terms of increasing the security of WordPress as well as its better performance.

  1. Update WordPress and its plugins

Considering that WordPress, as a content management system, is constantly improving and updating based on the needs of users, including the security solutions that are defined for it, we can mention its constant updating. In fact, the existence of some disturbances that can be seen in the functioning of the WordPress site is the result of hackers’ efforts to access different parts of these sites.

This category of security threats can be resolved by updating WordPress and its plugins. As a result, by updating your WordPress site, in addition to being able to fix various problems and performance disturbances, you will greatly increase its security.

  1. Disable File Editing

The File Editing section is a feature or tool in the WordPress dashboard that allows people to edit code and change the structure of templates and plugins. This part of the site can be identified as a threat that needs to be disabled. In fact, by accessing this part of the WordPress site, hackers can hide malicious codes in the structure of your site and cause its malfunction.

In such a case that the activation of the File Editing function acts as a threat, the best thing to do is to disable this function in order to maintain the security of the site as much as possible.

  1. backup

Since sites can go down for various reasons and unpredictably, putting your content at risk, they need to be backed up regularly. This can maintain the security of your site in terms of content.

The importance of content in all types of sites is so great that it can influence the activity of a site. So that the site without content, practically cannot be visited and feedback. For this reason, it is necessary to prioritize the security of this sector.

In addition, you should keep in mind that there are various files in WordPress that need to be backed up. In this case, you can use different methods such as manual backup, automatic backup or backup with the help of plugins.

In general, it should be said that the ways and solutions to increase the security of WordPress can be much wider than the 10 mentioned, each of which plays a different role in improving the level of security of the WordPress site. The important thing is to pay attention to these sites and their level of security in order to avoid unpleasant events that may occur due to the smallest hacker threats.

Checking the amount of CPU usage in Linux

Understanding CPU utilization is important for measuring overall system performance. From Linux geeks to system administrators, everyone knows how critical it can be to monitor CPU usage in Linux.


In this tutorial, we’ll go over some options for checking CPU usage in Linux.

prerequisites

  • A computer based on a Linux operating system (such as Ubuntu and CentOS)
  • Having an account with sudo access
  • A command line window (Ctrl-Alt-T on Ubuntu and Menu > Applications > Utilities > Terminal on CentOS)
  • (Optional) An installer program such as apt or yum, usually available by default.

top command to view Linux processor load

Open a terminal window and enter the following command.

1
top

The system should respond to you by displaying a list of all running processes . You will also get a summary of users, profiles, CPU load and memory usage.

This list may change; Why do background tasks start and end? One of the useful options in this context is the -i option in this command.

1
top –i

As a result, all background processes are hidden and it becomes easier for you to organize the list. To end the top command, just press the q key on the keyboard.

Other useful options when running the top command include:

  • M – Setting the list of tasks based on the amount of memory usage
  • P – Adjust task list based on CPU usage
  • N – set list of tasks based on process ID
  • T – Setting the list of tasks based on execution time

To have top command help, you can use the letter h when running the command or type the following command.

1
man top

As a result, the help page of the top command will open for you.

mpstat command to display CPU activity

Mpstat is part of the software package called sysstat. Note that many RHEL-based Linux distributions have this software installed by default. But for Debian and Ubuntu systems, you will definitely need to install the sysstat package.

To do this, enter the following command in a terminal window.

1
sudo apt-get install sysstat

Wait for the installation process to complete.

If you are using an older version of Red Hat or CentOS (eg 4.x), you can use the up2date tool to install sysstat.

1
sudo up2date install sysstat

On newer installations of CentOS or Red Hat (versions 5.x and higher) it is possible to install the sysstat package using the following command.

1
sudo yum install sysstat

When the installation process is complete, you can use the mpstat command as follows in the terminal.

1
mpstat

As a result, the system displays the usage of each processor or processor core.

The first line is the series of column labels and the second line will be the value of each of these columns.

  • %usr – percentage of CPU usage at user level
  • %nice – CPU percentage for user processes labeled “nice”
  • %sys – percentage of CPU usage at the system level (Linux kernel)
  • %iowait – Percentage of CPU spent reading and writing to disk.
  • %irq – Percentage of CPU dedicated to handling hardware interrupts.
  • %soft – Percentage of CPU dedicated to handling software interrupts.
  • %steal – CPU allocation percentage for managing virtual processors
  • %guest – Percentage of CPU usage during the execution of a virtual processor
  • %idle – percentage of CPU usage when the system is free (no process and disk reading and writing)

In the meantime, you can use some options in the mpstat command.

The -P option allows you to specify a specific processor for logging.

1
mpstat –P 0

As a result, you will have a report about the first processor (CPU 0).

1
mpstat –P ALL

This command, like the basic form of mpstat, will show you the usage of all CPUs. Also, the processes related to each of the processors are shown. Meanwhile, the mpstat command only provides you with a general picture of CPU usage.

To get a set of reports, enter one number as the time interval and the next number as the number of reports.

1
mpstat 5 7

In this example, 7 reports are generated with time intervals of 5 seconds.

sar command to display CPU usage

sar is a tool for managing system resources. The effectiveness of this tool is not limited to CPU usage. But at the same time, you can monitor the CPU performance by using the u option in it.

For this purpose, enter the following command.

1
sar –u 5

The -u option is used to display CPU performance. Also, the number 5 means that this report should be displayed every 5 seconds. The execution of this command continues indefinitely. You can use Ctrl-C to stop it.

iostat command to view average CPU usage

In a terminal, enter the following command.

1
iostat

As a result, the system shows the average CPU usage since the last startup. Also, the amount of input/output load, or in other words, the activities related to reading and writing the disk, will be provided to you.

Other options for monitoring CPU performance

Nmon monitoring tool

Nmon is a special monitoring tool developed by IBM employees. To install Nmon in Ubuntu, just enter the following command.

1
sudo apt-get install nmon

Use the following commands to install on CentOS.

1
2
3
sudo yum epel-release
sudo yum install nmon

The command required to run Nmon is as follows.

1
nmon

As a result, this tool will run for you and all the options will be displayed. Press C to view CPU usage. To return to the previous mode, press C again. Use the H key to have a list of commands as well. Press the Q key to close.

Graphical tools option

In many systems, the CPU cycle is not spent on a graphical user interface (GUI). However, you may have a GUI style version or use a Linux client system. Also, some Linux versions such as Ubuntu have a built-in monitoring tool.

To run Ubuntu system monitoring, enter the following command in the terminal.

1
gnome-system-monitor

As a result, an application similar to the Windows task-manager will open for you, where you can see the status of tasks and the amount of CPU usage. Usually the GUI has a “task manager” or “system monitor” application. This tool can be used for real-time CPU performance monitoring.

Conclusion

There are several ways to check CPU usage in Linux. In this tutorial, we reviewed some basic methods for this purpose through internal Linux tools or third-party applications. These commands will be useful for checking the performance of your processor and system and will give you better control.

support hosting100